

第一步:IP配置
172.16.0.0 /16
骨干链路
172.16.0.0 /24
172.16.0.0 /30
172.16.0.4 /30
.......
172.16.0.20 /30
环回网段
172.16.1.0 /24
172.16.1.2 /32
.....
172.16.1.7 /32
用户网段
172.16.2.0 /24
172.16.3.0 /24
.....
172.16.7.0 /24
第二步:AS2内部使用ospf内部互通
R2上配置
[r2-ospf-1]area 0
[r2-ospf-1-area-0.0.0.0]network 172.16.0.0 0.0.255.255
R3上配置
[r3]ospf 1 router-id 3.3.3.3
[r3-ospf-1]area 0
[r3-ospf-1-area-0.0.0.0]network 172.16.0.0 0.0.255.255R4上配置
[r4]ospf 1 ro 4.4.4.4
[r4-ospf-1]area 0
[r4-ospf-1-area-0.0.0.0]network 172.16.0.0 0.0.255.255
后面的类似
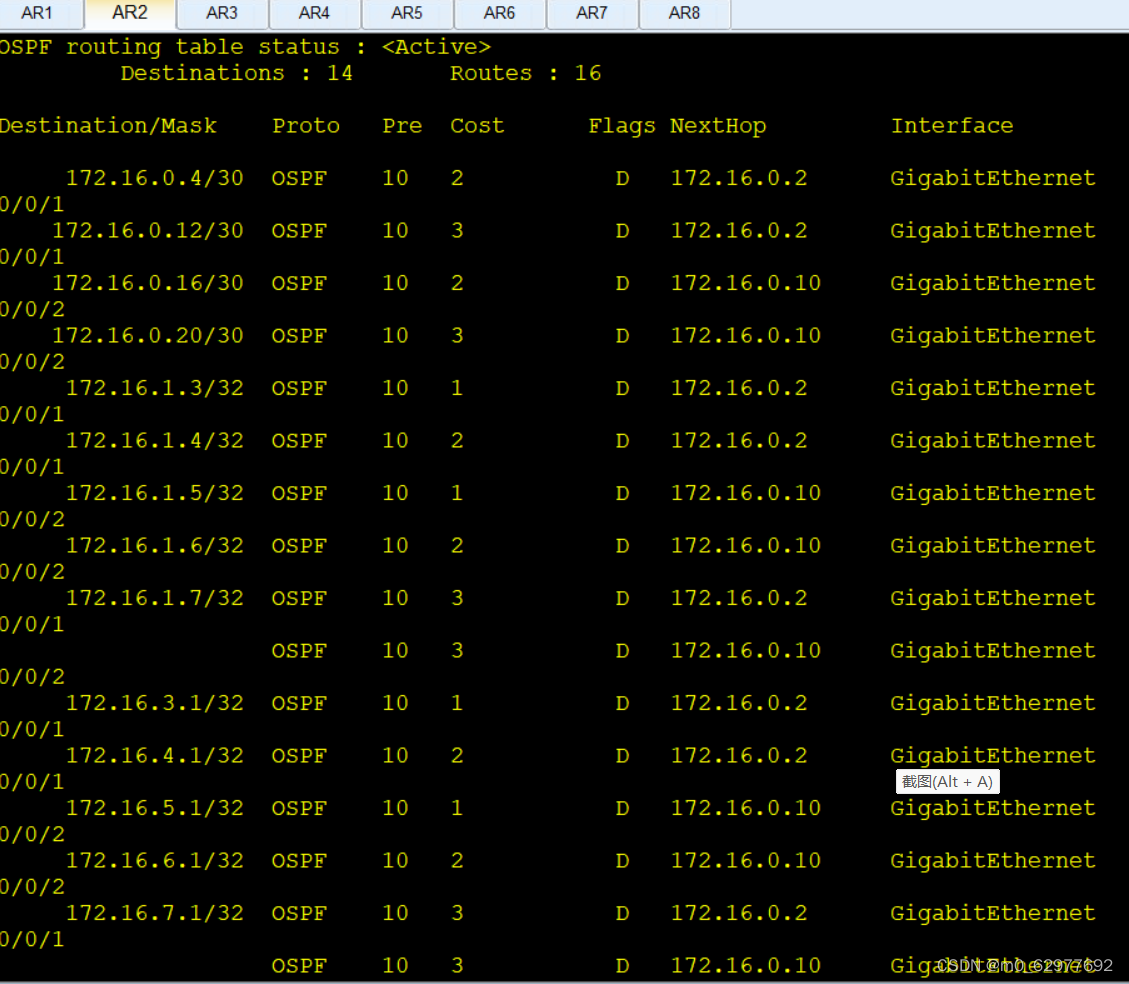
然后查看ospf路由表
第三步:建立BGP对等体关系
R1上:
首先写一条静态指向R2建邻的环回网段
[r1]ip route-static 172.16.1.2 32 12.1.1.2
然后修改设置
r1]bgp 1
[r1-bgp]peer 172.16.1.2 as-number 2
[r1-bgp]peer 172.16.1.2 connect-interface l
[r1-bgp]peer 172.16.1.2 connect-interface LoopBack 0
[r1-bgp]peer 172.16.1.2 ebgp-max-hop 2[r1-bgp]router-id 1.1.1.1
R2上:
也写一条静态指向R1建邻的环回网段
[r2]ip route-static 1.1.1.1 32 12.1.1.1
然后建邻
[r2]bgp 64512
[r2-bgp]router-id 2.2.2.2
[r2-bgp]confederation id 2
[r2-bgp]peer 1.1.1.1 as-number 1
[r2-bgp]peer 1.1.1.1 connect-interface lo0
[r2-bgp]peer 1.1.1.1 ebgp-max-hop 2[r2-bgp]confederation peer-as 64513
Jul 31 2023 11:55:36-08:00 r2 %%01BGP/3/STATE_CHG_UPDOWN(l)[1]:The status of the
peer 172.16.1.3 changed from OPENCONFIRM to ESTABLISHED. (InstanceName=Public,
StateChangeReason=Up)
[r2-bgp]peer 172.16.1.5 as-number 64513
r2-bgp]peer 172.16.1.5 connect-interface lo0
[r2-bgp]peer 1.1.1.1 ebgp-max-hop 2R3上:
[r3]bgp 64512
[r3-bgp]confederation id 2
[r3-bgp]peer 172.16.0.2 as-number 64512
Warning: Local interface is already configured with this address.
[r3-bgp]peer 172.16.1.2 as-number 64512
[r3-bgp]peer 172.16.1.2 connect-interface lo0
[r3-bgp]peer 172.16.1.4 as-number 64512
[r3-bgp]peer 172.16.1.4 connect-interface lo0R4上
[r4]bgp 64512
[r4-bgp]router-id 4.4.4.4
[r4-bgp]confederation id 2
[r4-bgp]peer 172.16.1.3 as-number 64512
[r4-bgp]peer 172.16.1.3 connect-interface lo0
[r4-bgp]confederation peer-as 64513
[r4-bgp]peer 172.16.1.7 as-number 64513
[r4-bgp]peer 172.16.1.7 connect-interface lo0
[r4-bgp]peer 172.16.1.7 ebgp-max-hop 2R5上
[r5]bgp 64513
[r5-bgp]confederation id 2
[r5-bgp]peer 172.16.1.2 as-number 64512[r5-bgp]peer 172.16.1.6 as 64513
[r5-bgp]peer 172.16.1.6 connect-interface lo0
R6上
[r6]bgp 64513
[r6-bgp]confederation id 2
[r6-bgp]peer 172.16.1.5 as
[r6-bgp]peer 172.16.1.5 as-number 64513[r6-bgp]peer 172.16.1.5 connect-interface lo0
[r6-bgp]peer 172.16.1.7 as-number 64513
[r6-bgp]peer 172.16.1.7 connect-interface[r6-bgp]peer 172.16.1.7 connect-interface lo0
R7上
[r7]bgp 64513
[r7-bgp]confederation id 2
[r7-bgp]peer 172.16.1.6 as
[r7-bgp]peer 172.16.1.6 as-number 64513
[r7-bgp]peer 172.16.1.6 con
[r7-bgp]peer 172.16.1.6 connect-interface lo0
[r7-bgp]confederation peer
[r7-bgp]confederation peer-as 64512
[r7-bgp]peer 172.16.1.4
[r7-bgp]peer 172.16.1.4 as
[r7-bgp]peer 172.16.1.4 as-number 64512
[r7-bgp]peer 172.16.1.4 connect-interface lo0
[r7-bgp]peer 172.16.1.4 ebgp-max-hop 2
[r7-bgp]peer 8.8.8.8 as-path-filter
[r7-bgp]peer 8.8.8.8 as-number 3
[r7-bgp]peer 8.8.8.8 con
[r7-bgp]peer 8.8.8.8 connect-interface lo0
[r7-bgp]peer 8.8.8.8 e
[r7-bgp]peer 8.8.8.8 ebgp-max-hop 2[r7]ip route-static 8.8.8.8 32 78.1.1.8
R8上
[r8]bgp 3
[r8-bgp]peer 172.16.1.7 as-number 64513
[r8-bgp]peer 172.16.1.7 connect-interface lo0
[r8-bgp]peer 172.16.1.7 ebgp-max-hop 2[r8]ip route-static 172.16.1.7 32 78.1.1.7


第四步在bgp中发布路由
先把所有用户网段的ospf类型改为broadcost
[r2]interface lo1
[r2-LoopBack1]ospf network-type broadcast[r3]interface lo1
[r3LoopBack1]ospf network-type broadcast[r4]interface lo1
[r4-LoopBack1]ospf network-type broadcast........
[r7]interface lo1
[r7-LoopBack1]ospf network-type broadcast
然后将R2和R7上本地下一跳改为自己
[r2-bgp]peer 172.16.1.3 next-hop-local
[r2-bgp]peer 172.16.1.5 next-hop-local
[r7-bgp]peer 172.16.1.4 next-hop-loca
[r7-bgp]peer 172.16.1.6 next-hop-local
然后 在R2上宣告
[r2-bgp]network 172.16.2.0 24
[r2-bgp]network 172.16.3.0 24
[r2-bgp]network 172.16.4.0 2
[r2-bgp]network 172.16.5.0 24
[r2-bgp]network 172.16.6.0 24
[r2-bgp]network 172.16.7.0 24
R1上[r1-bgp]network 1.1.1.1 24
R8上
[r8-bgp]network 8.8.8.8 24
第五步:将R3和R6 设置为反射器
[r3-bgp]peer 172.16.1.2 reflect-client
[r6-bgp]peer 172.16.1.7 reflect-client

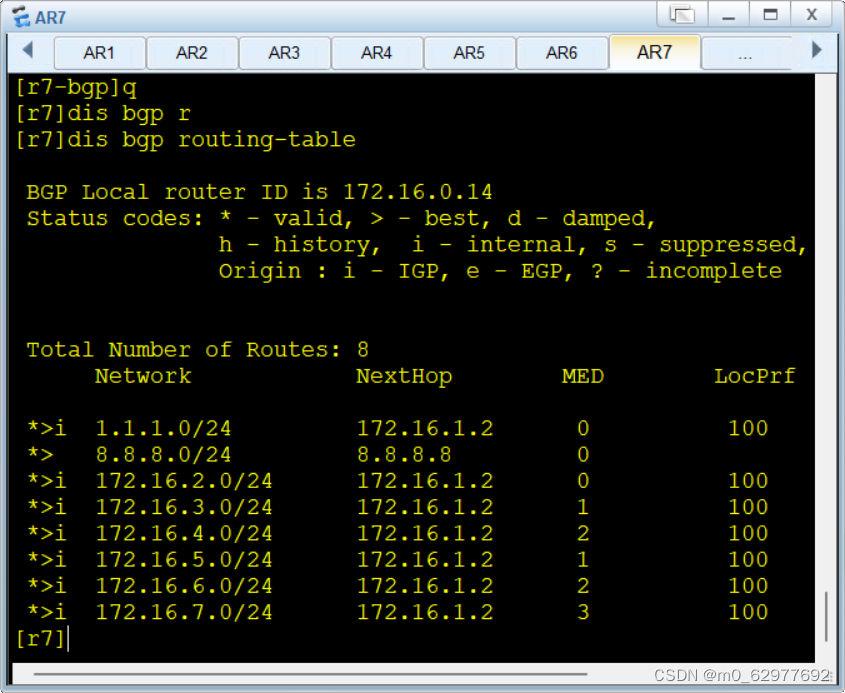
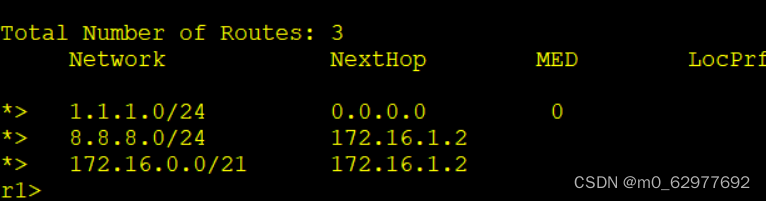
第六步:做手工聚合
[r2-bgp]aggregate 172.16.0.0 21 detail-suppressed
[r7-bgp]aggregate 172.16.0.0 21 detail-suppressed
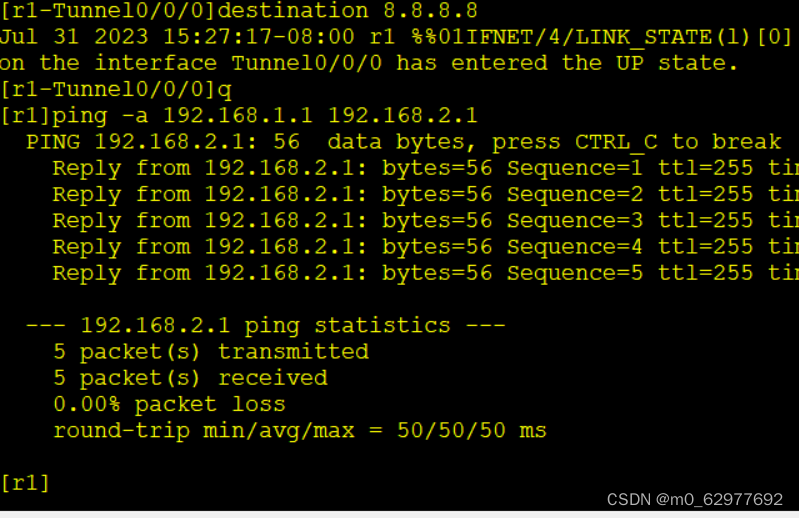
 最后创建GRE隧道实现两个环回的通讯
[r8-Tunnel0/0/0]source 8.8.8.8
[r8-Tunnel0/0[r1-Tunnel0/0/0]destination 1.1.1.1
[r1-Tunnel0/0/0]destination 8.8.8.8
/0] source 1.1.1.1
[r8]ip route-static 192.168.1.0 24 Tunnel 0/0/0
[r1]ip route-static 192.168.2.0 24 Tunnel 0/0/0
推荐本站淘宝优惠价购买喜欢的宝贝:

本文链接:http://hqyman.cn/post/8103.html 非本站原创文章欢迎转载,原创文章需保留本站地址!

 微信支付宝扫一扫,打赏作者吧~
休息一下~~