您想了解如何在Windows上配置链接聚合吗? 本教程将向您展示如何在运行Windows服务器的计算机上配置NIC绑定。
本教程还将向您展示如何在Cisco交换机上配置链路聚合。
教程 - Cisco Switch上的链路聚合
首先,您需要在网络交换机上执行链路聚合配置。
在我们的示例中,我们将教您如何在Cisco Catalyst交换机型号2960上执行链路聚合配置。
在提示屏幕上,输入管理登录信息。
configure terminal命令用来进入配置模式。
Switch>
Switch> enable
Switch# configure terminal
创建新VLAN,选择标识号并添加简要说明。
Switch(config)# vlan 100
Switch(config-vlan)# name Server Vlan
Switch(config-vlan)# exit
在配置模式下,需要清除交换机端口的所有配置。
Switch(config)# default interface gigabitEthernet 0/11
Switch(config-if)# default interface gigabitEthernet 0/12
在配置模式下,将交换机端口添加到链路聚合组。
Switch(config)# interface gigabitethernet0/11
Switch(config-if)# channel-group 1 mode active
Switch(config)# interface gigabitethernet0/12
Switch(config-if)# channel-group 1 mode active
Switch(config-if)# exit
在我们的示例中,交换机端口11和12被配置为链路聚合组1的成员。
要将链路聚合端口配置为VLAN成员,需要使用以下命令。
Switch(config)# interface Port-channel 1
Switch(config)# switchport mode access
Switch(config-if)# switchport access vlan 100
Switch(config-if)# exit
Switch(config)# exit
恭喜,您已完成Cisco交换机上的链路聚合配置。
现在,您需要在Windows服务器上执行链接聚合配置。
教程 - Windows 2012上的链接聚合
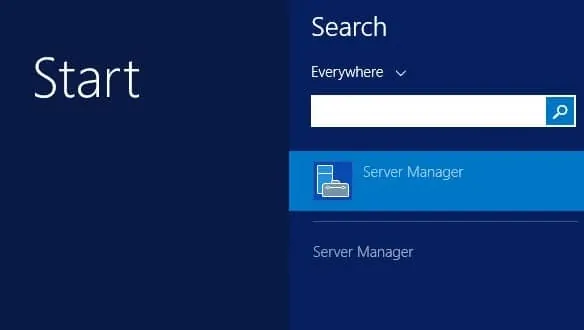
首先,您需要打开服务器管理器应用程序。
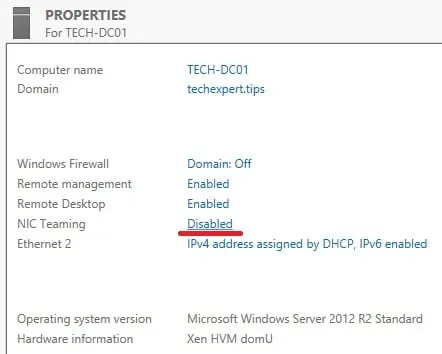
在屏幕左侧,选择名为Local Server的选项。
单击NIC Teaming选项。
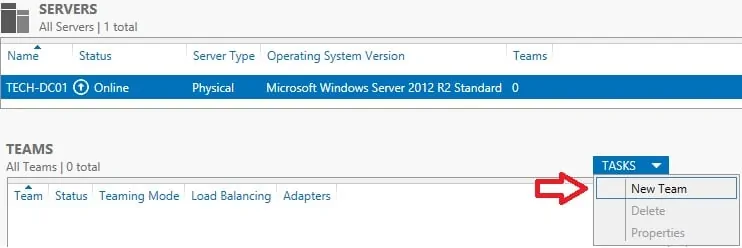
访问“任务”菜单,然后单击名为“新建团队”的选项。
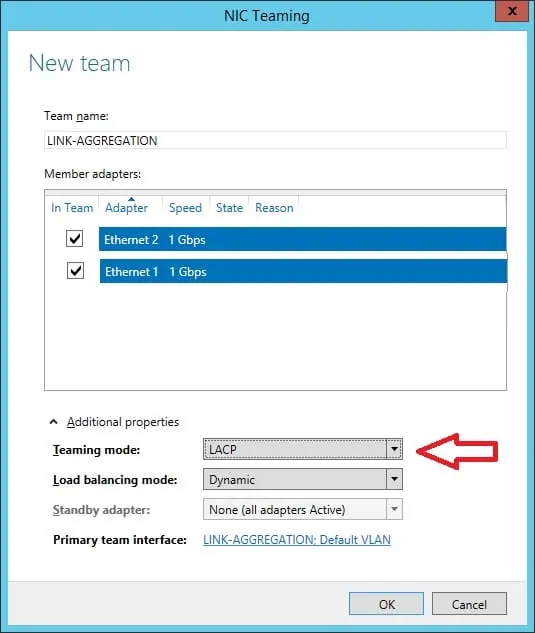
在New team屏幕上,选择应该是NIC组合成员的网络接口。
单击“其他属性”选项。
选择LACP组队模式。
单击“确定”按钮。
系统将使用指定的名称自动创建新的虚拟接口。
在我们的示例中,系统使用物理以太网接口1和2创建了名为链路聚合的虚拟接口。
配置新的虚拟接口以满足您的需求。
您不应在物理接口上执行任何配置。
完成配置后,NIC组合接口应连接到先前配置的网络交换机端口。
恭喜,您已完成Windows Server 2012上的链接聚合配置。
推荐本站淘宝优惠价购买喜欢的宝贝:
本文链接:https://hqyman.cn/post/1986.html 非本站原创文章欢迎转载,原创文章需保留本站地址!
休息一下~~


 微信支付宝扫一扫,打赏作者吧~