背景
如何 对 debain11 已分区的磁盘进行分区扩容?一下内容将演示如何将已分区的40GB磁盘扩容为1TB。
系统介绍
查看debain版本,笔者的系统为debain11.5 cat /etc/debian_version
al@debian:~$ cat /etc/debian_version
11.5
查看磁盘信息
通过 df -h 输出当前磁盘分区大小 。
al@debian:~$ sudo df -h
Filesystem      Size  Used Avail Use% Mounted on
udev            7.9G     0  7.9G   0% /dev
tmpfs           1.6G  616K  1.6G   1% /run
/dev/sda1       40G    10G   30G  25% /
tmpfs           7.9G     0  7.9G   0% /dev/shm
tmpfs           5.0M     0  5.0M   0% /run/lock
tmpfs           1.6G     0  1.6G   0% /run/user/1000
通过 fdisk -l 输出所有的磁盘和磁盘分区的详细信息
al@debian:~# sudo fdisk -l
Disk /dev/sda: 1 TiB, 1099511627776 bytes, 2147483648 sectors
Disk model: Virtual disk
Units: sectors of 1 * 512 = 512 bytes
Sector size (logical/physical): 512 bytes / 512 bytes
I/O size (minimum/optimal): 512 bytes / 512 bytes
Disklabel type: dos
Disk identifier: 0x500f2a57

Device     Boot    Start      End  Sectors  Size Id Type
/dev/sda1  *        2048 81885183 81883136   39G 83 Linux
/dev/sda2       81887230 83884031  1996802  975M  5 Extended
/dev/sda5       81887232 83884031  1996800  975M 82 Linux swap / Solaris
在本例中磁盘扩展后我们有一个大小为 1 TB的磁盘/dev/sda,它分为3个分区:/dev/sda1、/dev/sda2和/dev/sda5。正如您所记得的,我们对Linux类型的/dev/sda1感兴趣。
查看分区
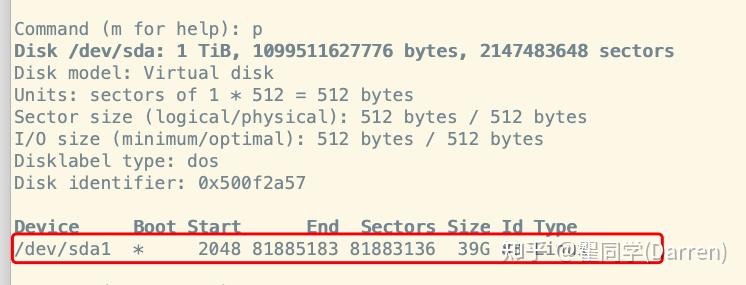
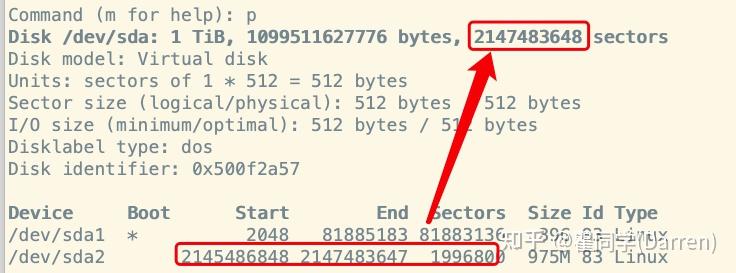
我们不能只扩展/dev/sda1分区,因为后面紧跟着sda5。因此,首先需要将其移动到磁盘的末尾(添加的扇区所在的位置),然后才扩展sda1本身。但是,如果fdisk输出中只有一个分区,或者其它分区位于于磁盘的末端(查看末端扇区),则可以直接转到扩展分区章节。 下图所示只有一个分区:

下图所示只有两个分区且交换分区在末尾:

修改交换分区
交换分区介绍
来自GPT的解释:Linux交换分区的主要作用是提供额外的虚拟内存空间,以便系统在物理内存(RAM)不足时能够继续正常运行。当系统中的RAM用尽时,操作系统可以将部分不常用的数据移到交换分区,从而释放RAM供更重要的任务使用。
以下是Linux交换分区的一些作用和优势: 1. 扩展内存容量: 交换分区允许系统将不常用的数据页面移到磁盘上,以释放物理内存,从而扩展可用的内存容量。这对于运行大型应用程序或执行内存密集型任务的系统特别重要。
提高系统稳定性: 如果系统中的所有物理内存都被使用完毕,而没有交换分区可用,系统可能会崩溃或变得非常缓慢。交换分区允许系统在需要时延展其内存,提高系统的稳定性和性能。
支持休眠功能: 交换分区对于系统的休眠(hibernation)功能也很重要。当系统休眠时,当前的系统状态被保存到交换分区中,以便在下次唤醒时恢复到先前的状态。
缓解内存泄漏: 如果某个进程出现内存泄漏,逐渐占用所有可用内存,交换分区可以用作缓冲区,防止系统因内存耗尽而崩溃。
虽然交换分区对于提高系统性能和稳定性非常有用,但在一些情况下,如果系统有足够的物理内存,交换分区的使用可能会较少。在某些情况下,也可以使用交换文件替代交换分区。总体而言,合理配置和使用交换分区有助于优化系统的内存管理。 关闭交换分区
al@debian:~# sudo swapoff -a删除交换分区
运行 fdisk 指定磁盘 /dev/sda fdisk /dev/sda
al@debian:~# sudo fdisk /dev/sda

Welcome to fdisk (util-linux 2.36.1).
Changes will remain in memory only, until you decide to write them.
Be careful before using the write command.
注意: fdisk需要小心使,要知道,在保存更改之前,您始终可以退出而不会产生任何更改。
我们输入p查看分区列表:
Command (m for help): p
Disk /dev/sda: 1 TiB, 1099511627776 bytes, 2147483648 sectors
Disk model: Virtual disk
Units: sectors of 1 * 512 = 512 bytes
Sector size (logical/physical): 512 bytes / 512 bytes
I/O size (minimum/optimal): 512 bytes / 512 bytes
Disklabel type: dos
Disk identifier: 0x500f2a57

Device     Boot    Start      End  Sectors  Size Id Type
/dev/sda1  *        2048 81885183 81883136   39G 83 Linux
/dev/sda2       81887230 83884031  1996802  975M  5 Extended
/dev/sda5 81887232 83884031 1996800 975M 82 Linux swap / Solaris这里我们对磁盘上的扇区总数(2147483648)和要交换的扇区数(1996800)感兴趣。请注意分区/dev/sda2(它是自动创建的)没有里面文件我们将删除它。
删除交换分区5和逻辑分区2(命令d):
Command (m for help): d
Partition number (1,2,5, default 5): 5

Partition 5 has been deleted.

Command (m for help): d
Partition number (1,2, default 2): 2

Partition 2 has been deleted.
然后执行p查看结果,此时只剩下一个分区。
Command (m for help): p
Disk /dev/sda: 1 TiB, 1099511627776 bytes, 2147483648 sectors
Disk model: Virtual disk
Units: sectors of 1 * 512 = 512 bytes
Sector size (logical/physical): 512 bytes / 512 bytes
I/O size (minimum/optimal): 512 bytes / 512 bytes
Disklabel type: dos
Disk identifier: 0x500f2a57

Device     Boot Start      End  Sectors Size Id Type
/dev/sda1  *     2048 81885183 81883136  39G 83 Linux
新建交换分区
现在,让我们在磁盘末尾重新创建交换分区。使用n创建新分区,如果你的内存够大可以考虑不启用交换分区,可以跳过此步骤:
Command (m for help): n
Partition type
   p   primary (1 primary, 0 extended, 3 free)
   e   extended (container for logical partitions)
Select (default p): e
Using default response p.
您将被要求为创建的 /dev/sda2 选择分区类型。选择逻辑 e:
指定分区2的序列号:
Partition number (2-4, default 2): 2接下来,您需要指示第一个扇区。如果我们想保持交换大小不变,那么从磁盘/dev/sda的最后一个扇区(2147483648)减去分区/dev/sda2的扇区大小(1996800)为默认值,得到 2145486848:
First sector (81885184-2147483647, default 81885184): 2145486848
指定磁盘的最后一个扇区一般默认就行:
Last sector, +/-sectors or +/-size{K,M,G,T,P} (2145486848-2147483647, default 2147483647): 2147483647

Created a new partition 2 of type 'Linux' and of size 975 MiB.
现在我们通过按 t 来更改其类型,指定分区 2 和代码 82 进行转换分区类型:
Command (m for help): t
Partition number (1,2, default 2): 2
Hex code or alias (type L to list all): 82

Changed type of partition 'Linux' to 'Linux swap / Solaris'.
转换分区类型后看到的结果:
Command (m for help): p
Disk /dev/sda: 1 TiB, 1099511627776 bytes, 2147483648 sectors
Disk model: Virtual disk
Units: sectors of 1 * 512 = 512 bytes
Sector size (logical/physical): 512 bytes / 512 bytes
I/O size (minimum/optimal): 512 bytes / 512 bytes
Disklabel type: dos
Disk identifier: 0x500f2a57

Device     Boot      Start        End  Sectors  Size Id Type
/dev/sda1  *          2048   81885183 81883136   39G 83 Linux
/dev/sda2       2145486848 2147483647  1996800  975M 82 Linux swap / Solaris
保存所做的更改:
Command (m for help): w
The partition table has been altered.
Syncing disks.
在这之后,我们可以创建一个交换(指定您的新交换分区),通过如下命令获取盘符的UUID。
al@debian:~# sudo mkswap /dev/sda2
Setting up swapspace version 1, size = 975 MiB (1022357504 bytes)
no label, UUID=28131458-4fd7-4a59-b7c9-4d5dc01707cc
复制上一步获取的UUID,更新 /etc/fstab 文件为交换分区设置新的UUID:
sudo vi /etc/fstab
启动交换分区
sudo swapon /dev/sda2扩展分区
进入 fdisk /dev/sda 输入 p 查看磁盘分配
al@debian:~# sudo fdisk /dev/sda

Welcome to fdisk (util-linux 2.36.1).
Changes will remain in memory only, until you decide to write them.
Be careful before using the write command.

ommand (m for help): p
Disk /dev/sda: 1 TiB, 1099511627776 bytes, 2147483648 sectors
Disk model: Virtual disk
Units: sectors of 1 * 512 = 512 bytes
Sector size (logical/physical): 512 bytes / 512 bytes
I/O size (minimum/optimal): 512 bytes / 512 bytes
Disklabel type: dos
Disk identifier: 0x500f2a57

Device     Boot      Start        End  Sectors  Size Id Type
/dev/sda1  *          2048   81885183 81883136   39G 83 Linux
/dev/sda2       2145486848 2147483647  1996800  975M 82 Linux swap / Solaris
您可以有其他分区。主要的是在我们想要扩展的分区之后有空闲扇区。为了做到这一点,在上一节中,我们将交换分区移动到磁盘的末尾。我们得到sda1在扇区81885183处结束,下一个分区sda2在52145486848处开始,它们之间有空闲扇区。如果磁盘上有一个分区或者是最后一个分区,那么您需要查看分区(81883136)和磁盘(2145486848)的最后一个扇区。
要扩展分区,必须首先删除有关它的信息。为此,输入d并指定分区(1 /dev/sda1):
Command (m for help): d
Partition number (1-2, default 2): 1

Partition 1 has been deleted.
创建新分区
Command (m for help): n
Partition type
   p   primary (1 primary, 0 extended, 3 free)
   e   extended (container for logical partitions)
Select (default p):

Using default response p.
Partition number (1,3,4, default 1): 1
First sector (2048-2145486847, default 2048):
Last sector, +/-sectors or +/-size{K,M,G,T,P} (2048-2145486847, default 2145486847):

Created a new partition 1 of type 'Linux' and of size 1023 GiB.
系统会询问是否删除当前文件选择 N 不删除,然后输入 w 保存更改。
# 此处不要选 y
Do you want to remove the signature? [Y]es/[N]o: n

Command (m for help): w

The partition table has been altered.
Syncing disks.
重启系统,此处也可以不操作,有条件建议重启一下。
sudo reboot调整 ext4 文件系统的大小 sudo resize2fs /dev/sda1
al@debian:~$ sudo resize2fs /dev/sda1
-bash: resize2fs: command not found
al@debian:~$ sudo resize2fs /dev/sda1
resize2fs 1.46.2 (28-Feb-2021)
Filesystem at /dev/sda1 is mounted on /; on-line resizing required
old_desc_blocks = 5, new_desc_blocks = 128
The filesystem on /dev/sda1 is now 268185600 (4k) blocks long.
通过 df -h 可以验证磁盘已经扩展成功
al@debian:~$ df -h
Filesystem      Size  Used Avail Use% Mounted on
udev            7.9G     0  7.9G   0% /dev
tmpfs           1.6G  616K  1.6G   1% /run
/dev/sda1      1007G  4.2G  962G   1% /
tmpfs           7.9G     0  7.9G   0% /dev/shm
tmpfs           5.0M     0  5.0M   0% /run/lock
tmpfs           1.6G     0  1.6G   0% /run/user/1000
参考
https://pocketadmin.tech/en/deb
推荐本站淘宝优惠价购买喜欢的宝贝:
本文链接:https://hqyman.cn/post/8316.html 非本站原创文章欢迎转载,原创文章需保留本站地址!
休息一下~~


 微信支付宝扫一扫,打赏作者吧~