
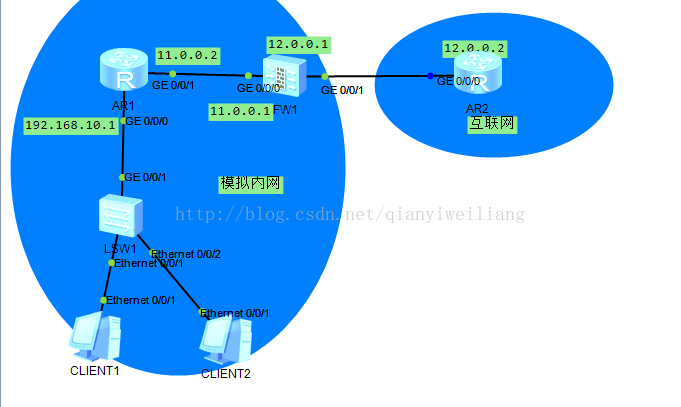
实验拓扑图:
实验文档
配置R1 R2的IP地址
R1:
Huawei]sy
[Huawei]sysname r1
[r1]int g0/0/0
[r1-GigabitEthernet0/0/0]ip add 192.168.10.1 24
[r1-GigabitEthernet0/0/0]int g0/0/1
[r1-GigabitEthernet0/0/1]ip add 11.0.0.2 24
[r1]ip route-static 0.0.0.0 0.0.0.0 11.0.0.1
R2:
[Huawei]sy
[Huawei]sysname r2
[r2]int g0/0/0
[r2-GigabitEthernet0/0/0]ip add 12.0.0.2 24
<SRG>sy
18:53:08 2017/10/13
Enter system view, return user view with Ctrl+Z.
[SRG]
[SRG]int g0/0/0
[SRG-GigabitEthernet0/0/0]ip add 11.0.0.1 24
[SRG-GigabitEthernet0/0/0]int g0/0/1
[SRG-GigabitEthernet0/0/1]ip add 12.0.0.1 24
[SRG]firewall zone trust
[SRG-zone-trust]add interface g0/0/0 将接口加入trust区域(默认安全级别85)
[SRG]firewall zone untrust
[SRG-zone-untrust]add interface g0/0/1 将接口键入untrust区域(安全级别5)
[SRG]ip route-static 192.168.10.0 24 11.0.0.2
静态NAT: 一对一
[SRG]nat server global 12.0.0.10 inside 192.168.10.10
配置将内网地址192.168.10.10 映射到12.0.0.10地址
[SRG]policy interzone trust untrust outbound
进入trust到untrust出口方向策略
[SRG-policy-interzone-trust-untrust-outbound]policy 1 创建一个策略
[SRG-policy-interzone-trust-untrust-outbound-1]policy service service-set icmp 服务为ICMP协议
[SRG-policy-interzone-trust-untrust-outbound-1]action permit
测试:
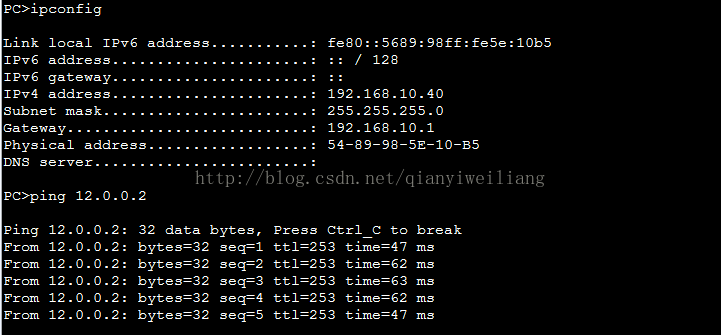
在PC1上PING
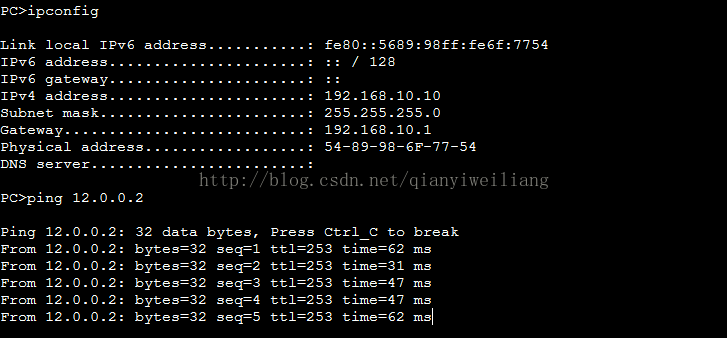
在R2 上抓包,看看地址是否是12.0.0.10

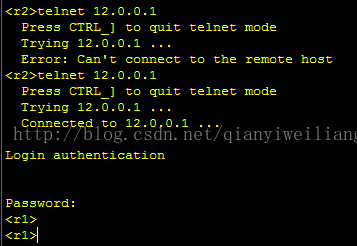
静态pat:将公网地址的某个端口映射到私网的某个端口
[SRG]nat server protocol tcp global interface g0/0/1 23 inside
将出口g/0/1的23端口映射到内网的R1的23端口
[SRG]policy interzone trust untrust inbound
[SRG-policy-interzone-trust-untrust-inbound]policy 1
[SRG-policy-interzone-trust-untrust-inbound-1]policy service service-set telnet 配置为telent协议
[SRG-policy-interzone-trust-untrust-inbound-1]action permit
测试:
动态NAT : 多对多
[SRG]nat address-group 1 12.0.0.20 12.0.0.30 创建nat地址池
[SRG]nat-policy interzone trust untrust outbound
[SRG-nat-policy-interzone-trust-untrust-outbound]policy 1
[SRG-nat-policy-interzone-trust-untrust-outbound-1]policy source 192.168.10.0 mask 24 配置源IP地址
[SRG-nat-policy-interzone-trust-untrust-outbound-1]action source-nat 配置动作为源IP进行nat
[SRG-nat-policy-interzone-trust-untrust-outbound-1]address-group 1 no-pat 关联nat地址池
测试:
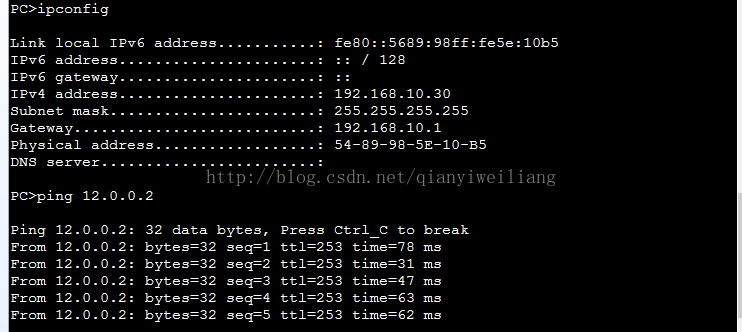
在R2上抓包看看地址是否改变:

改变下PC机地址:
查看抓包结果:

动态PAT: 一个公网地址带N个私网地址上网:
[SRG]nat-policy interzone trust untrust outbound
[SRG-nat-policy-interzone-trust-untrust-outbound]policy 2
[SRG-nat-policy-interzone-trust-untrust-outbound-2]policy source 192.168.10.0 mask 24 配置源IP地址
[SRG-nat-policy-interzone-trust-untrust-outbound-2]action source-nat
配置动作为源IP进行nat
[SRG-nat-policy-interzone-trust-untrust-outbound-2]easy-ip GigabitEthernet 0/0/1 配置要转换的地址为g/0/1
测试:PC1 ping 12.0.0.2 看地址是否为12.0.0.1

抓包:

推荐本站淘宝优惠价购买喜欢的宝贝:

本文链接:https://hqyman.cn/post/1317.html 非本站原创文章欢迎转载,原创文章需保留本站地址!

 微信支付宝扫一扫,打赏作者吧~
休息一下~~