https://www.itbkz.com/8162.html
简介
ELK是三个开源软件的缩写分别表示:
E代表:Elasticsearch
L代表:Logstash
K代表:Kibana
它们都是开源软件,后面新增了一个FileBeat,这是一个轻量级的日志收集处理工具(Agent),Filebeat占用资源少,适合于在各个服务器上搜集日志后传输给Logstash,官方也推荐此工具。
具体简介见下表:
1.相关
系统:CentOS Linux release 7.6.1810 (Core)
Java1.8:1.8.0_212
Apache: httpd.x86_64 0:2.4.6-89.el7.centos
IP:172.20.10.156
存入路径:/tmp

下载:官方下载页
集合包:点击下载
Elasticsearch(ES)版本:elasticsearch-6.5.3 点击下载单包
Kibana版本:kibana-6.5.3 点击下载单包
Logstash版本:logstash-6.5.3 点击下载单包
Filebeat版本:filebeat-6.5.3 点击下载单包
个人自定义系统初始化环境配置参考以下文章:
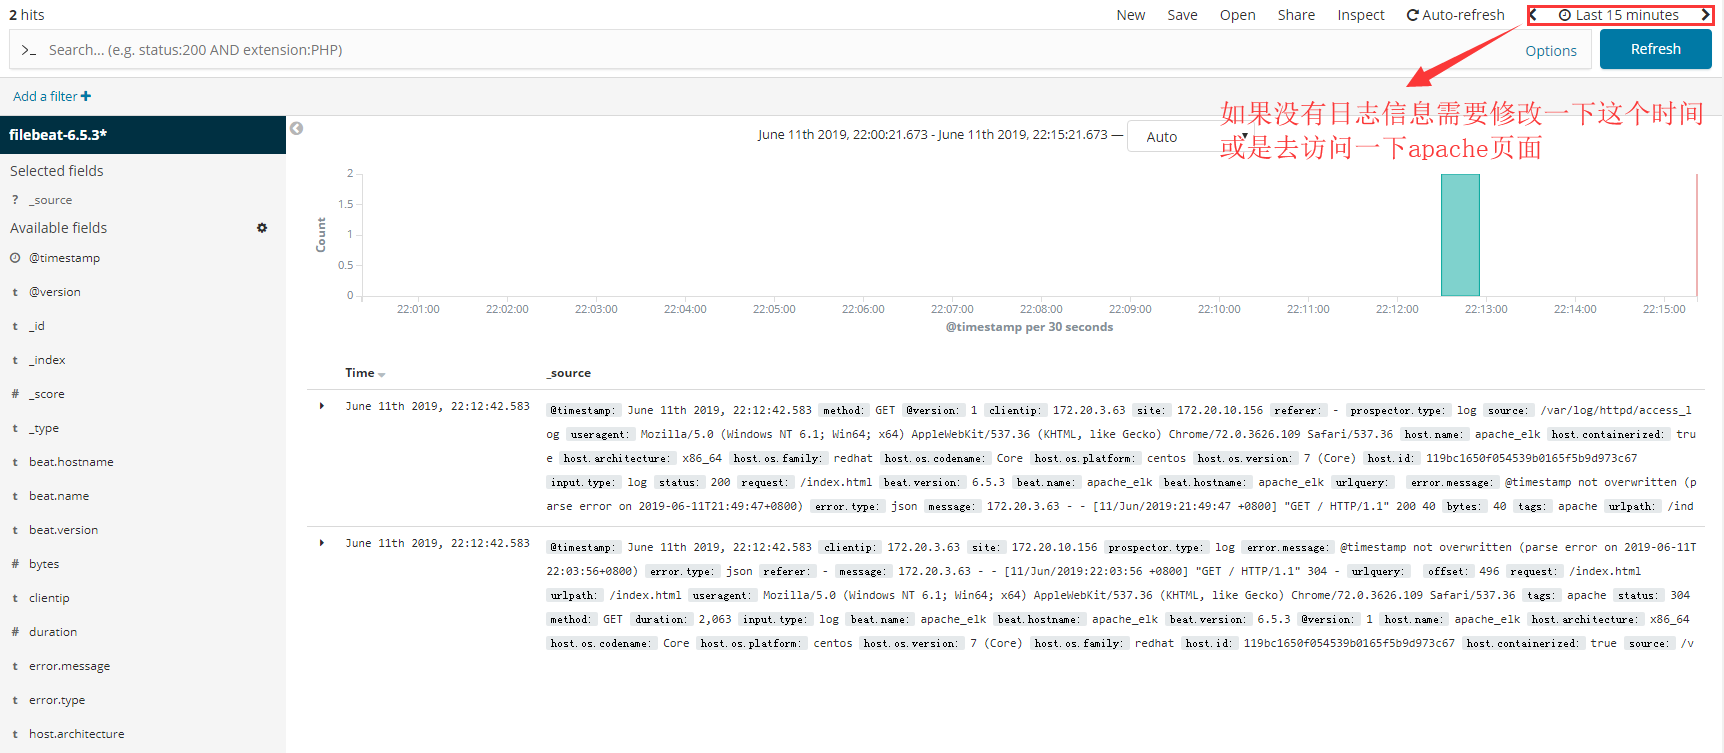
2.效果
3.步骤
3.1.安装apache
yum install -y httpd
备份配置文件
cp /etc/httpd/conf/httpd.conf /etc/httpd/conf/httpd.conf.bak
配置apache日志(json)化
编辑配置文件
vim /etc/httpd/conf/httpd.conf
添加
LogFormat "{ \\"@timestamp\": \"%{%Y-%m-%dT%H:%M:%S%z}t\", \\"@version\": \"1\", \\"tags\":[\"apache\"], \\"message\": \"%h %l %u %t \\\"%r\\\" %>s %b\", \\"clientip\": \"%a\", \\"duration\": %D, \\"status\": %>s, \\"request\": \"%U%q\", \\"urlpath\": \"%U\", \\"urlquery\": \"%q\", \\"bytes\": %B, \\"method\": \"%m\", \\"site\": \"%{Host}i\", \\"referer\": \"%{Referer}i\", \\"useragent\": \"%{User-agent}i\" \}" apache_json将
CustomLog "logs/access_log" combined
修改为
CustomLog "logs/access_log" apache_json
注释
LogFormat "%h %l %u %t \"%r\" %>s %b \"%{Referer}i\" \"%{User-Agent}i\"" combinedLogFormat "%h %l %u %t \"%r\" %>s %b" commonLogFormat "%h %l %u %t \"%r\" %>s %b \"%{Referer}i\" \"%{User-Agent}i\" %I %O" combinedio最终见下图:
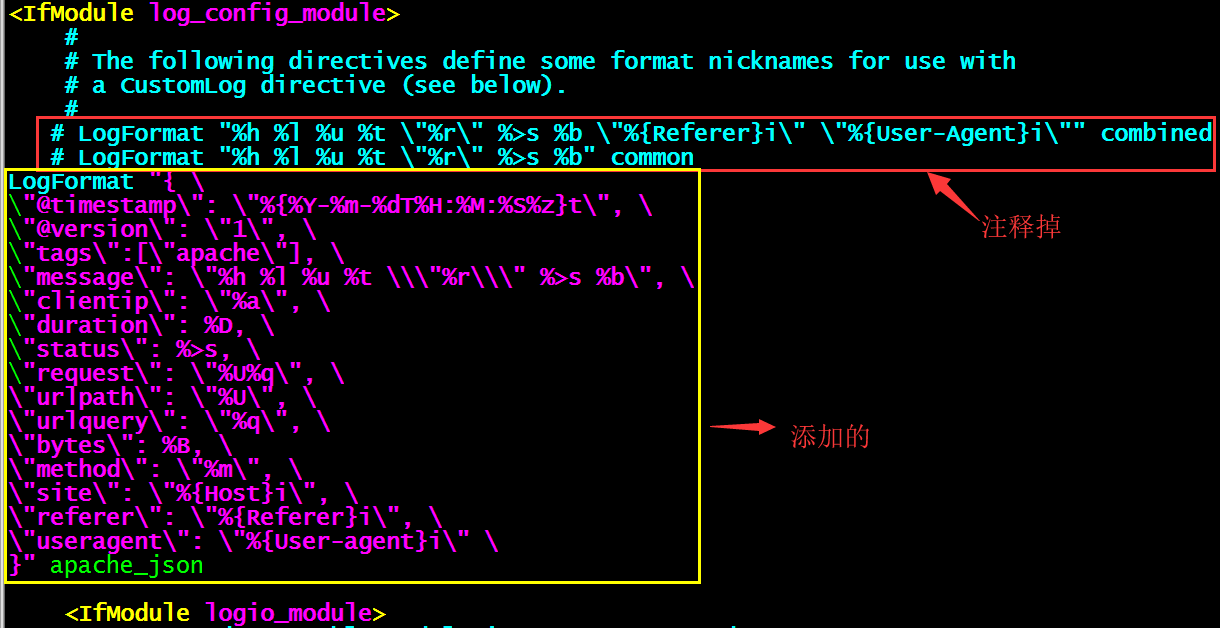
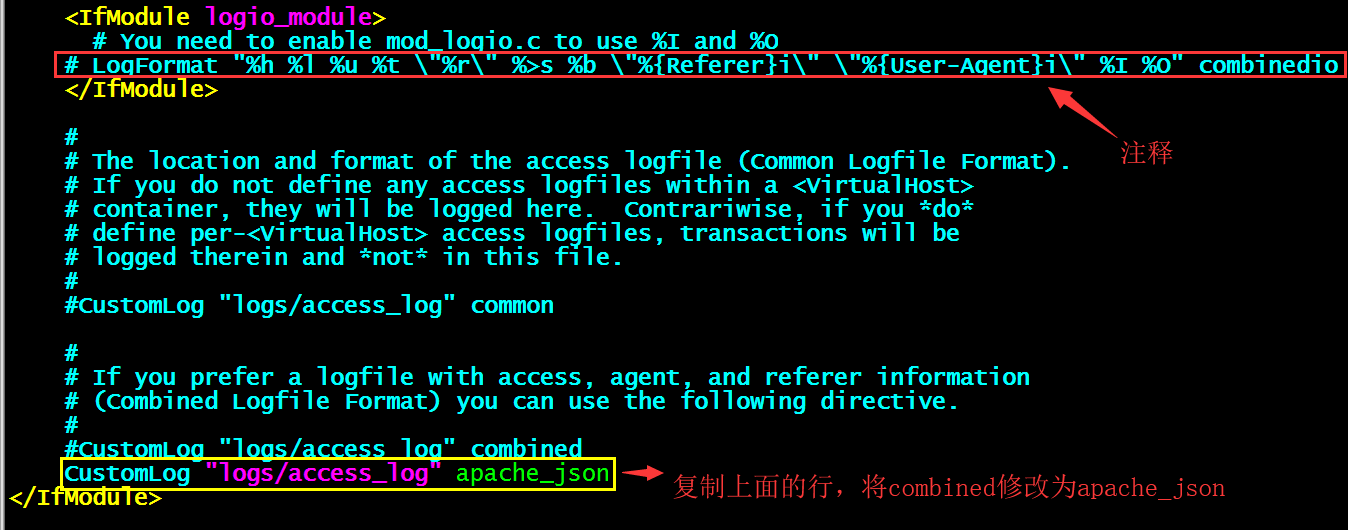
默认配置文件路径:/etc/httpd/conf/
默认日志路径:/var/log/httpd/
默认WEB页面路径:/var/www/html/
添加默认页面
echo 这是一个156服务器的测试页面 > /var/www/html/index.html
启动
httpd开机自启动
systemctl enable httpd
httpd启动
systemctl start httpd
查看启动状态
systemctl status httpd
进程
ps -ef|grep httpd

端口
netstat -nultp

监视日志
tailf /var/log/httpd/access_log | nl
访问
http://172.20.10.156
查看监视日志控制台显示如下,日志已经json化

提示:如果你没有json化apache日志就启动了,需要把日志清一下,然后重新启动apache
rm -rf /var/log/httpd/*systemctl restart httpd
3.2.安装Java
yum install -y java
3.3.安装配置Elasticsearch
创建用户(Elasticsearch不允许使用root启动)
useradd -M -s /sbin/nologin elasticsearch
创建安装目录
mkdir /usr/local/elasticsearch
安装及授权
tar -xzvf elasticsearch-6.5.3.tar.gzmv elasticsearch-6.5.3/* /usr/local/elasticsearch/ && rm -rf elasticsearch-6.5.3chown -R elasticsearch:elasticsearch /usr/local/elasticsearch
配置
备份配置文件
cp /usr/local/elasticsearch/config/elasticsearch.yml /usr/local/elasticsearch/config/elasticsearch.yml.bak
原默认配置文件
egrep -v "^#|^$" /usr/local/elasticsearch/config/elasticsearch.yml
提示:原配置文件全部被注释
编辑配置文件
vim /usr/local/elasticsearch/config/elasticsearch.yml
现配置文件
egrep -v "^#|^$" /usr/local/elasticsearch/config/elasticsearch.yml

相关
| 配置项 | 解释 | 原配置 | 现配置 |
| cluster.name | 自定义集群名,相同集群内的节点设置相同的集群名 | #cluster.name: my-application | cluster.name: my-application |
| node.name | 自定义节点名,建议统一采用节点hostname | #node.name: node-1 | node.name: node-1 |
| path.data | data存储路径,这里更改成自定义以应对日志的big | #path.data: /path/to/data | path.data: /usr/local/elasticsearch/data |
| path.logs | log存储路径,是为es自己的日志 | #path.logs: /path/to/logs | path.logs: /usr/local/elasticsearch/logs |
| network.host | es监听地址,采用”0.0.0.0″,表示允许所有设备访问 | #network.host: 192.168.0.1 | network.host: 0.0.0.0 |
| http.port | es监听端口,可不取消注释,默认即此端口 | #http.port: 9200 | http.port: 9200 |
| discovery.zen.ping.unicast.hosts | 集群节点发现列表,也可采用ip的形式 | #discovery.zen.ping.unicast.hosts: [“host1”, “host2”] | discovery.zen.ping.unicast.hosts: [“172.0.0.1”, “::1”] |
添加到systemd管理
vim /etc/sysconfig/elasticsearch
在 /etc/sysconfig/ 目录下创建 elasticsearch 文件,内容如下所示:
######################## Elasticsearch ######################## # Elasticsearch home directoryES_HOME=/usr/local/elasticsearch # Elasticsearch configuration directoryES_PATH_CONF=/usr/local/elasticsearch/config # Elasticsearch PID directoryPID_DIR=/usr/local/elasticsearch/bin ############################## Elasticsearch Service ############################## # SysV init.d# The number of seconds to wait before checking if elasticsearch started successfully as a daemon processES_STARTUP_SLEEP_TIME=5 ################################# Elasticsearch Properties ################################## Specifies the maximum file descriptor number that can be opened by this process# When using Systemd,this setting is ignored and the LimitNOFILE defined in# /usr/lib/systemd/system/elasticsearch.service takes precedence#MAX_OPEN_FILES=65536 # The maximum number of bytes of memory that may be locked into RAM# Set to "unlimited" if you use the 'bootstrap.memory_lock: true' option# in elasticsearch.yml.# When using Systemd,LimitMEMLOCK must be set in a unit file such as# /etc/systemd/system/elasticsearch.service.d/override.conf.#MAX_LOCKED_MEMORY=unlimited # Maximum number of VMA(Virtual Memory Areas) a process can own# When using Systemd,this setting is ignored and the 'vm.max_map_count'# property is set at boot time in /usr/lib/sysctl.d/elasticsearch.conf#MAX_MAP_COUNT=262144
提示:该文件用于配置es服务的系统变量用于systemd调用,上面我们配置了ES_HOME、ES_PATH_CONF、PID_DIR等,其中PID_DIR用于存放es进程的PID,用于systemd管理es进程的启动或停止。
创建elasticsearch服务
vim /usr/lib/systemd/system/elasticsearch.service
在 /usr/lib/systemd/system/ 目录下创建 elasticsearch.service文件,内容如下:
[Unit]Description=ElasticsearchDocumentation=http://www.elastic.coWants=network-online.targetAfter=network-online.target [Service]Environment=ES_HOME=/usr/local/elasticsearchEnvironment=ES_PATH_CONF=/usr/local/elasticsearch/configEnvironment=PID_DIR=/usr/local/elasticsearch/binEnvironmentFile=/etc/sysconfig/elasticsearchWorkingDirectory=/usr/local/elasticsearchUser=elasticsearchGroup=elasticsearchExecStart=/usr/local/elasticsearch/bin/elasticsearch -p ${PID_DIR}/elasticsearch.pid # StandardOutput is configured to redirect to journalctl since# some error messages may be logged in standard output before# elasticsearch logging system is initialized. Elasticsearch# stores its logs in /var/log/elasticsearch and does not use# journalctl by default. If you also want to enable journalctl# logging, you can simply remove the "quiet" option from ExecStart.StandardOutput=journalStandardError=inherit # Specifies the maximum file descriptor number that can be opened by this processLimitNOFILE=65536 # Specifies the maximum number of processLimitNPROC=4096 # Specifies the maximum size of virtual memoryLimitAS=infinity # Specifies the maximum file sizeLimitFSIZE=infinity # Disable timeout logic and wait until process is stoppedTimeoutStopSec=0 # SIGTERM signal is used to stop the Java processKillSignal=SIGTERM # Send the signal only to the JVM rather than its control groupKillMode=process # Java process is never killedSendSIGKILL=no # When a JVM receives a SIGTERM signal it exits with code 143SuccessExitStatus=143 [Install]WantedBy=multi-user.target启动
重新加载systemd的守护线程:
systemctl daemon-reload
elasticsearch开机自启动
systemctl enable elasticsearch
elasticsearch启动
systemctl start elasticsearch
查看启动状态
systemctl status elasticsearch
如果出现错误可以使用如下命令查看日志:
journalctl -u elasticsearch

错误1:
max virtual memory areas vm.max_map_count [65530] is too low, increase t...62144]
解决:
编辑配置文件
vim /etc/sysctl.conf
在最下面添加
vm.max_map_count=655360
保存退出
sysctl -p
错误2:
max file descriptors [4096] for elasticsearch process is too low, increase to at least [65536]max number of threads [3802] for user [elsearch] is too low, increase to at least [4096]
解决:
编辑配置文件
vim /etc/security/limits.conf
在最下面添加如下代码,添加完成之后关闭所有终端重新连接
# elasticsearch config start* soft nofile 65536* hard nofile 131072* soft nproc 2048* hard nproc 4096# elasticsearch config end
进程(elasticsearch用户启动)
ps -ef |grep elasticsearch

端口
netstat -nultp

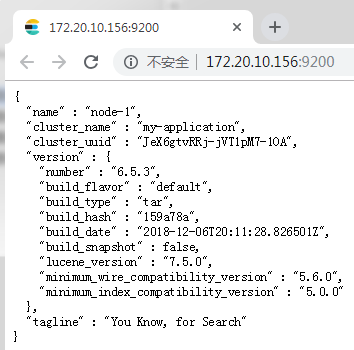
访问
WEB访问http://172.20.10.156:9200
3.4.安装配置Kibana
创建安装目录
mkdir /usr/local/kibana
安装
tar -xzvf kibana-6.5.3-linux-x86_64.tar.gzmv kibana-6.5.3-linux-x86_64/* /usr/local/kibana/ && rm -rf kibana-6.5.3-linux-x86_64
备份配置文件
cp /usr/local/kibana/config/kibana.yml /usr/local/kibana/config/kibana.yml.bak
原默认配置文件
egrep -v "^#|^$" /usr/local/kibana/config/kibana.yml
提示:全部被注释
编辑配置文件
vim /usr/local/kibana/config/kibana.yml
现配置文件
egrep -v "^#|^$" /usr/local/kibana/config/kibana.yml

相关
| 配置项 | 解释 | 原配置 | 现配置 |
| server.port | kibana监听端口 | #server.port: 5601 | server.port: 5601 |
| server.host | 指定Kibana服务器将绑定到的地址。IP地址和主机名都是有效值。
#默认值是“localhost”,这通常意味着远程计算机将无法连接。 | #server.host: “localhost” | server.host: “0.0.0.0” |
| elasticsearch.url | elasticsearch服务器的访问地址 | #elasticsearch.url: "http://localhost:9200" | elasticsearch.url: "http://172.20.10.156:9200" |
添加到systemd管理
新建编辑服务文件
vim /usr/lib/systemd/system/kibana.service
添加以下代码
[Unit]Description=Kibana Server Manager [Service]ExecStart=/usr/local/kibana/bin/kibana [Install]WantedBy=multi-user.target
启动
重新载入 systemd
systemctl daemon-reload
kibana开机自启动
systemctl enable kibana
kibana启动
systemctl start kibana
查看启动状态
systemctl status kibana

进程
ps -ef|grep kibana

端口
netstat -nultp

访问
WEB访问http://172.20.10.156:5601

提示:访问WEB页面如果提示“kibana server is not ready yet”请多等待一会在刷新,第一次启动比较慢,如果一直这样请检查kibana.yml文件配置项。
3.5.安装配置Logstash
创建安装目录
mkdir /usr/local/logstash
安装
tar -xzvf logstash-6.5.3.tar.gzmv logstash-6.5.3/* /usr/local/logstash/ && rm -rf logstash-6.5.3
复制模版
cp /usr/local/logstash/config/logstash-sample.conf /usr/local/logstash/config/filebeat.conf
原默认配置文件模版
cat /usr/local/logstash/config/logstash-sample.conf# Sample Logstash configuration for creating a simple# Beats -> Logstash -> Elasticsearch pipeline. input { beats { port => 5044 }} output { elasticsearch { hosts => ["http://localhost:9200"] index => "%{[@metadata][beat]}-%{[@metadata][version]}-%{+YYYY.MM.dd}" #user => "elastic" #password => "changeme" }}编辑filebeat.conf配置文件
vim /usr/local/logstash/config/filebeat.conf
现配置文件
cat /usr/local/logstash/config/filebeat.conf# Sample Logstash configuration for creating a simple# Beats -> Logstash -> Elasticsearch pipeline. input { beats { port => 5044 }} output { elasticsearch { #hosts => ["http://localhost:9200"] hosts => ["http://172.20.10.156:9200"] index => "%{[@metadata][beat]}-%{[@metadata][version]}-%{+YYYY.MM.dd}" #user => "elastic" #password => "changeme" }}相关
| 配置项 | 解释 | 原配置 | 现配置 |
hosts => ["http://localhost:9200"] | 连接elasticsearch服务器的地址 | hosts => ["http://localhost:9200"] | hosts => ["http://172.20.10.156:9200"] |
添加到systemd管理
新建编辑服务文件
vim /usr/lib/systemd/system/logstash.service[Unit]Description=logstash[Service]ExecStart=/usr/local/logstash/bin/logstash -f /usr/local/logstash/config/filebeat.conf[Install]WantedBy=multi-user.target
启动
重新载入 systemd
systemctl daemon-reload
logstash开机自启动
systemctl enable logstash
logstash启动
systemctl start logstash
查看启动状态
systemctl status logstash

进程
ps -ef |grep logstash

端口
netstat -nultp

3.6.安装配置filebeat
创建安装目录
mkdir /usr/local/filebeat
安装
tar -xzvf filebeat-6.5.3-linux-x86_64.tar.gzmv filebeat-6.5.3-linux-x86_64/* /usr/local/filebeat/ && rm -rf filebeat-6.5.3-linux-x86_64
备份配置文件
cp /usr/local/filebeat/filebeat.yml /usr/local/filebeat/filebeat.yml.bak
原默认配置文件
egrep -v "#|^$" /usr/local/filebeat/filebeat.yml filebeat.inputs:- type: log enabled: false paths: - /var/log/*.logfilebeat.config.modules: path: ${path.config}/modules.d/*.yml reload.enabled: falsesetup.template.settings: index.number_of_shards: 3setup.kibana:output.elasticsearch: hosts: ["localhost:9200"]processors: - add_host_metadata: ~ - add_cloud_metadata: ~编辑配置文件
vim /usr/local/filebeat/filebeat.yml
现配置文件
egrep -v "#|^$" /usr/local/filebeat/filebeat.yml filebeat.inputs:- type: log enabled: true paths: - /var/log/httpd/access_log json.keys_under_root: true json.overwrite_keys: truefilebeat.config.modules: path: ${path.config}/modules.d/*.yml reload.enabled: falsesetup.template.settings: index.number_of_shards: 3setup.kibana: host: "172.20.10.156:5601"output.elasticsearch: hosts: ["172.20.10.156:9200"]processors: - add_host_metadata: ~ - add_cloud_metadata: ~相关
| 配置项 | 解释 | 原配置 | 现配置 |
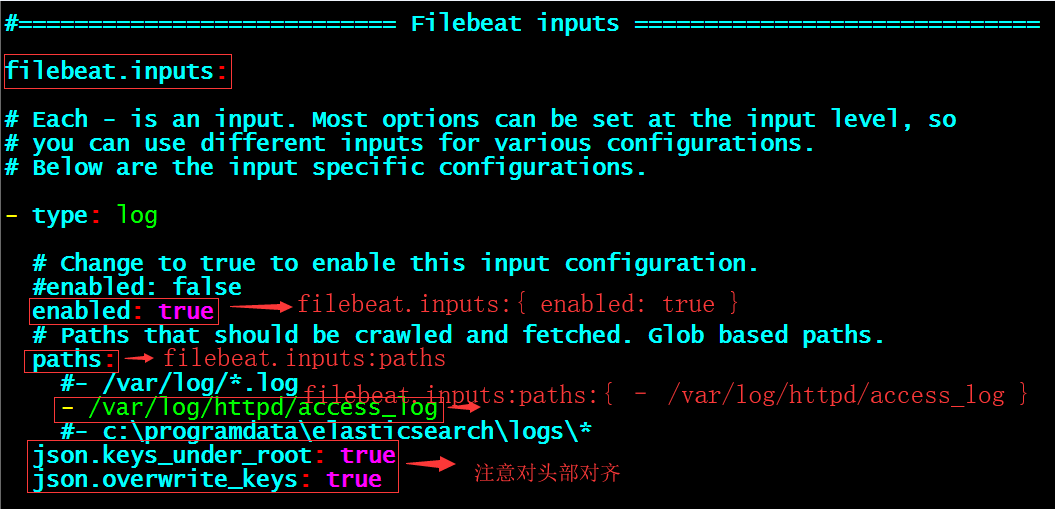
| filebeat.inputs:{ enabled: false } | 启用filebeat输入功能 | enabled: false | enabled: true |
| filebeat.inputs:paths:{ – /var/log/*.log } | 监控日志的路径 | – /var/log/*.log | – /var/log/httpd/access_log |
|
|
| json.keys_under_root: true |
|
|
| json.overwrite_keys: true |
| setup.kibana:{ #host: “localhost:5601” } | kibana服务器的连接地址,从Beats版本6.0.0开始,仪表盘通过Kibana API加载 | #host: “localhost:5601” | host: “172.20.10.156:5601” |
| output.elasticsearch:{ hosts: [“localhost:9200”] } | elasticsearch服务器的连接地址,将日志传递给elasticsearch | hosts: [“localhost:9200”] | hosts: [“172.20.10.156:9200”] |
提示:表中“filebeat.inputs:”代表大项,“{}”中表示大项中的小项数值,例如下:
添加到systemd管理
新建编辑服务文件
vim /usr/lib/systemd/system/filebeat.service[Unit]Description=filebeat[Service]User=rootExecStart=/usr/local/filebeat/filebeat -e -c /usr/local/filebeat/filebeat.yml[Install]WantedBy=multi-user.target
启动
重新载入 systemd
systemctl daemon-reload
filebeat开机自启动
systemctl enable filebeat
filebeat启动
systemctl start filebeat
查看启动状态
systemctl status filebeat

进程
ps -ef |grep filebeat.yml

kibana索引配置
检查项
WEB页正常访问: http://172.20.10.156:9200/_cat/indices
elasticsearch地址打开之后有yellow项
提示:如果没有yellow项,可能你没有访问apache的页面或是配置有问题。

提示:.kibana_1为系统自动生成的,如果你的只有这一条,请检查安装步骤及配置项,确认有“filebeat-*”才可进行下面的步骤。
elasticsearch的参数
http://172.20.10.156:9200/_cat/
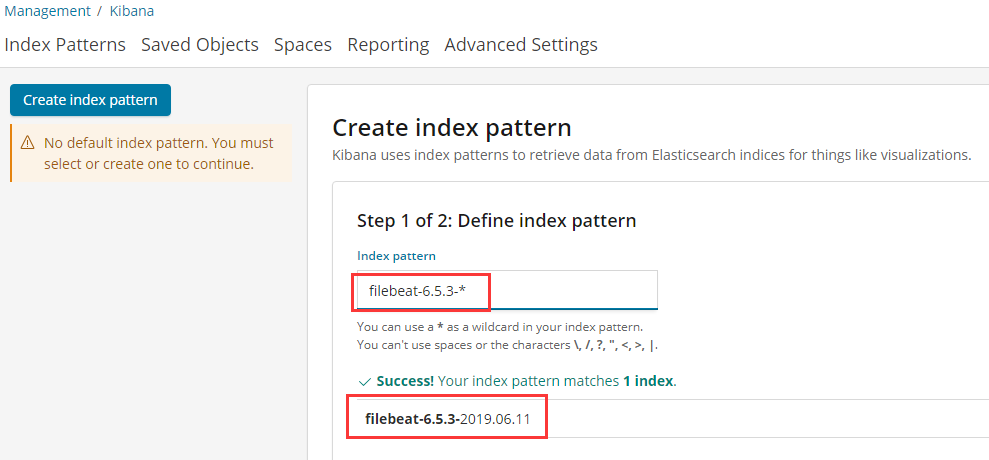
=^.^=/_cat/allocation/_cat/shards/_cat/shards/{index}/_cat/master/_cat/nodes/_cat/tasks/_cat/indices/_cat/indices/{index}/_cat/segments/_cat/segments/{index}/_cat/count/_cat/count/{index}/_cat/recovery/_cat/recovery/{index}/_cat/health/_cat/pending_tasks/_cat/aliases/_cat/aliases/{alias}/_cat/thread_pool/_cat/thread_pool/{thread_pools}/_cat/plugins/_cat/fielddata/_cat/fielddata/{fields}/_cat/nodeattrs/_cat/repositories/_cat/snapshots/{repository}/_cat/templates打开浏览器访问kibana面板-Management– Index Patterns– Create index pattern– Index pattern下的文本框中输入“filebeat-6.5.3*“即可看到索引到的匹配项,然后点击”Next step”按钮,如下图所示
在Time Filter field name中选择”@timestamp”,然后点击” Create index pattern”如下图所示:

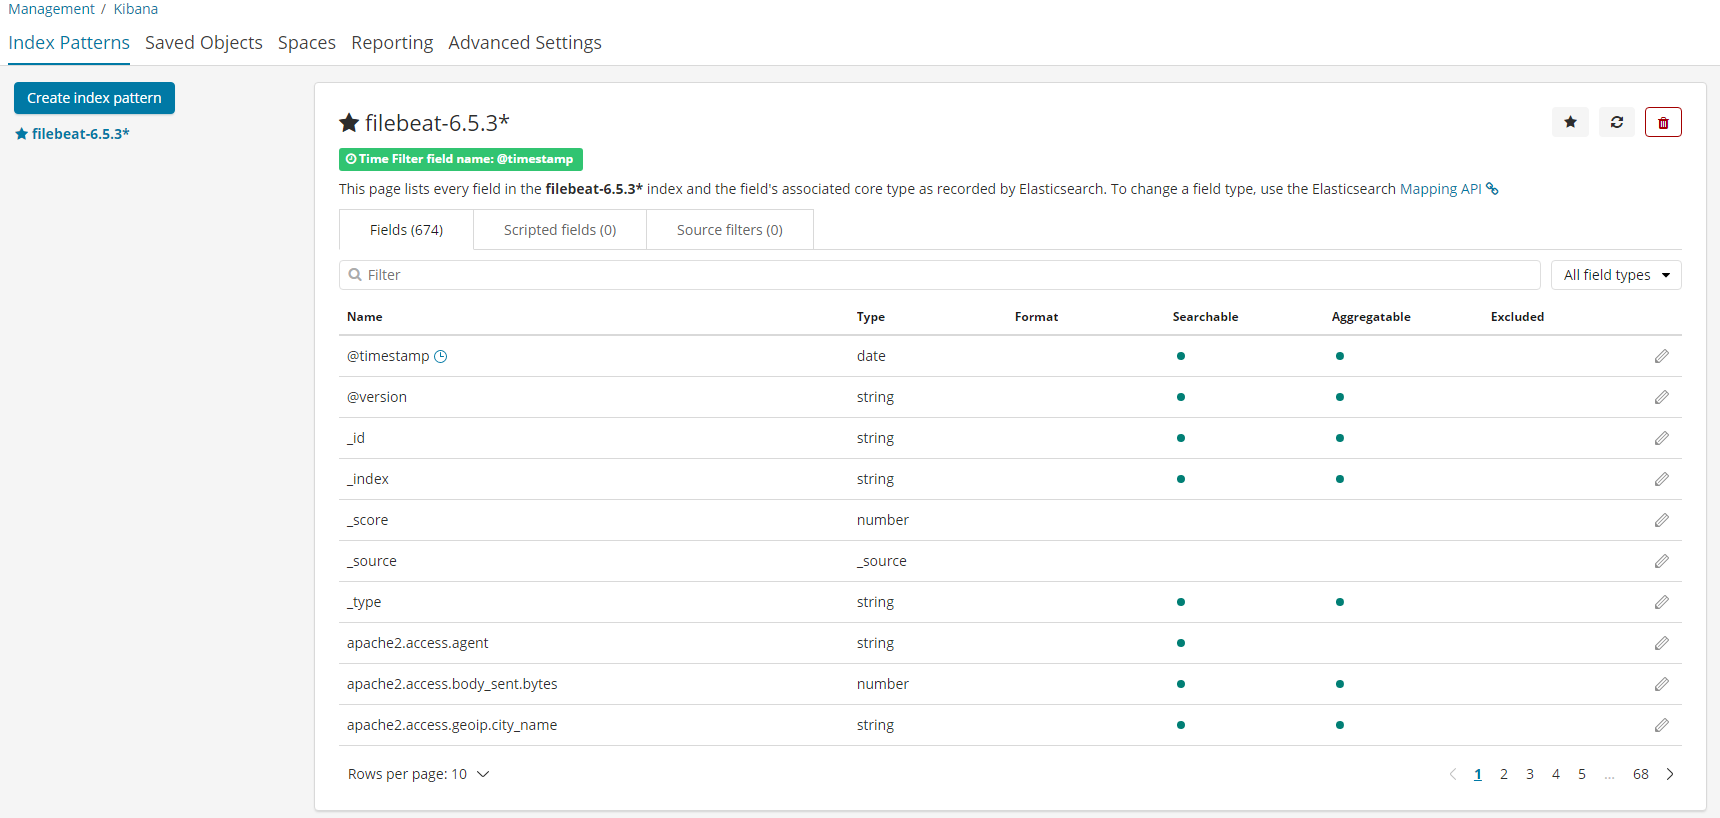
创建索引之后如下图所示:
然后点击Discover菜单,将出现以下面板,如未出现请修改图中框中的时间段或是访问一下apache站点即可显示。

推荐本站淘宝优惠价购买喜欢的宝贝:

本文链接:https://hqyman.cn/post/1576.html 非本站原创文章欢迎转载,原创文章需保留本站地址!
打赏

微信支付宝扫一扫,打赏作者吧~
休息一下~~


 微信支付宝扫一扫,打赏作者吧~