
https://zhuanlan.zhihu.com/p/491758993?utm_id=0
写在前面:
如果能坚持看完并反思其中的原理。相信这些内容一定会让你对计算机世界的认知多上一个台阶。
vSphere系列的知识非常杂,跳跃幅度很大。开始前先对vSphere虚拟化产品做个简单介绍,背景属实有点绕。我在自学的时候经常连教程里提到的名词都对不上号,十分槛尬。vSphere虚拟化最初有两条线,收费的esxi和免费的esxi。5.0之后,esx被砍掉了,免费的ESXI三又分出了免费版和付费版。
正文:
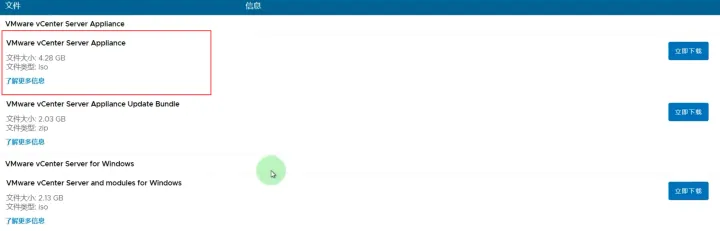
常说的ESXIEN是VMware vSphere Hypervisor,免费的ESXI通过序列号是可以直接享受付费功能的,所以两者之间的实质区别已经很小了,强调一下vSphere是整个虚拟化方案,并不特指某一个功能或产品,而是整套虚拟化方案所有组件的总和,包括ESXI也同样是vSphere的组件之一。由于vSphere本质就是很多组件的合集,所以玩vSphere虚拟化时一定要有模块化思维,比如我们的vSphere Client就是一个组件,一个由软件搭建的web管理平台,在ESXI 6.0之前,这个管理平台是CS架构的没有web端,并且安装要求比较苛刻,必须是server系统才能安装,6.0之后官方已经没有CS架构的客户端了,虽然网上还有些奇奇怪怪的方法,能实现用客户端管理,但毕竟是邪道,因此这个Web管理平台也叫vSphere Web Client,既然这是组件那么组件就有它的搭建环境,所以安装vSphere Client第一步是创建基础环境,因为以前管理平台是区分服务端和客户端的,而现在主推Web端后,服务端与客户端的概念就没那么大了,毕竞服务端装好直接就能用,所以部署了vSphere Web Client的服务器,又叫vCenter Server,因此相关内容需要在官网搜索vCenter Server,下载安装包还需要你注册一个账号,而且下载速度极慢。
所以我也会把下载好的安装包分享到网盘内,最下面的是用Windows系统做服务器的安装包,中间是update升级补丁包,第一个是VMware自家基于Linux的Photon系统的安装包,我也推荐大家用这种方式部署,因为全家桶部署起来流程简化很多,碰巧VMware也在慢慢舍弃Windows,所以在Photon系统下安装vCenter Server的程序,又叫vCenter Server Appliance(简称VCSA)。
总之vSphere产品线的名词可能很难理解,为了让大伙儿快速理解不严谨的讲,你可以认为vCenter,vCenter Server,vSphere Client, VCSA,Photon都指的是本期要安装的web管理平台。
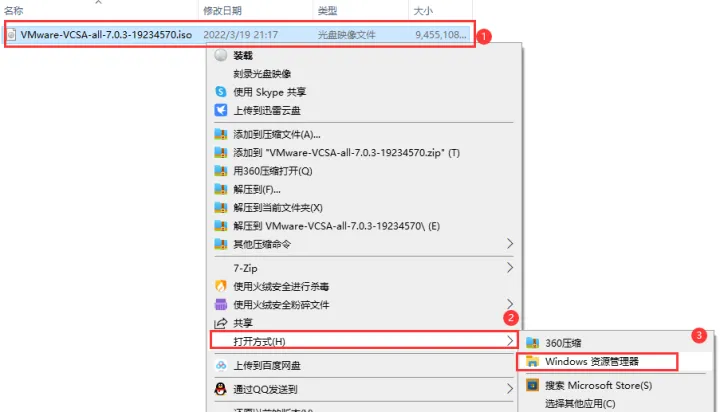
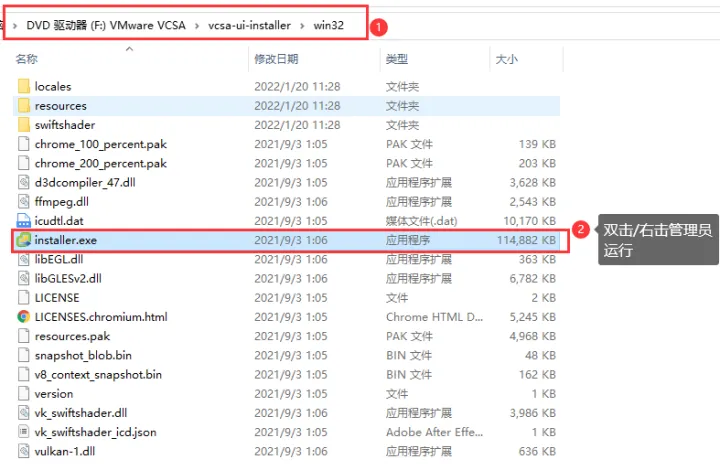
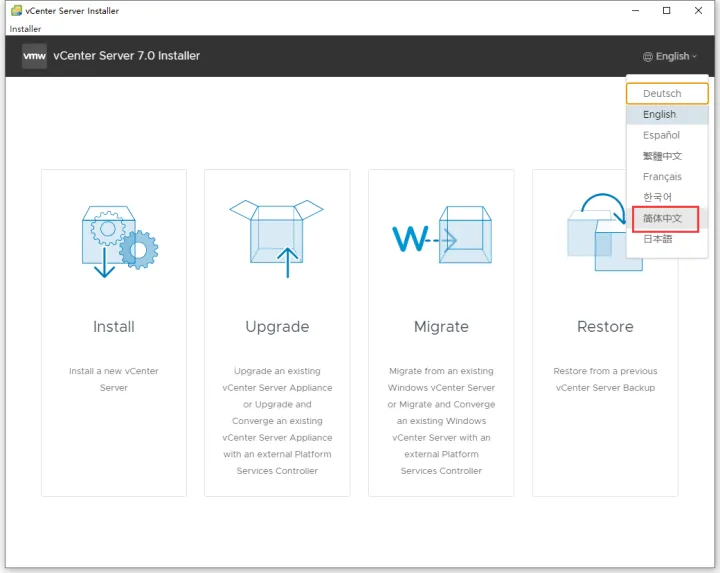
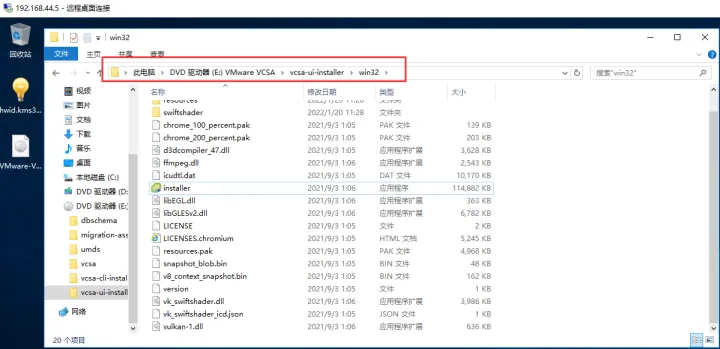
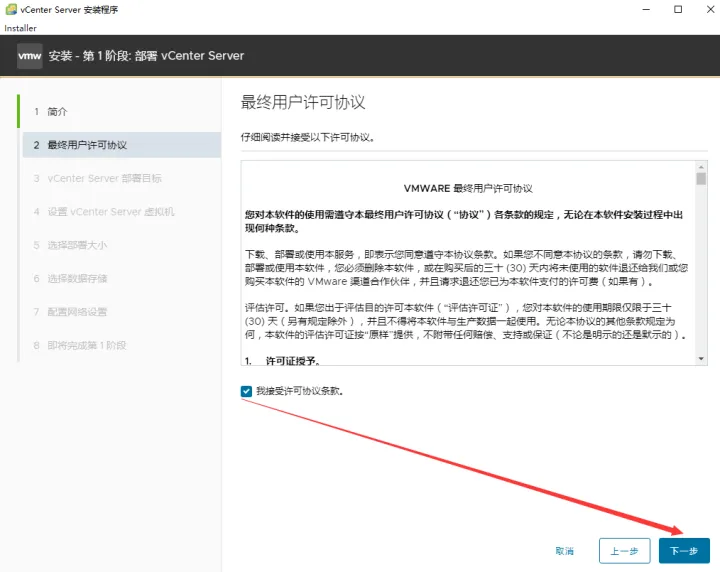
然后我们进入安装流程,下载的安装包在局域网内任意电脑上解压。我图方便选择在虚拟机里进行,然后在这个目录下找到启动程序;

这里插一句,如果你仅仅只装一个vSphere Client,以后也不打算再深入折腾ESXI,那么基本上你只要全程点下一步就能装好,但这样的缺点是没有把基础框架搭起来,日后进阶内容根本没法用,因为这样搭建的vCenter Server,是一个没有加入域的残次品,所以为了稳健考虑,我们选择把整个体系搞起来,那么整个框架都需要什么呢,最底层的是活动目录AD域,其次是DNS服务器,因为商用的东西不同的服务器有不同的作用,所以vSphere整个体系都是依靠网络实现模块化拼凑的,当网络内存在大量设备、用户管理需求时,就出现了AD域,这是微软搞出来的管理方案,似乎上个世纪就有了,即便如今超大型企业还是在用,我大概解释一下这是个什么东西。我们在Windows里用SMB做文件共享的时候,其实有个潜在条件,就是这两台电脑必须在同一个工作组,之所以你没留意过这一点,因为Windows默认大家都在WORKGROUP组;

还有网上邻居能看到局域网内的其他设备,其实一样发现的是同一个组内的设备,因此在Windows环境下你所理解的局域网很方便,本质是大家都在一个组里很方便,组的特点是任何人都可以自发创建,组员也可以来去自如,并且大家平权;

AD域你可以简单理解成进阶版的组,企业管理员创建一个域,公司所有电脑再验证了管理员账户和密码的前提下才能加进来,一旦加入到域那么你的电脑和账户都是可被管理的状态,ESXI主机本身也是有加入域的功能;
为了更好地理解AD域,想想上期演示时使用Windows账户,进行单点登录访问ESXI,这就是AD域的应用,以为企业有太多的系统和太多的员工,而使用系统都必须用Windows;

那么用AD域或更细化的SSO单点登录体系,与其它系统对接, 用户列表与权限的维护就能轻松不少;

装域控服务器,我建议选择Windows Server 2016,因vSphere产品线官方文档中,部分产品有写支持Windows Server 2019,而有一些没说支持Windows Server 2019,为了避免不必要的麻烦,所以折中一下玩vSphere是现阶段windows Server2016满足兼容性前提下的最新版本,但是注意2017不要用VL版本,名字建议叫DC或者DC Server,因为AD域只是DC的主要用途,就像SSO单点登录,只是活动目录的主要用途一样;
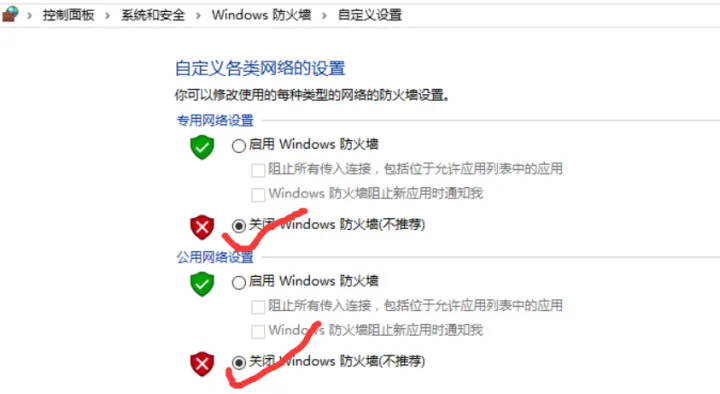
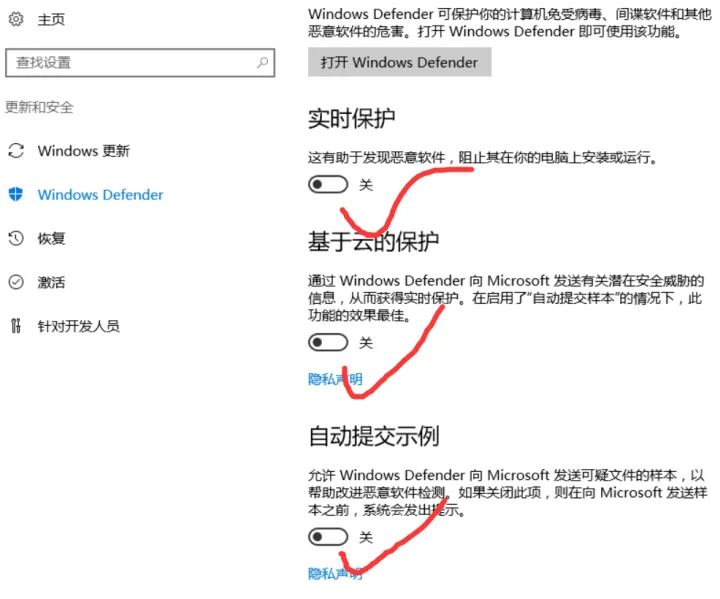
安装系统的过程直接跳过,装好后关闭防火墙、关闭Windows Defender;
然后激活系统,开启远程;
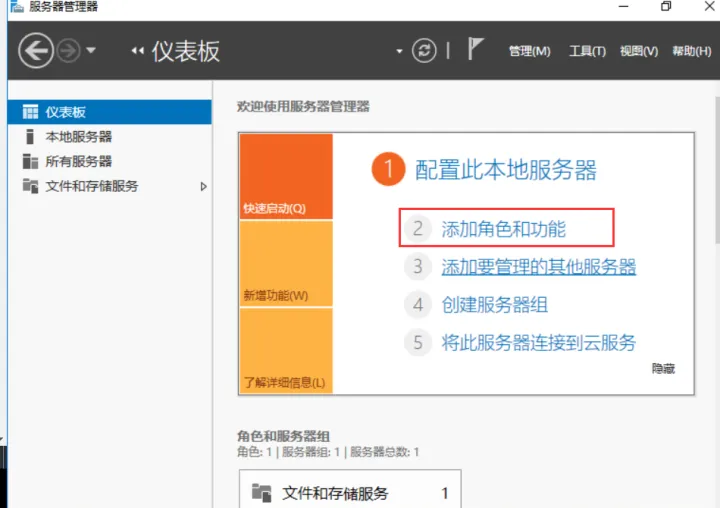
开启主服务器,打开“服务器管理器”窗口,单击“添加角色和服务”;
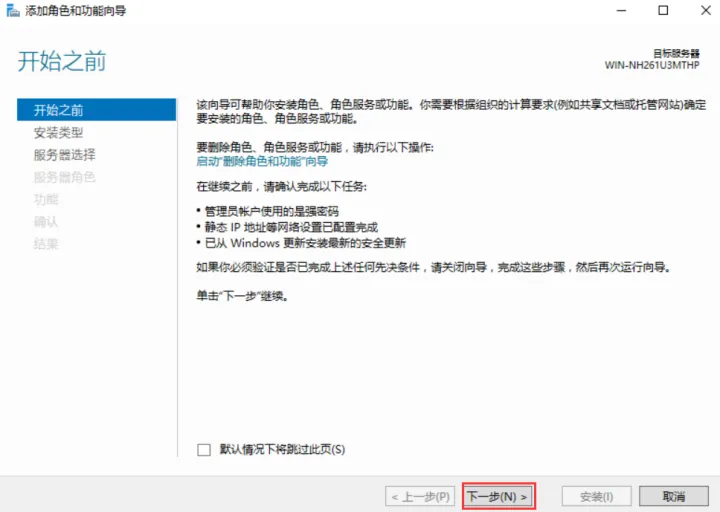
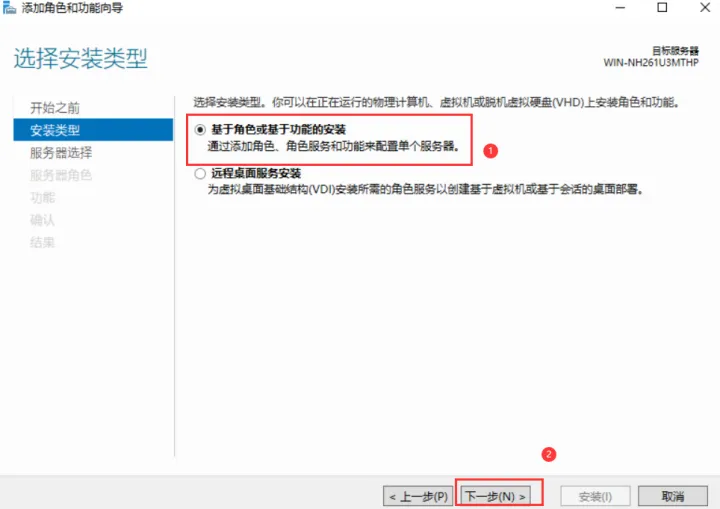
在“选择安装类型”窗口,选择“基于角色和功能的安装”;
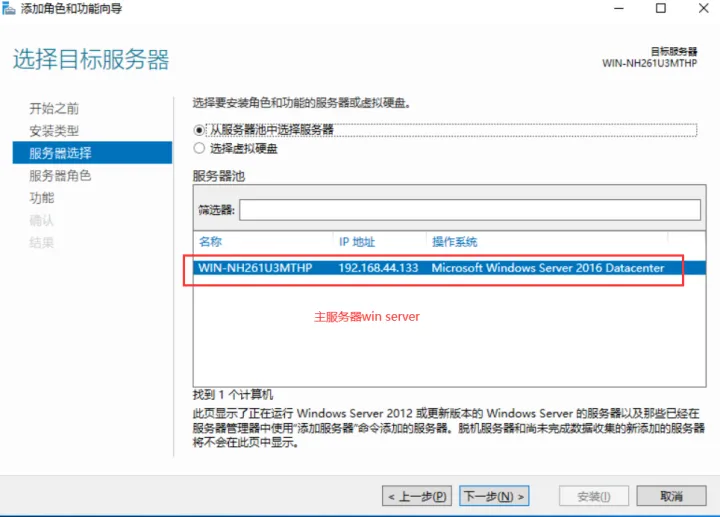
在“选择目标服务器”对话框,选择主服务器;
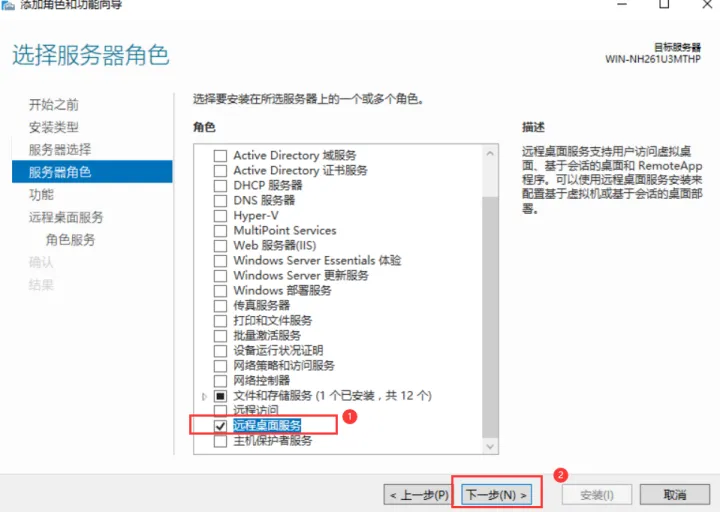
在“选择角色服务”对话框中,选择“远程访问”复选框;
在“选择功能”对话框和“远程访问”对话框,保持默认;
在“选择角色服务”对话框中,选择“DirectAccess和×××(ras)”和“路由”复选框(如没有这两个,按图示勾选内容进行选择);


这些标准铺垫就不再赘述了,但最重要的是设置一个固定P地址和给计算机重命名;
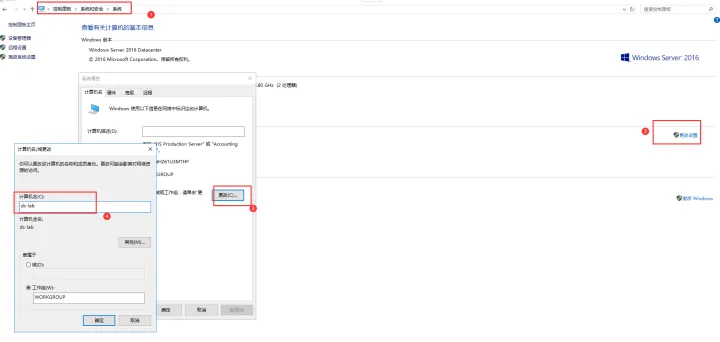
重启后重新连接远程桌面,在服务器管理器里添加角色和功能,安装ad域服务;


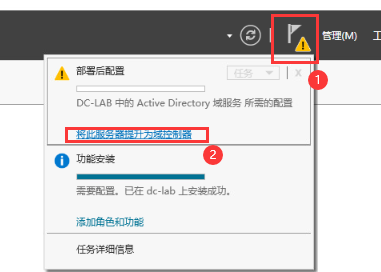
打开vm web右上角叹号,点击“将此服务器提升为域控服务器”;
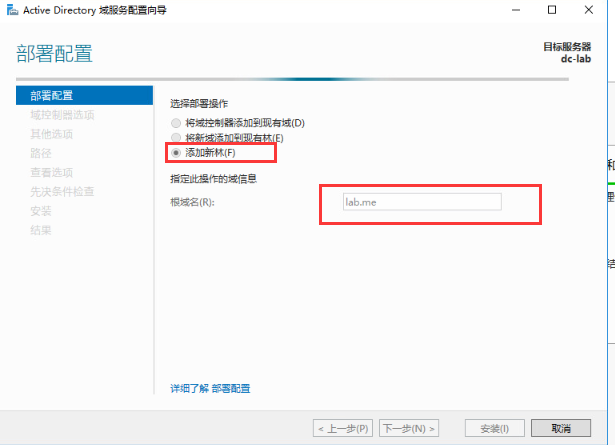
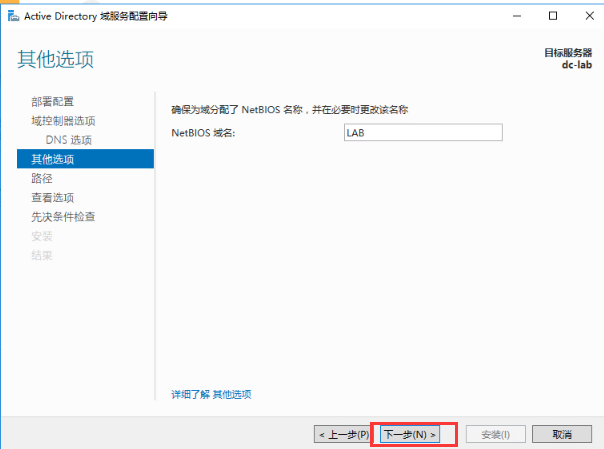
域名这里理论上随便填.com/.cn怎么好记怎么好输入你就怎么写,但为了避免不必要的麻烦,我用.me,一是比较短好打,二是好记。最重要的是真的有.me这个域名,所以即便瞎写我也要遵循基本法,起个能记住的密码,建议整套部看流程都用一个密码,香则你最好用小本本把密码记下来;
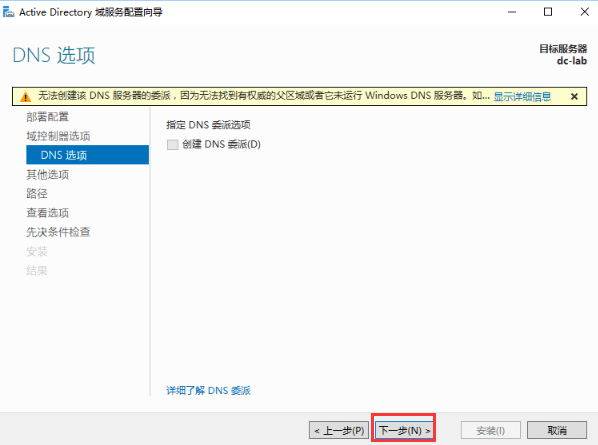
接着,一路下一步它会帮你自动安装DNS服务器;


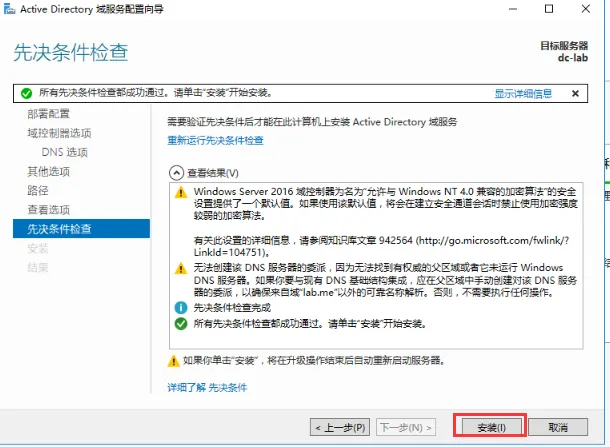
然后什么都不用管,系统会自动重启;
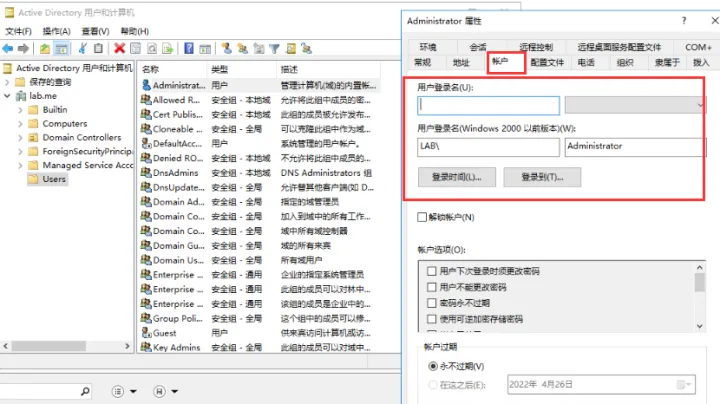
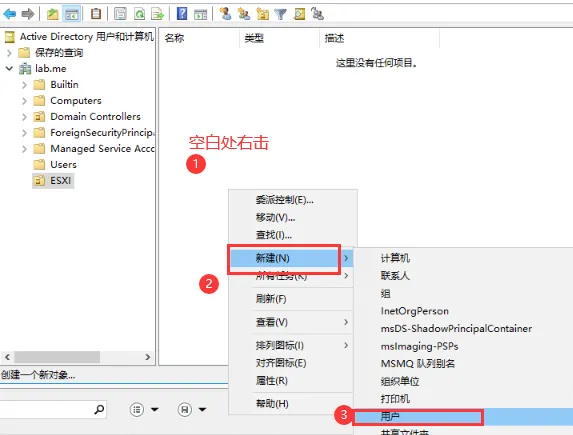
重启完成刚才的虚拟机,就成为了域控服务器这个时候在登录Windows就得用域账户(DC-LAB\administrator),LAB\administrator登录了。用户名这里正常来讲你不用操心,默认都是正确用户名,我只是因为远程的账户记录里是错的,万一你真进不去,在web端登录,在AD域管理器上右键,选择ad用户和计算机;
选择users,然后双击adnministrator;
账户标签下就可以设置域用户名了,其它域用户的操作也是同理;
然后接下来是可选的拓展内容;
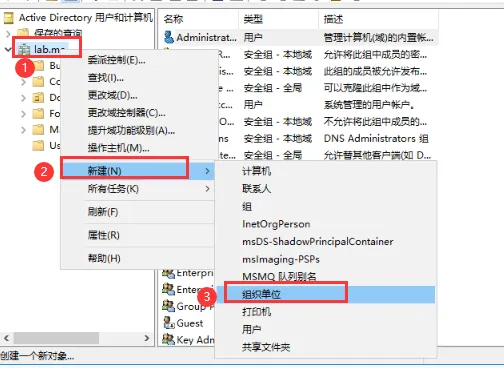
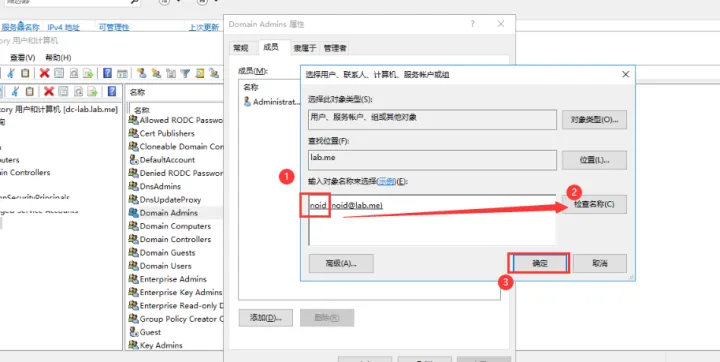
新建一个ESXI组织单位;

再在组织单位下新建admmin用户组;

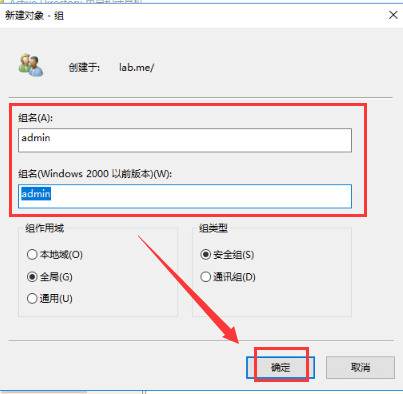
然后新建一个用户;


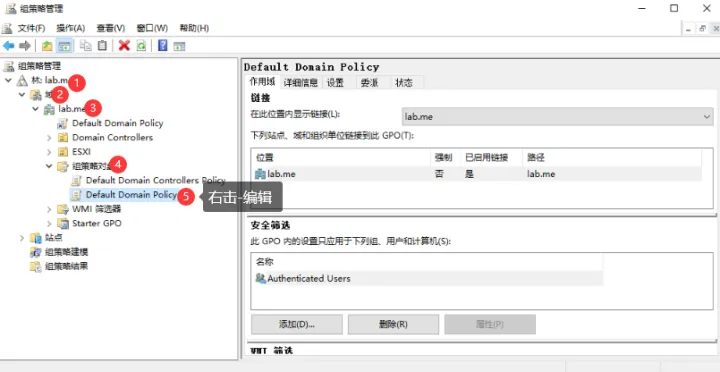
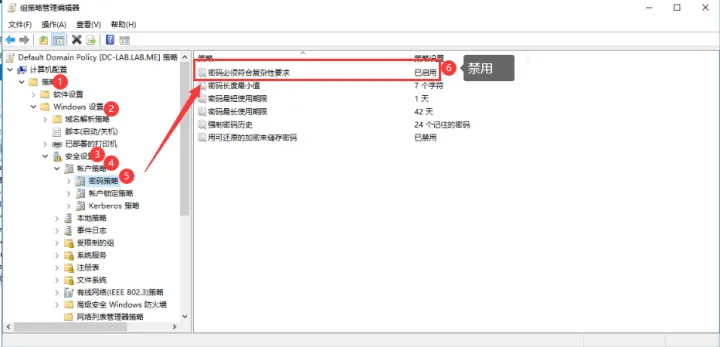
域账户的密码策略有点复杂,我修改下密码规则;


验证:
打开cmd键入命令gpupdate/force,修酸完刷新下组策略;
把用户添加到新建的admmin用户组内

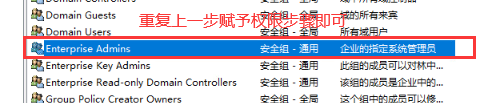
这里是给单个用户赋予了管理员权限,虽然也能用没啥问但操作流程不够标准,正确后法应该是把adrmin组赋予管理员权限,以后你只需要给admmin组里加成员就行了;

赋予权限的操作方法都是一样的自己搞就行
然后挂载到windows资源管理器进行安装
桌面远程访问参阅
CSDN:https://blog.csdn.net/moxun2011/article/details/80604727
原文地址:https://www.apizl.com/archives/view-134220-1.html
如果现在你脑袋有点晕,那么这里直接写你ESXI主机的ip地址。然后继续安装就可以,没有任何影响,虽然不太完美,但细节以后搞也不影响;
但这里我还是要先讲解一下esx的主机名。ESXI的主机名,在你ESXI管理界面;

F2设置configure management network(网络配置)--DNS configuration(DNS配置);

(注意:上图指向的域控服务器是错的,实际上我这里win server的静态ipv4是192.168.44.5,也就是说需要域控服务器192.168.44.5)
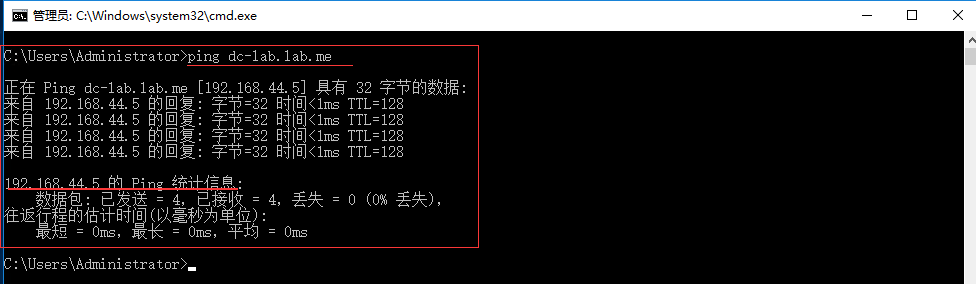
ESXI的主机名和windows电脑的计算机名有点不太一样,windows的计算机名在局域网里和ip地址。基本是一个东西,但ESXI的主机名和域名是一个性质,也就是说它的计算机名是个网址。所以要把网址解析成IP,还需要dns,碰巧我们刚才安装ad域的服务器帮我们装了dns服务器。可以看到默认有一个正向解析记录,这个解析记录刚好就是预服务器本身;
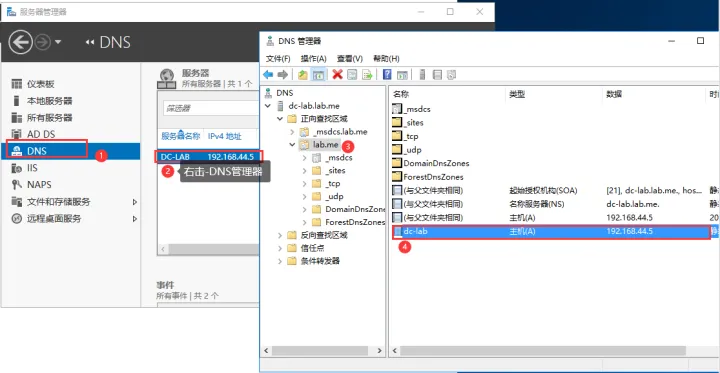
我们测试一下效果,cmd管理器键入:ping http://dc-lab.lab.me直接ping下能返回结果,说明解析成功了;
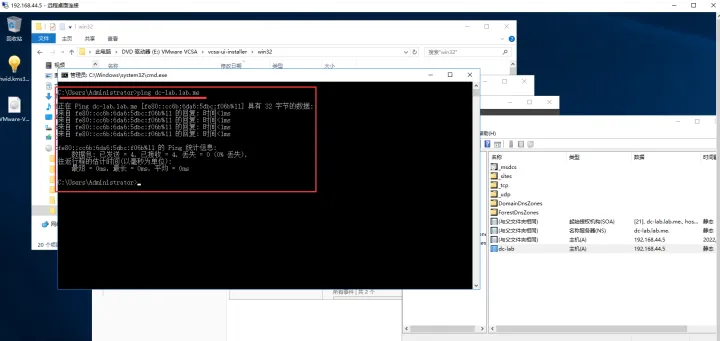
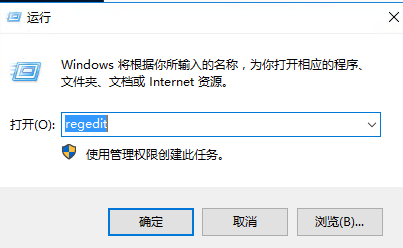
但是返回的是ipv6的地址,这个现象一旦出现,禁用ipv6根本不管用。系统就一根筋非走ipv6不可,因此需要通过修改注册表实现强制使用ipv4的方法,一定要注意走1PV6的问题必须要解决;
regedit注册表编辑器
找到:HKEY_LOCAL_MACHINE\SYSTEM\CurrentControlSet\Services\Tcpip6\Parameters

重命名为DisabledComponents

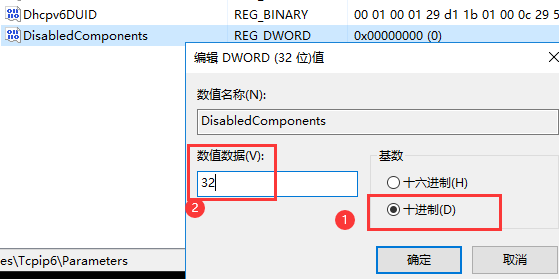
重启此win server2016虚拟机,重启后再次测试:ping http://dc-lab.lab.me注册表强制ipv4成功;
前面提到,vSphere整个结构都是基于网络实现,逐渐拼凑的。所以,除非你能保证vSphere全流程都在ipv6下跑,否则某些组件就会出问题。这里把ESXI的主题名解析记录添加一下;
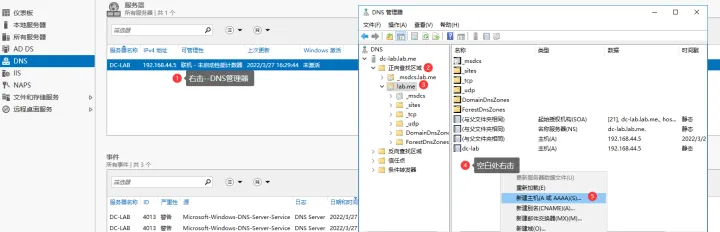
完成后,简单做一下测试;
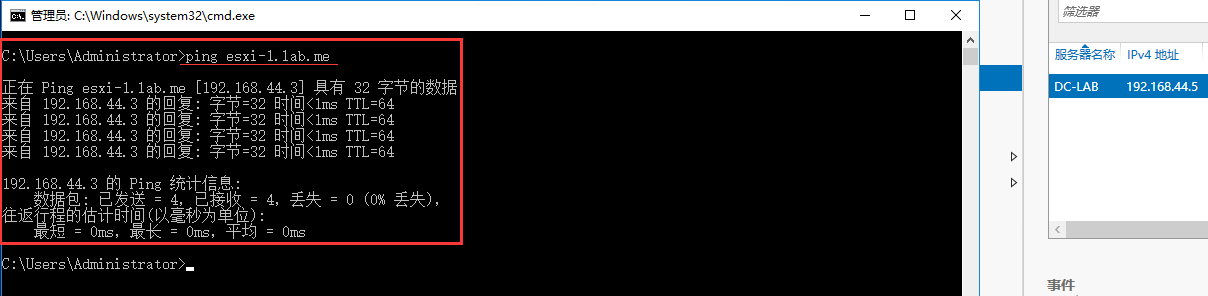
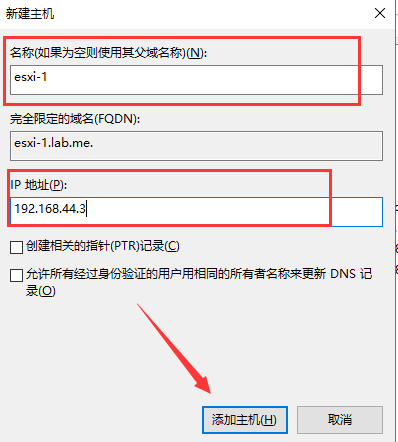
能返回正确地址后,就可以在浏览器里通过主机名的网址访问了 http://esxi-1.lab.me
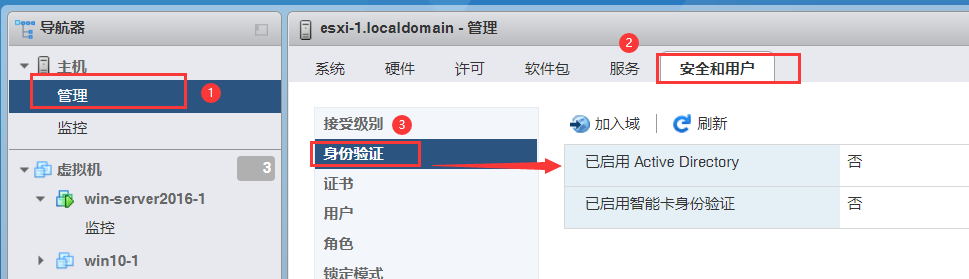
当然,有人可能会讲这有啥意义,讲这些主要是为了更好理解整套体系的运行原理,如果你觉得我在刻意复杂化。就这么说吧,某些组件出于安全原因必须用主机名访问才能用可以看到,现在esxi主机名也叫ESXI;

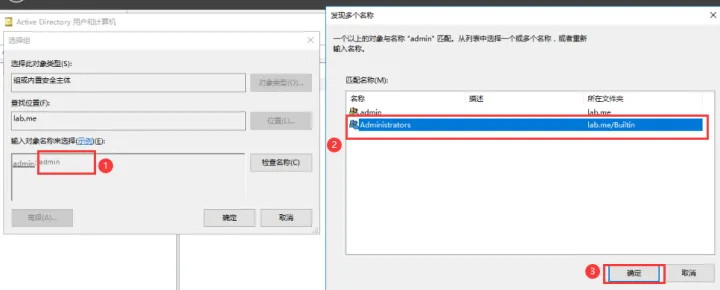
如果我们去管理中心加入域ESXI的主机名,就变成了[主机名.域名]的结构;
注意:身份验证需要使用域管理员的账号密码,也就是Windows域控服务器的管理员账号密码,或者用自己创建并分配好管理员的用户,例如我刚才创建的noid
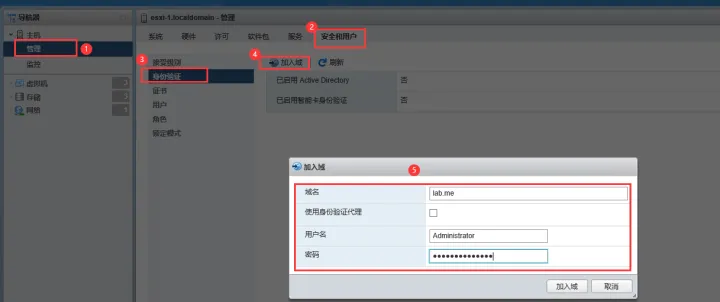
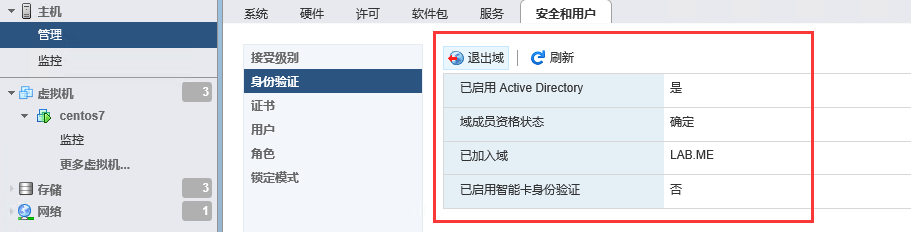
刷新,显示已经成功加入域;
其实我们装了vSphere Client之后也不怎么用这个自带的管理器了,单纯是为了更好的理解主机名这个东西是什么意思;
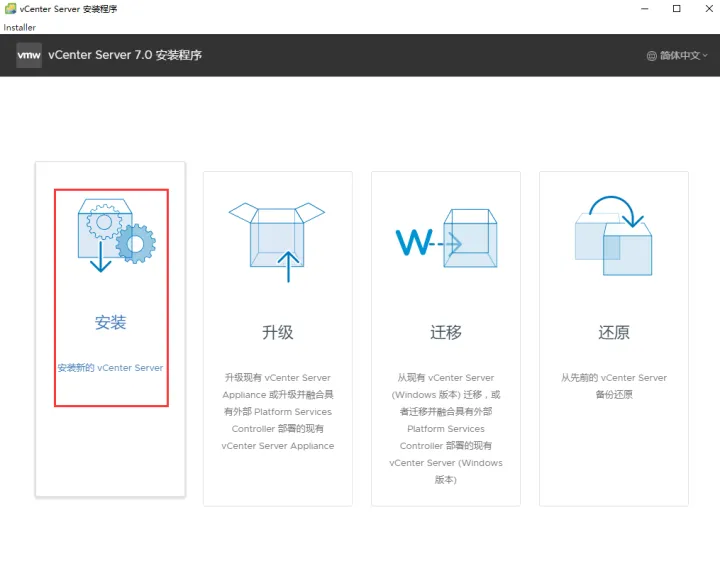
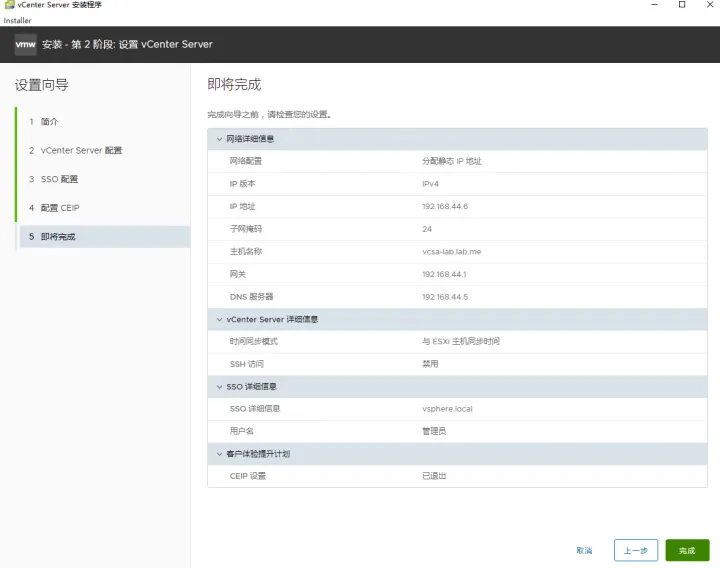
回到安装流程
这里填写ESXI主机的相关信息;
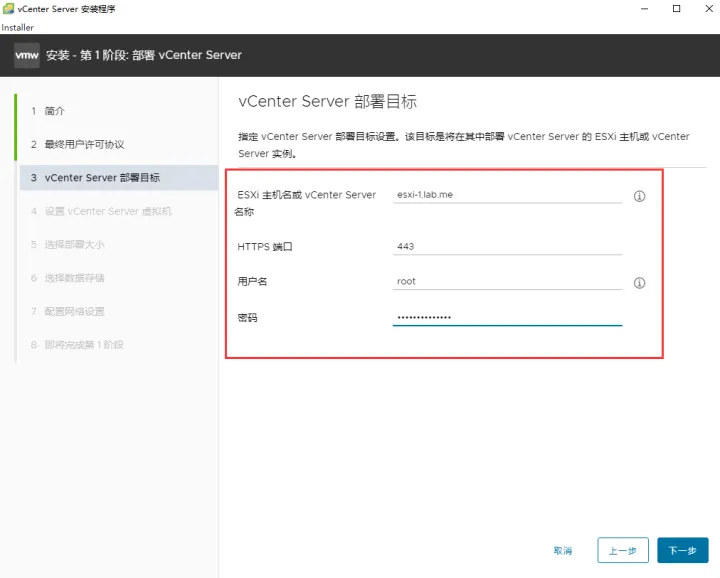
这里虚拟机名字指的就是photo系统虚拟机的名字;

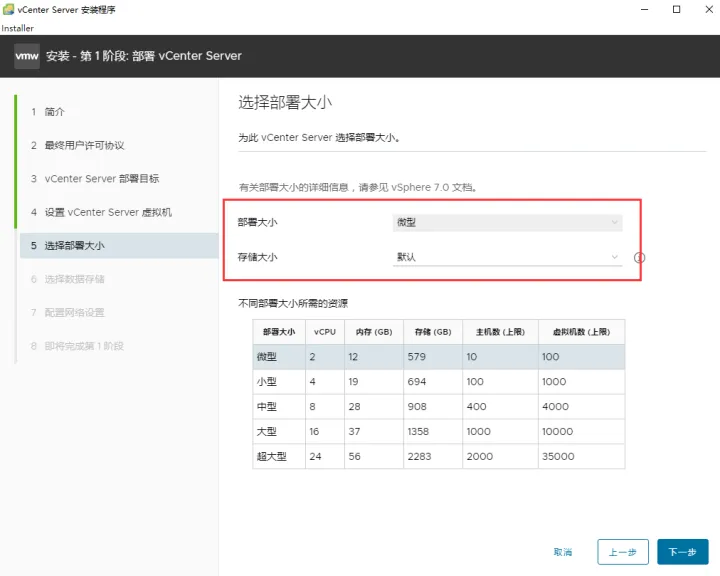
photon这个安装程序就是通过你上一步输入的ESXI主机相关信息连接到esx主机上,并创建一个否存系统的虚拟机作为vCenter server。因此,注册密码是指等会新建的包层系统的管理员密码,默认的微型就可以;
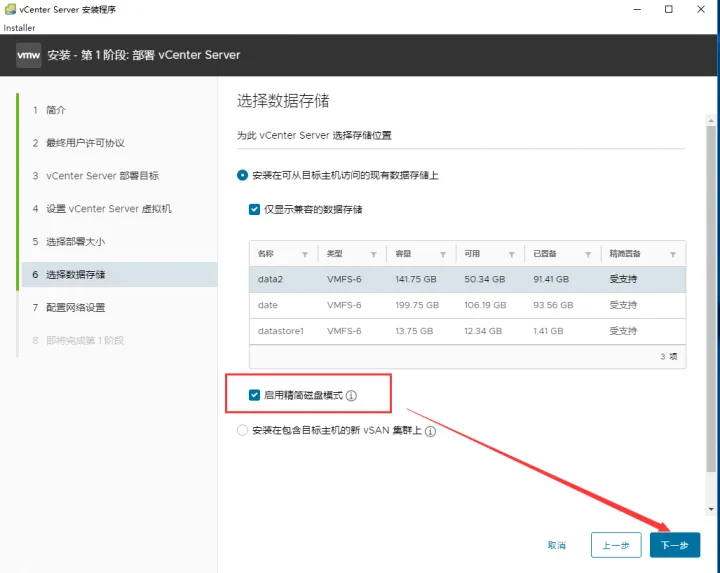
正式环境,建议不要勾精简磁盘;
然后是配置photon系统的网络信息,FQDN。图省事,你可以不填,但如果你填了就一定要解析;
必须指向能解析FQDN的服务器,所以我域控服务器是192.168.44.5,并且域控服务器也作为DNS服务器,所以我就填192.168.44.5
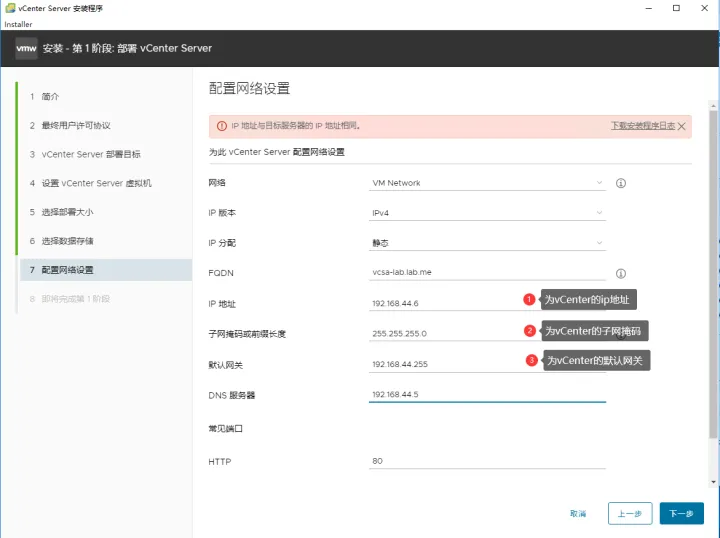
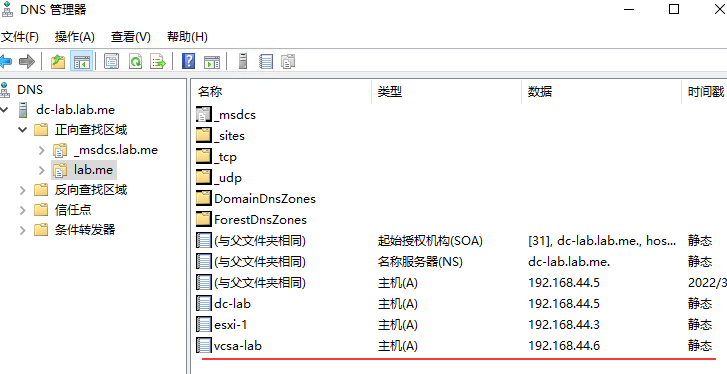
DNS新建一个vcsa-lab主机;所以,dns服器要添加对应的正向解析记录,并且aot的网络配置里dns得填域控服器;
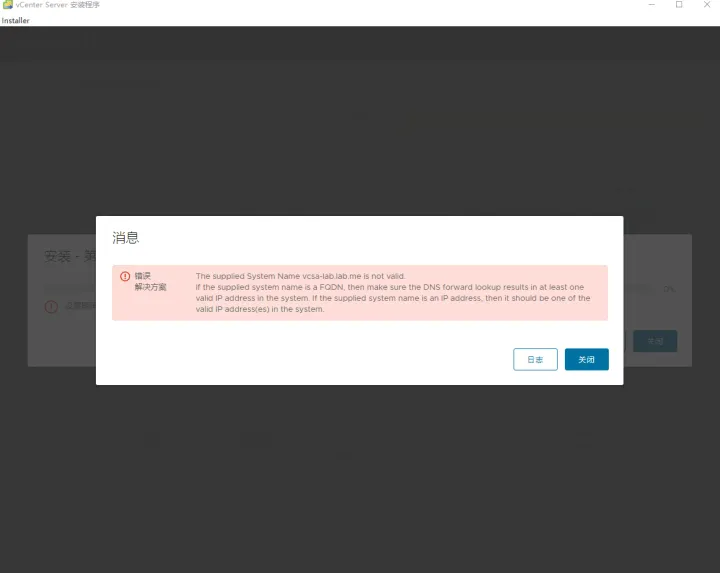
注意:并且dns正向解析记录这个ip地址一定不能填错,否则第二阶段进度条会卡住,最后会提示报错。这里报错的dns正向解析新添加的主机是192.168.44.3。(报错译文: 提供的系统名称vcsa-lab.lab。我是无效的。如果提供的系统名是FQDN,那么请确保DNS正向查找在系统中至少产生一个有效的IP地址。如果提供的系统名是一个IP地址,那么它应该是系统中有效的IP地址之一);
继续,dns服器要添加对应的正向解析记录;

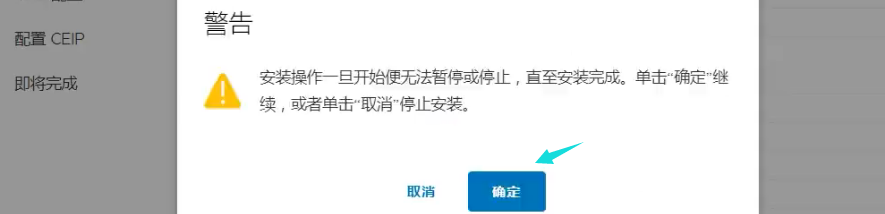
继续安装;
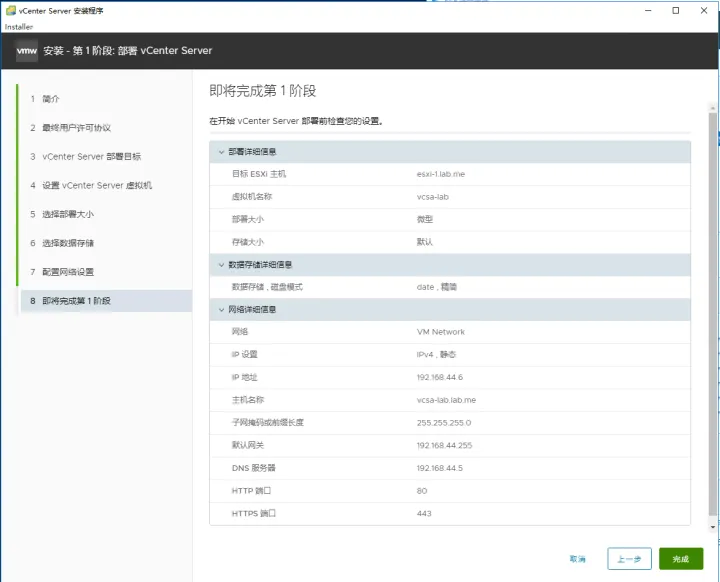
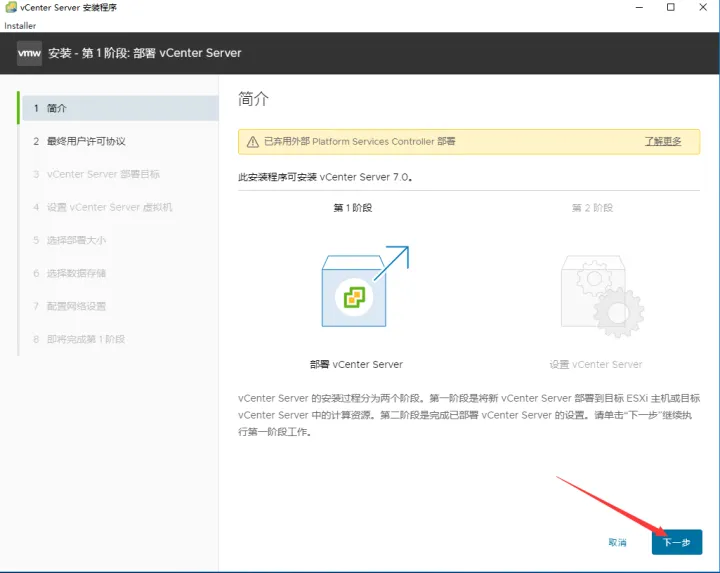
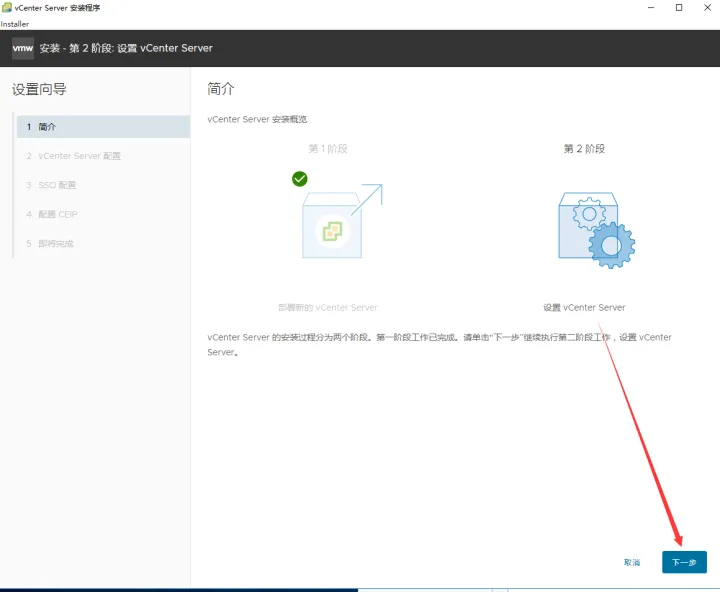
第1阶段vCenter Server部署完成(到这里基于Photon系统的vCenter Server就安装完成了);

在管理平台上已经能看到新建的虚拟机了;
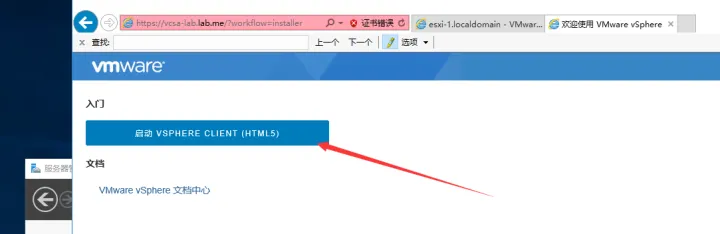
界面和ESXI完全是一个模子,然后继续第二阶段的安装,在photon系统上部署vSphere Client管理平台;

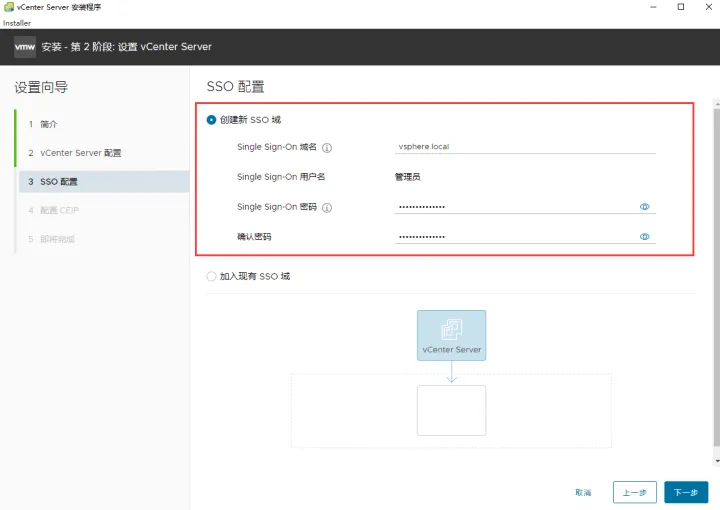
SSO可以不用创建,用本机默认的域就行。这个域和用户名密码一定要记住,这是你vSphere Client管理平台的默认登录账户;
之后一路下一步;

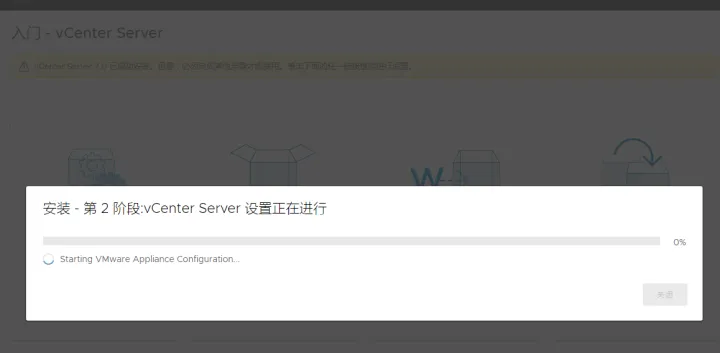
等待10min,进度条岿然不动;

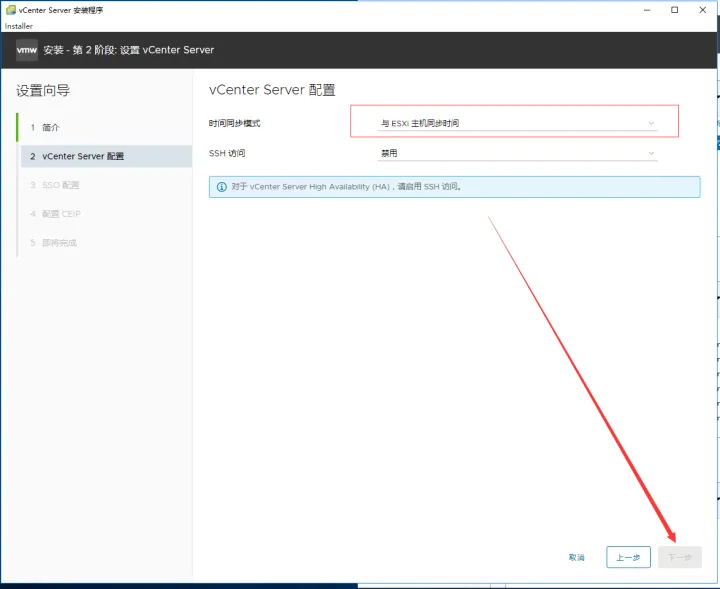
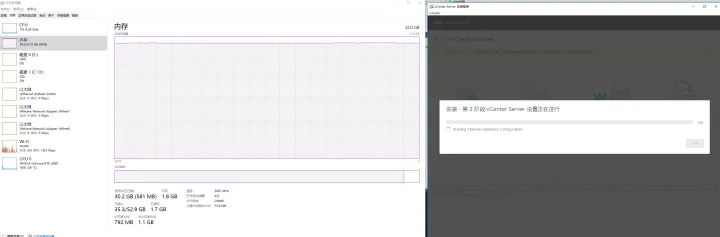
注意:宿主机可以看到,第二阶段安装过程中32G内存时刻处于即将爆掉状态,不过不用担心,只要设置了FQDN并添加DNS正向解析记录的ip是可以正常安装没问题的;
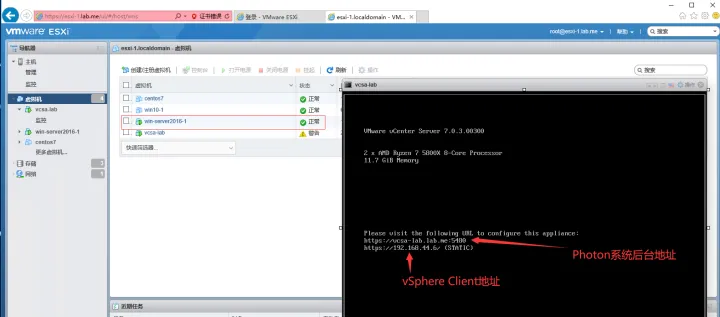
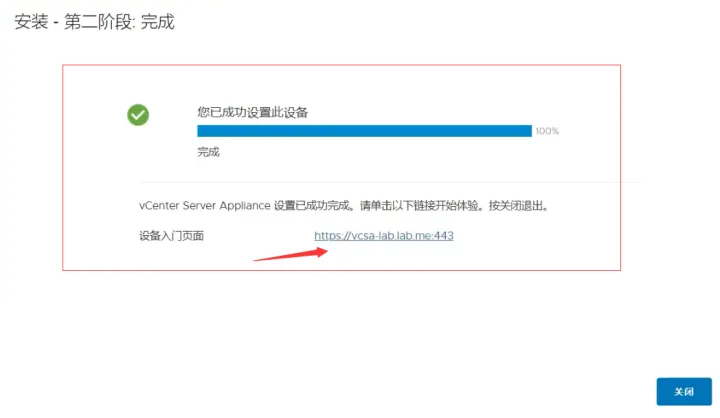
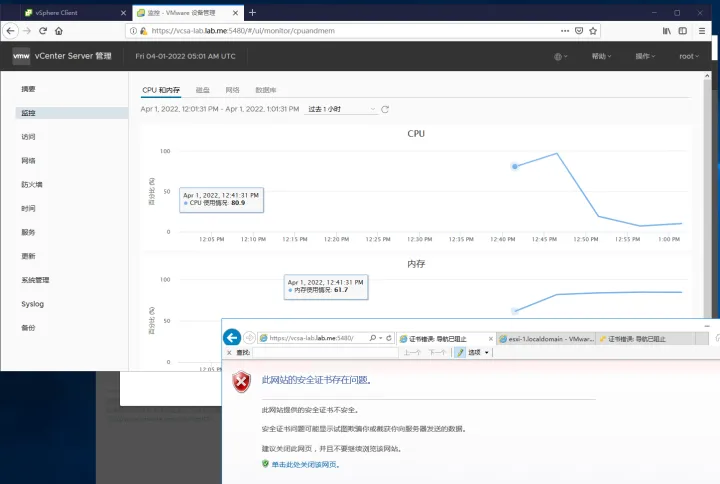
等待缓慢的安装,这里显示安装完成后设备入门页面地址:https://vcsa-lab.lab.me:443
服务启动是很慢的,大概需要十几分钟,所以还得耐心再等一会;
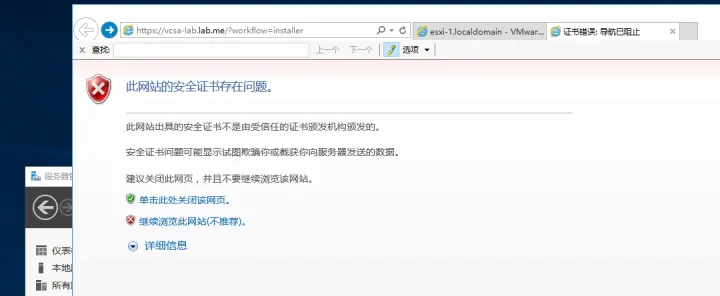
有一定概率ie浏览器玩不起来原因未知,不妨试试换个浏览器;
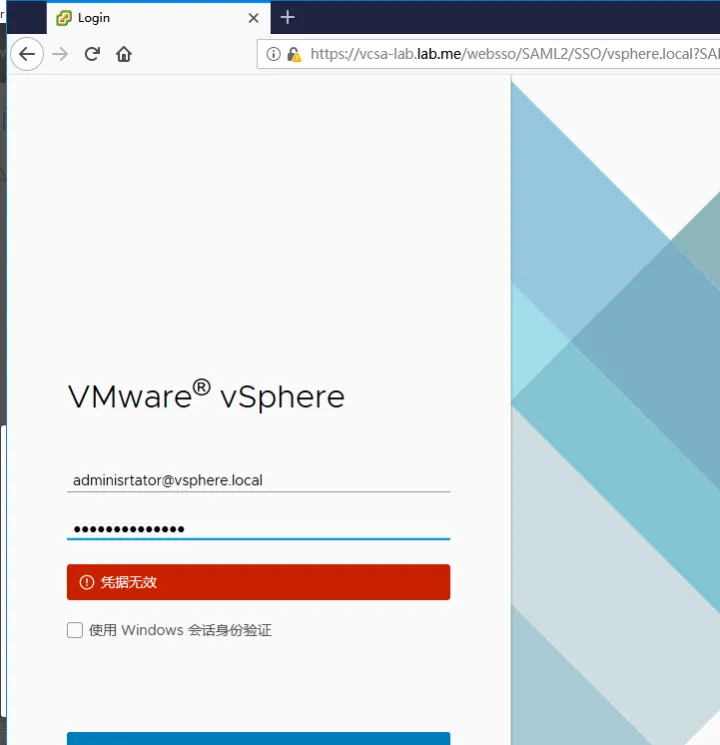
最后一个注意事项,登录时,默认账号后面要加上域名才能成功登录;
至此,vSphere Client的安装部署流程就全部结束了,上述内容牵扯的知识点是非常杂的,如果能坚持看完并反思其中的原理。相信这些内容一定会让你对计算机世界的认知多上一个台阶。
推荐本站淘宝优惠价购买喜欢的宝贝:

本文链接:https://hqyman.cn/post/3451.html 非本站原创文章欢迎转载,原创文章需保留本站地址!

 微信支付宝扫一扫,打赏作者吧~
休息一下~~