
https://cdn.modb.pro/db/538452
很久之前,我们介绍过一个案例(仅操作一台设备,如何实现本地访问另一个相同网段的私网?),在两个站点使用相同的私网地址,并且通过模拟SD-WAN进行打通,然后通过调整两台设备的组合配置,来实现两个站点的互访。
上个实验中,我们使用的是H3C的路由器设备进行测试的,那如果要降低成本,使用VPP进行组网,该如何配置解决呢?


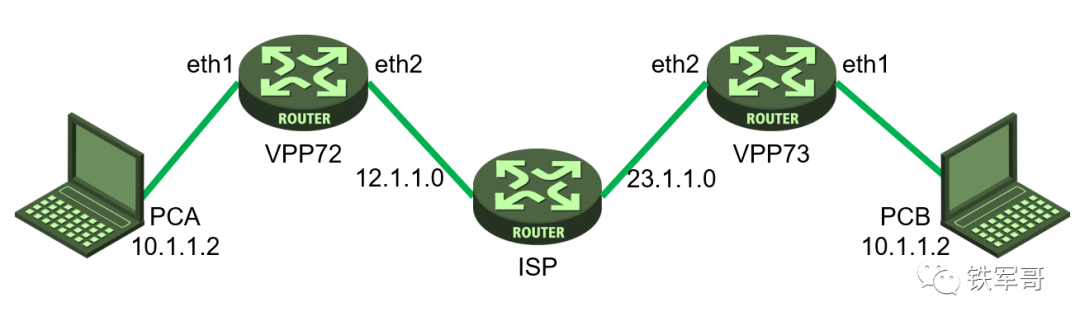
1、某公司有两个办公点,内网网段地址均为10.1.1.0/24,现在通过基于VPP的SD-WAN方案将两个办公点内网打通;同时,因为有生产业务,不能改变主机的IP地址。
2、该公司拥有组网图中所有地址段的所有地址的使用权。
3、需要实现,PCA能够访问PCB。
局域网通过NAT访问另一个地址重叠的局域网(IP访问)
VMWare ESXi 6.7.0(ProLiant DL360 Gen9,48核心,128 GB内存)
H3C VSR1000(Version 7.1.064, Release 0621P18,4核心,4 GB内存)
CentOS Linux 7.9.2009(测试用虚拟机,8核心,16 GB内存)
对于IPsec VPN的配置,相关的介绍已经有几十篇了(IPsec VPN文章及知识点汇总【墙裂建议收藏】)。IPsec仅仅是一种安全封装,底层仍然是IP的隧道接口,所以我们无需考虑中间ISP设备的配置,先建立起VPP72和VPP73之间的IPsec隧道,再新建一个网段配置NAT即可。
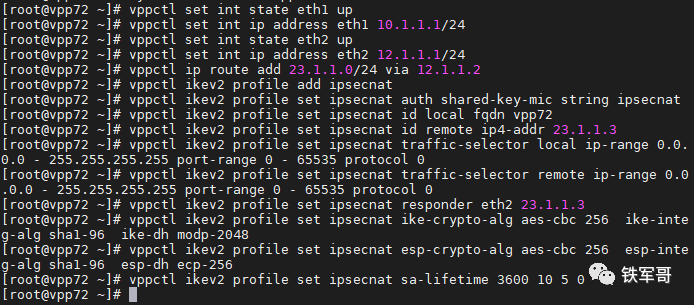
首先参考文章(VPP配置指南:穿越NAT的IPsec VPN配置及性能测试),配置好VPP72和VPP73之间的IPsec隧道。
vppctl set int state eth1 upvppctl set int ip address eth1 10.1.1.1/24vppctl set int state eth2 upvppctl set int ip address eth2 12.1.1.1/24vppctl ip route add 23.1.1.0/24 via 12.1.1.2vppctl ikev2 profile add ipsecnatvppctl ikev2 profile set ipsecnat auth shared-key-mic string ipsecnatvppctl ikev2 profile set ipsecnat id local fqdn vpp72vppctl ikev2 profile set ipsecnat id remote ip4-addr 23.1.1.3vppctl ikev2 profile set ipsecnat traffic-selector local ip-range 0.0.0.0 - 255.255.255.255 port-range 0 - 65535 protocol 0vppctl ikev2 profile set ipsecnat traffic-selector remote ip-range 0.0.0.0 - 255.255.255.255 port-range 0 - 65535 protocol 0vppctl ikev2 profile set ipsecnat responder eth2 23.1.1.3vppctl ikev2 profile set ipsecnat ike-crypto-alg aes-cbc 256 ike-integ-alg sha1-96 ike-dh modp-2048vppctl ikev2 profile set ipsecnat esp-crypto-alg aes-cbc 256 esp-integ-alg sha1-96 esp-dh ecp-256vppctl ikev2 profile set ipsecnat sa-lifetime 3600 10 5 0
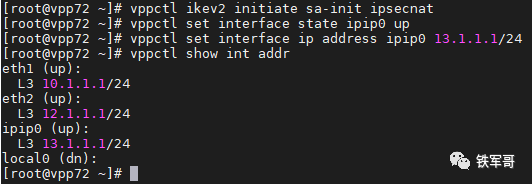
vppctl ikev2 initiate sa-init ipsecnatvppctl set interface state ipip0 upvppctl set interface ip address ipip0 13.1.1.1/24
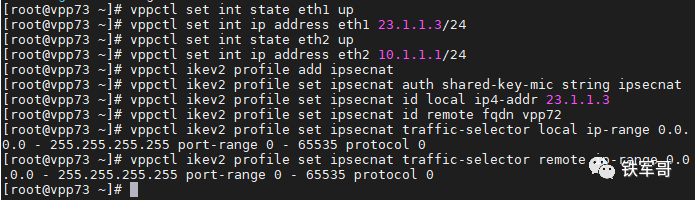
vppctl set int state eth1 upvppctl set int ip address eth1 23.1.1.3/24 vppctl set int state eth2 upvppctl set int ip address eth2 10.1.1.1/24vppctl ikev2 profile add ipsecnatvppctl ikev2 profile set ipsecnat auth shared-key-mic string ipsecnatvppctl ikev2 profile set ipsecnat id local ip4-addr 23.1.1.3vppctl ikev2 profile set ipsecnat id remote fqdn vpp72vppctl ikev2 profile set ipsecnat traffic-selector local ip-range 0.0.0.0 - 255.255.255.255 port-range 0 - 65535 protocol 0vppctl ikev2 profile set ipsecnat traffic-selector remote ip-range 0.0.0.0 - 255.255.255.255 port-range 0 - 65535 protocol 0
vppctl set interface state ipip0 upvppctl set interface ip address ipip0 13.1.1.3/24

#interface GigabitEthernet2/0 ip address 12.1.1.2 255.255.255.0#interface GigabitEthernet3/0 ip address 23.1.1.2 255.255.255.0 nat outbound
我们现在已经建立起了VPP72到VPP73之间的IPsec隧道。我们想让PCA先访问到VPP73的IPsec接口,可以参考(VPP配置指南:NAT“三板斧”),配置如下命令:
vppctl nat44 add address 13.1.1.102vppctl set interface nat44 out ipip0 output-feature
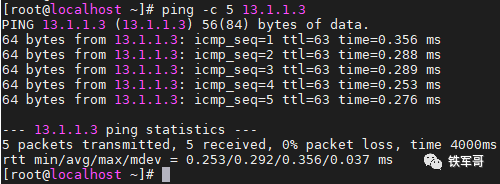
我们可以看到,现在PCA已经可以通过IP地址13.1.1.102访问到VPP73的IPsec隧道接口地址了。
然后我们尝试在VPP73上配置一个DNAT,将PCB(10.1.1.2)一对一映射到IP地址13.1.1.202。
vppctl nat44 add static mapping local 10.1.1.2 external 13.1.1.202vppctl set interface nat44 in ipip0 out eth1 output-feature
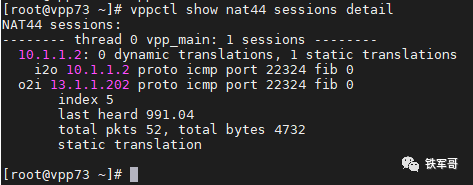
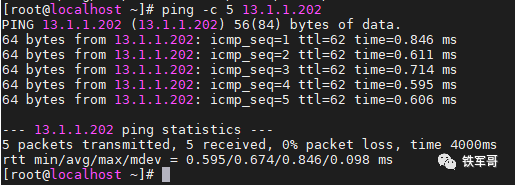
此时,PCA已经可以访问到PCB映射后的地址13.1.1.202了。
最后介绍一下PCA通过地址13.1.1.202来访问PCB的报文转换过程:
1、从VPP72的eth1接口收到请求报文,源地址为10.1.1.2,目的地址为13.1.1.202;
2、在VPP72的ipip0接口上做SNAT转换,转换后的源地址为13.1.1.102,目的地址为13.1.1.202;
3、报文到达VPP73,在ipip0接口上做DNAT转换,转换后的源地址为13.1.1.102,目的地址为10.1.1.2;
4、报文到达PCB进行处理,处理完成后返回VPP73;
5、VPP73从接口eth1接收到响应报文,源地址为10.1.1.2,目的地址为13.1.1.102,匹配接口ipip0的NAT会话,做NAT转换,转换后的源地址为13.1.1.202,目的地址13.1.1.102,将报文转发到接口ipip0;
7、VPP72从接口ipip0接收到响应报文,匹配接口ipip0的NAT会话,做NAT转换,转换后的源地址为13.1.1.202,目的地址10.1.1.2,并发出报文;
8、PCA收到PCB的响应报文,转发结束。
推荐本站淘宝优惠价购买喜欢的宝贝:

本文链接:https://hqyman.cn/post/3453.html 非本站原创文章欢迎转载,原创文章需保留本站地址!

 微信支付宝扫一扫,打赏作者吧~
休息一下~~