
centos7上进行一下操作
[root@localhost ~]# yum install tigervnc-server -y#安装vnc服务器
Loaded plugins: fastestmirror, langpacks
base | 3.6 kB 00:00:00
extras | 3.4 kB 00:00:00
updates | 3.4 kB 00:00:00
(1/2): extras/7/x86_64/primary_db | 129 kB 00:00:00
(2/2): updates/7/x86_64/primary_db | 3.6 MB 00:00:00
Loading mirror speeds from cached hostfile
* base: mirrors.aliyun.com
* extras: mirrors.163.com
* updates: mirrors.zju.edu.cn
Resolving Dependencies
--> Running transaction check
---> Package tigervnc-server.x86_64 0:1.8.0-1.el7 will be installed
--> Finished Dependency Resolution
Dependencies Resolved
=========================================================================================================================================================
Package Arch Version Repository Size
=========================================================================================================================================================
Installing:
tigervnc-server x86_64 1.8.0-1.el7 base 213 k
Transaction Summary
=========================================================================================================================================================
Install 1 Package
Total download size: 213 k
Installed size: 504 k
Downloading packages:
tigervnc-server-1.8.0-1.el7.x86_64.rpm | 213 kB 00:00:01
Running transaction check
Running transaction test
Transaction test succeeded
Running transaction
Warning: RPMDB altered outside of yum.
Installing : tigervnc-server-1.8.0-1.el7.x86_64 1/1
Verifying : tigervnc-server-1.8.0-1.el7.x86_64 1/1
Installed:
tigervnc-server.x86_64 0:1.8.0-1.el7
Complete!
[root@localhost ~]# vncserver #启动服务器
You will require a password to access your desktops.
Password:#这里设置的密码是可以操控服务器的,连接时输入这个密码,或者下面的密码
Verify:
Would you like to enter a view-only password (y/n)? y#设置一个只可以查看,但是无法操作,相当于录制屏幕而已,如果不需要可以选n
Password:
Password must be at least 6 characters - try again
Password:
Verify:
New 'localhost.localdomain:1 (root)' desktop is localhost.localdomain:1
Creating default startup script /root/.vnc/xstartup
Creating default config /root/.vnc/config
Starting applications specified in /root/.vnc/xstartup
Log file is /root/.vnc/localhost.localdomain:1.log
[root@localhost ~]# vncserver :1#开启远程端口
A VNC server is already running as :1
New 'localhost.localdomain:2 (root)' desktop is localhost.localdomain:2
Starting applications specified in /root/.vnc/xstartup
Log file is /root/.vnc/localhost.localdomain:2.log
[root@localhost ~]# ifconfig|grep inet#查看服务器ip,用来远程连接
inet 10.0.3.66 netmask 255.255.255.0 broadcast 10.0.3.255
inet6 fe80::c808:e090:6136:4632 prefixlen 64 scopeid 0x20<link>
inet6 fe80::4083:92b7:c2f3:d09a prefixlen 64 scopeid 0x20<link>
inet 127.0.0.1 netmask 255.0.0.0
inet6 ::1 prefixlen 128 scopeid 0x10<host>
inet 192.168.122.1 netmask 255.255.255.0 broadcast 192.168.122.255
[root@localhost ~]# 注意关闭防火墙和selinux
在win10上
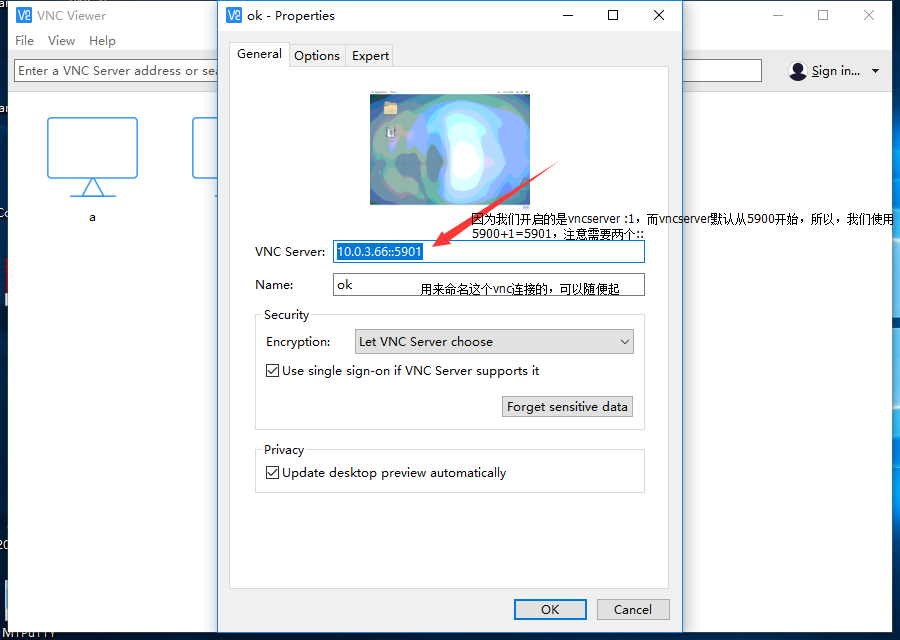
接下来输入密码就可以了

推荐本站淘宝优惠价购买喜欢的宝贝:

本文链接:https://hqyman.cn/post/348.html 非本站原创文章欢迎转载,原创文章需保留本站地址!

 微信支付宝扫一扫,打赏作者吧~
休息一下~~