安装前首先配置DNS

配置方法:

#vi /etc/resolv.conf

nameserver=114.114.114.114

search localdomain

配完后可以ping  www.baidu.com看是否配置成功

Ovrit部署虚拟机主要分为五部分

  1. Vorit engine安装

  2. 安装计算节点

  3. 存储部署(此文档用的是NFS存储)

  4. spice客户端安装

  5. 创建虚拟机

  6. Ping通网络

  7. 解决乌班图无法链接Xshell和Xftp的问题(如果装的linux是乌班图版本)

第一步:Vorit-engine安装

1)、安装源

# yum install -y  http://resources.ovirt.org/pub/yum-repo/ovirt-release43.rpm

2)、安装ovirt-engine

# yum install -y ovirt-engine

3).配置ovirt-engine

ovirt-engine安装完成后需要运行首次配置向导

# engine-setup

(配置向导比较多,需要注意的地方红色标出,未标出的直接回车下一步)

[ INFO  ] Stage: Initializing
[ INFO  ] Stage: Environment setup
          Configuration files: ['/etc/ovirt-engine-setup.conf.d/10-packaging-jboss.conf', '/etc/ovirt-engine-setup.conf.d/10-packaging.conf']
          Log file: /var/log/ovirt-engine/setup/ovirt-engine-setup-20190420195341-6bsbdg.log
          Version: otopi-1.7.7 (otopi-1.7.7-1.el7.centos)
[ INFO  ] Stage: Environment packages setup
[ INFO  ] Stage: Programs detection
[ INFO  ] Stage: Environment setup
[ INFO  ] Stage: Environment customization1.2.3.4.5.6.7.8.9.


          --== PRODUCT OPTIONS ==--

在这之前回出现是否安装一个什么集合,手动输入yes,然后又出现询问,手动输入yes,一共两个)


Configure Engine on this host (Yes, No) [Yes]: 回车
          Configure ovirt-provider-ovn (Yes, No) [Yes]: 回车(OVN:Open Virtual Network,配置虚拟网络)
          Configure Image I/O Proxy on this host (Yes, No) [Yes]: 回车(Image I/O Proxy可以支持向oVirt平台中上传虚拟机的磁盘镜像)
          Configure WebSocket Proxy on this host (Yes, No) [Yes]: 回车(WebSocket Proxy用来支持使用noVNC远程登录虚拟机图形界面管理)1.2.3.4.


* Please note * : Data Warehouse is required for the engine.
          If you choose to not configure it on this host, you have to configure
          it on a remote host, and then configure the engine on this host so
          that it can access the database of the remote Data Warehouse host.
          Configure Data Warehouse on this host (Yes, No) [Yes]: 回车(在本机配置数据库)
          Configure VM Console Proxy on this host (Yes, No) [Yes]: 回车(支持访问虚拟机的串口console通信)
         
          --== PACKAGES ==--1.2.3.4.5.6.7.8.


[ INFO  ] Checking for product updates...
[ INFO  ] No product updates found
         
          --== NETWORK CONFIGURATION ==--
         
          Host fully qualified DNS name of this server [localhost.localdomain]: 回车(使用默认hostname就行,反正是准备用IP地址访问无所谓)
[WARNING] Failed to resolve localhost.localdomain using DNS, it can be resolved only locally
          Setup can automatically configure the firewall on this system.
          Note: automatic configuration of the firewall may overwrite current settings.
          NOTICE: iptables is deprecated and will be removed in future releases1.2.3.4.5.6.7.8.9.10.

(没关防火墙选择yes,关了的话选择no)


--== DATABASE CONFIGURATION ==--1.

          Where is the DWH database located? (Local, Remote) [Local]: 回车(DWH:Data WareHouse使用本地数据库)

          Setup can configure the local postgresql server automatically for the DWH to run. This may conflict with existing applications.

          Would you like Setup to automatically configure postgresql and create DWH database, or prefer to perform that manually? (Automatic, Manual) [Automatic]: 回车(自动配置PostGreSQL数据库)

          Where is the Engine database located? (Local, Remote) [Local]: 回车(Engine用到的数据库位于本机)

          Setup can configure the local postgresql server automatically for the engine to run. This may conflict with existing applications.

          Would you like Setup to automatically configure postgresql and create Engine database, or prefer to perform that manually? (Automatic, Manual) [Automatic]: 回车(使用安装程序自动创建Engine数据库)


--== OVIRT ENGINE CONFIGURATION ==--1.


输入后台管理员admin的密码回车

再输入一遍密码回车
          Application mode (Virt, Gluster, Both) [Both]: 回车
          Use default credentials (admin@internal) for ovirt-provider-ovn (Yes, No) [Yes]: 回车(使用默认的admin@internal内部管理员账号)
         
          --== STORAGE CONFIGURATION ==--
         
          Default SAN wipe after delete (Yes, No) [No]: 回车(yes的话在删除虚拟机的虚拟磁盘后会擦除存储设备上的对应块)
         
          --== PKI CONFIGURATION ==--
         
          Organization name for certificate [localdomain]: 回车
         
          --== APACHE CONFIGURATION ==--
         
          Setup can configure the default page of the web server to present the application home page. This may conflict with existing applications.
          Do you wish to set the application as the default page of the web server? (Yes, No) [Yes]: 回车(使用apache作为web服务器)
          Setup can configure apache to use SSL using a certificate issued from the internal CA.
          Do you wish Setup to configure that, or prefer to perform that manually? (Automatic, Manual) [Automatic]: 回车(自动配置CA证书)
         
          --== SYSTEM CONFIGURATION ==--
         
         
          --== MISC CONFIGURATION ==--
         
          Please choose Data Warehouse sampling scale:
          (1) Basic
          (2) Full
          (1, 2)[1]: 回车(使用基本的数据库示例初始化数据)
         
          --== END OF CONFIGURATION ==--
         
[ INFO  ] Stage: Setup validation
[WARNING] Cannot validate host name settings, reason: resolved host does not match any of the local addresses
[WARNING] Warning: Not enough memory is available on the host. Minimum requirement is 4096MB, and 16384MB is recommended.
          Do you want Setup to continue, with amount of memory less than recommended? (Yes, No) [No]: yes回车(因为是在虚拟机上装的,内存有点小,才会提示这个)
         
          --== CONFIGURATION PREVIEW ==--
         
          Application mode                        : both
          Default SAN wipe after delete           : False
          Update Firewall                         : False
          Host FQDN                               : localhost.localdomain
          Configure local Engine database         : True
          Set application as default page         : True
          Configure Apache SSL                    : True
          Engine database secured connection      : False
          Engine database user name               : engine
          Engine database name                    : engine
          Engine database host                    : localhost
          Engine database port                    : 5432
          Engine database host name validation    : False
          Engine installation                     : True
          PKI organization                        : localdomain
          Set up ovirt-provider-ovn               : True
          Configure WebSocket Proxy               : True
          DWH installation                        : True
          DWH database host                       : localhost
          DWH database port                       : 5432
          Configure local DWH database            : True
          Configure Image I/O Proxy               : True
          Configure VMConsole Proxy               : True
         
          Please confirm installation settings (OK, Cancel) [OK]: 回车
[ INFO  ] Stage: Transaction setup
[ INFO  ] Stopping engine service
[ INFO  ] Stopping ovirt-fence-kdump-listener service
[ INFO  ] Stopping dwh service
[ INFO  ] Stopping Image I/O Proxy service
[ INFO  ] Stopping vmconsole-proxy service
[ INFO  ] Stopping websocket-proxy service
[ INFO  ] Stage: Misc configuration
[ INFO  ] Stage: Package installation
[ INFO  ] Stage: Misc configuration
[ INFO  ] Upgrading CA
[ INFO  ] Initializing PostgreSQL
[ INFO  ] Creating PostgreSQL 'engine' database
[ INFO  ] Configuring PostgreSQL
[ INFO  ] Creating PostgreSQL 'ovirt_engine_history' database
[ INFO  ] Configuring PostgreSQL
[ INFO  ] Creating CA
[ INFO  ] Creating/refreshing DWH database schema
[ INFO  ] Configuring Image I/O Proxy
[ INFO  ] Setting up ovirt-vmconsole proxy helper PKI artifacts
[ INFO  ] Setting up ovirt-vmconsole SSH PKI artifacts
[ INFO  ] Configuring WebSocket Proxy
[ INFO  ] Creating/refreshing Engine database schema
[ INFO  ] Creating/refreshing Engine 'internal' domain database schema
[ INFO  ] Adding default OVN provider to database
[ INFO  ] Adding OVN provider secret to database
[ INFO  ] Setting a password for internal user admin
[ INFO  ] Generating post install configuration file '/etc/ovirt-engine-setup.conf.d/20-setup-ovirt-post.conf'
[ INFO  ] Stage: Transaction commit
[ INFO  ] Stage: Closing up
[ INFO  ] Starting engine service
[ INFO  ] Starting dwh service
[ INFO  ] Restarting ovirt-vmconsole proxy service
         
          --== SUMMARY ==--
         
[ INFO  ] Restarting httpd
          In order to configure firewalld, copy the files from
              /etc/ovirt-engine/firewalld to /etc/firewalld/services
              and execute the following commands:
              firewall-cmd --permanent --add-service ovirt-postgres
              firewall-cmd --permanent --add-service ovirt-https
              firewall-cmd --permanent --add-service ovn-central-firewall-service
              firewall-cmd --permanent --add-service ovirt-fence-kdump-listener
              firewall-cmd --permanent --add-service ovirt-imageio-proxy
              firewall-cmd --permanent --add-service ovirt-websocket-proxy
              firewall-cmd --permanent --add-service ovirt-http
              firewall-cmd --permanent --add-service ovirt-vmconsole-proxy
              firewall-cmd --permanent --add-service ovirt-provider-ovn
              firewall-cmd --reload
          The following network ports should be opened:
              tcp:2222
              tcp:35357
              tcp:443
              tcp:5432
              tcp:54323
              tcp:6100
              tcp:6641
              tcp:6642
              tcp:80
              tcp:9696
              udp:7410
          An example of the required configuration for iptables can be found at:
              /etc/ovirt-engine/iptables.example
          Please use the user 'admin@internal' and password specified in order to login
          Web access is enabled at:
              http://localhost.localdomain:80/ovirt-engine
              https://localhost.localdomain:443/ovirt-engine
          Internal CA 95:CB:1A:EA:A7:CC:48:A3:14:8F:79:8D:BC:07:4F:98:D7:EB:B4:19
          SSH fingerprint: SHA256:ltDYySFckI6bPO0OV+yzErG3YVqgA8zBnHZkEK3bWRs
[WARNING] Warning: Not enough memory is available on the host. Minimum requirement is 4096MB, and 16384MB is recommended.
         
          --== END OF SUMMARY ==--
     
[ INFO  ] Stage: Clean up
          Log file is located at /var/log/ovirt-engine/setup/ovirt-engine-setup-20190420195341-6bsbdg.log
[ INFO  ] Generating answer file '/var/lib/ovirt-engine/setup/answers/20190420195951-setup.conf'
[ INFO  ] Stage: Pre-termination
[ INFO  ] Stage: Termination
[ INFO  ] Execution of setup completed successfully1.2.3.4.5.6.7.8.9.10.11.12.13.14.15.16.17.18.19.20.21.22.23.24.25.26.27.28.29.30.31.32.33.34.35.36.37.38.39.40.41.42.43.44.45.46.47.48.49.50.51.52.53.54.55.56.57.58.59.60.61.62.63.64.65.66.67.68.69.70.71.72.73.74.75.76.77.78.79.80.81.82.83.84.85.86.87.88.89.90.91.92.93.94.95.96.97.98.99.100.101.102.103.104.105.106.107.108.109.110.111.112.113.114.115.116.117.118.119.120.121.122.123.124.125.126.127.128.129.130.131.132.133.134.135.136.137.138.139.140.141.142.143.

4)、ovirt取消主机名解析,修改文件

# vi /etc/ovirt-engine/engine.conf.d/99-sso.conf
SSO_CALLBACK_PREFIX_CHECK=false1.2.

5)、重启ovirt-engine服务

# service ovirt-engine restart1.

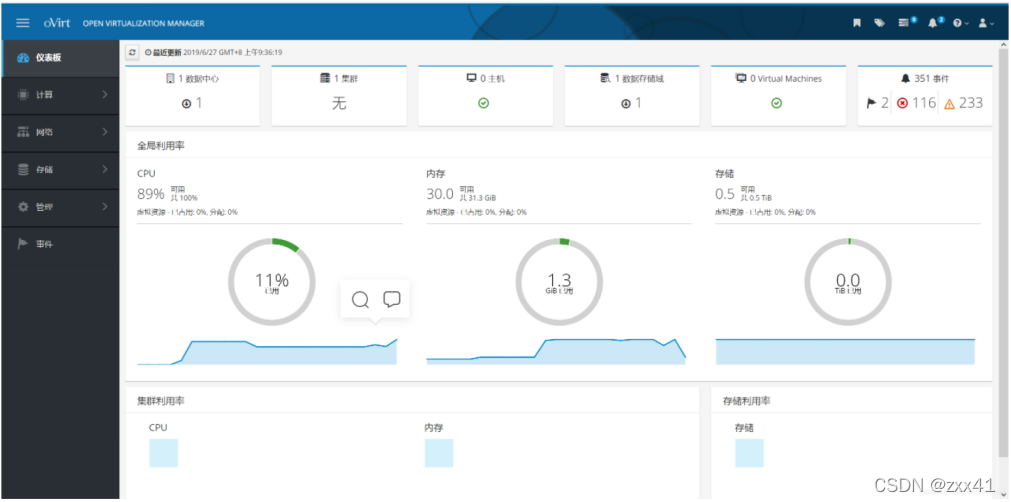
6)、通过ovirt-engine的节点地址登录web

在windows浏览器中输入:https://ip/ovirt-engine

ovirt迁移到kvm ovirt安装部署_linux

点击“管理门户”

用户名admin

密码:上述安装过程输入的密码

ovirt迁移到kvm ovirt安装部署_linux_02

第二步、安装计算节点

1)、安装源:

# yum install -y  http://resources.ovirt.org/pub/yum-repo/ovirt-release43.rpm

2)、安装软件

# yum -y install qemu-kvm libvirt virt-install bridge-utils vdsm

3)、启动服务并设置开机启动

# systemctl start libvirtd

# systemctl enable libvirtd

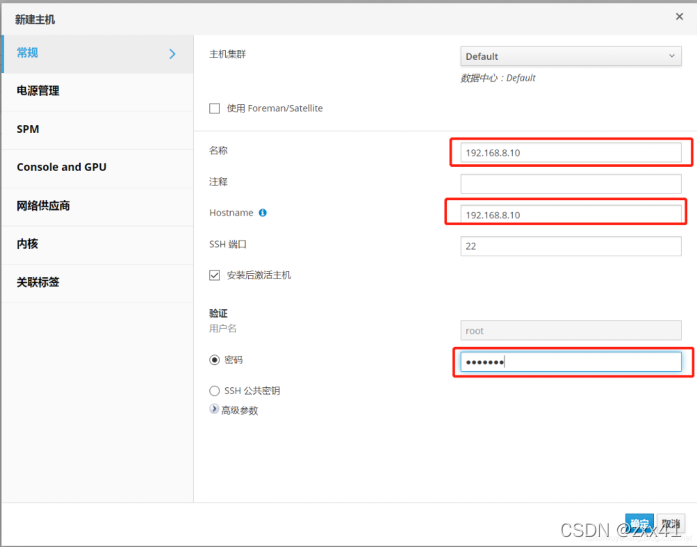
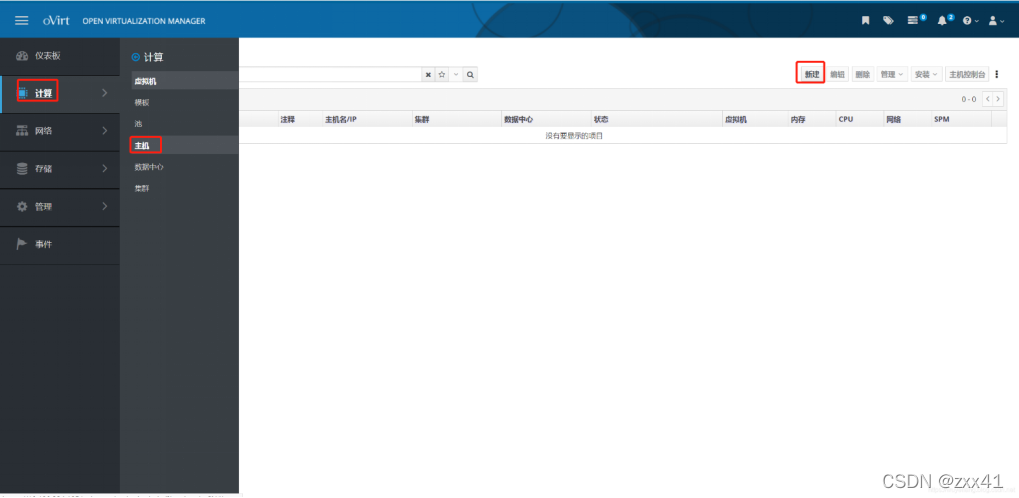
添加节点
ovirt迁移到kvm ovirt安装部署_debian_03

输入节点的Ip地址和root密码

ovirt迁移到kvm ovirt安装部署_ios_04

此处忽略电源管理

ovirt迁移到kvm ovirt安装部署_linux_05

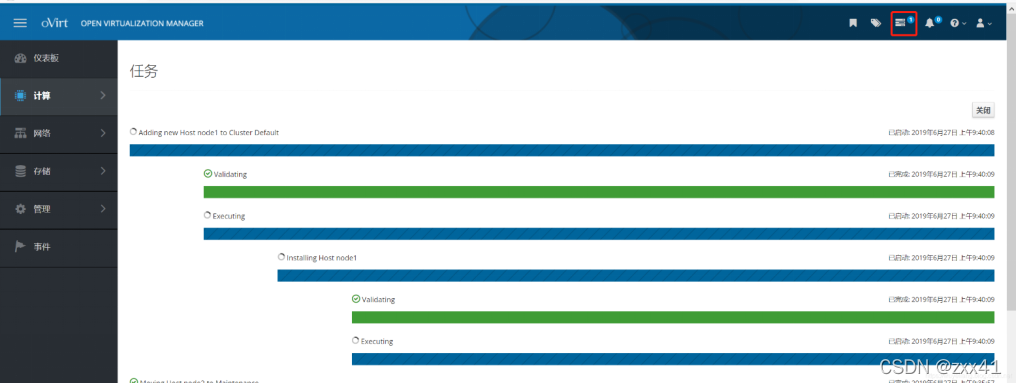
点击事件可以看到过程

ovirt迁移到kvm ovirt安装部署_ovirt迁移到kvm_06

节点正在安装过程

ovirt迁移到kvm ovirt安装部署_ovirt迁移到kvm_07

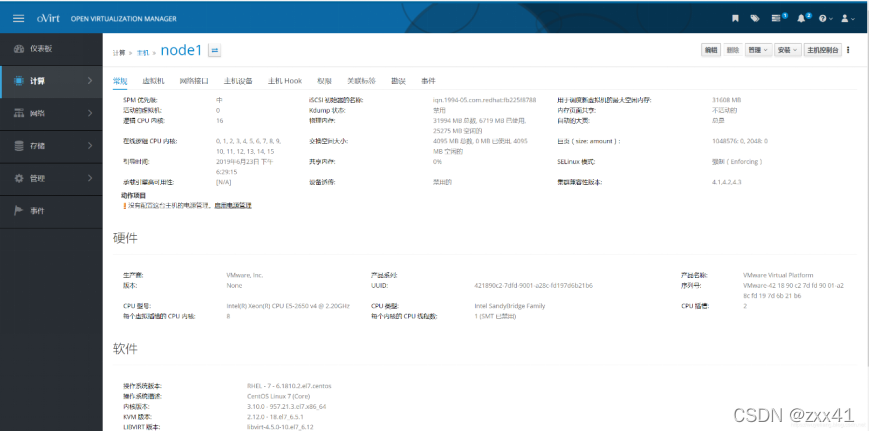
添加完成之后可以看到节点信息

ovirt迁移到kvm ovirt安装部署_debian_08

第三步、存储部署(此文档用的是NFS存储)

1)开启nfs服务

[root@localhos ~]# chkconfig rpcbind on
Note: Forwarding request to 'systemctl enable rpcbind.service'.
[root@localhos ~]# chkconfig nfs on
Note: Forwarding request to 'systemctl enable nfs.service'.
Created symlink from /etc/systemd/system/multi-user.target.wants/nfs-server.service to /usr/lib/systemd/system/nfs-server.service.
[root@localhos ~]# service rpcbind start
Redirecting to /bin/systemctl start rpcbind.service
//检查服务状态
[root@localhos ~]# service rpcbind status
Redirecting to /bin/systemctl status rpcbind.service
● rpcbind.service - RPC bind service
   Loaded: loaded (/usr/lib/systemd/system/rpcbind.service; enabled; vendor preset: enabled)
   Active: active (running) since Thu 2019-05-09 09:54:22 CST; 5h 4min ago
 Main PID: 6829 (rpcbind)
   CGroup: /system.slice/rpcbind.service
           └─6829 /sbin/rpcbind -w
May 09 09:54:22 node43 systemd[1]: Starting RPC bind service...
May 09 09:54:22 node43 systemd[1]: Started RPC bind service.1.2.3.4.5.6.7.8.9.10.11.12.13.14.15.16.17.18.

2)创建用于共享的文件夹

[root@localhos /]# mkdir data
[root@localhos /]# cd /data
[root@localhos data]# mkdir vmstorage(注意:在这之前先在根目录下创建data文件夹)
[root@localhos data]# mkdir ISO
[root@localhos data]# ls
images  vmstorage ISO
3)创建共享存储域
[root@node43 data]# chown 36:36 /data/ISO/ //更改文件夹权限给vdsm和kvm组
[root@node43 data]# chmod 755 /data/ISO/
[root@node43 data]# chown 36:36 /data/vmstorage/
[root@node43 data]# chmod 755 /data/vmstorage/
[root@node43 data]# vi /etc/exports
/data/ISO 0.0.0.0/0.0.0.0(rw,sync)
/data/vmstorage 0.0.0.0/0.0.0.0(rw,sync)
4)启动nfs服务,使上述配置生效
[root@node43 data]# exportfs -a
[root@node43 data]# service rpcbind start
Redirecting to /bin/systemctl start rpcbind.service
[root@node43 data]# service nfs-server start
Redirecting to /bin/systemctl start nfs-server.service
[root@node43 data]# systemctl enable rpcbind nfs-server1.2.3.4.5.6.7.8.9.10.11.12.13.14.15.16.17.18.19.20.21.

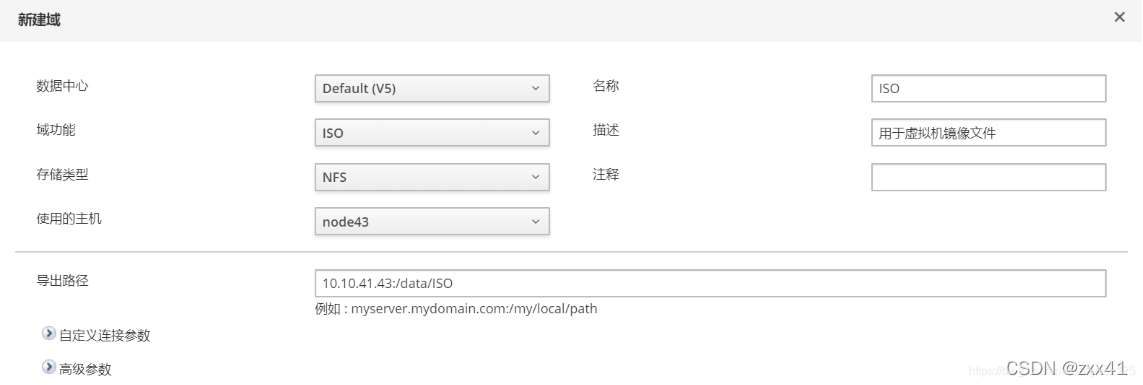
5)engine管理页面添加存储域

新建存储域

ovirt迁移到kvm ovirt安装部署_运维_09

新建镜像域

ovirt迁移到kvm ovirt安装部署_debian_10

创建成功

ovirt迁移到kvm ovirt安装部署_ios_11

6) 上传镜像文件

进行完上述操作,成功添加存储域后,查看node43的data目录,发现已经更新下级的文件夹

[root@node43 ~]# cd /data/ISO/
[root@node43 ISO]# ls
9aa52acd-acff-4383-80c2-06ac59f4a622  __DIRECT_IO_TEST__
[root@node43 ISO]# cd 9aa52acd-acff-4383-80c2-06ac59f4a622/
[root@node43 9aa52acd-acff-4383-80c2-06ac59f4a622]# ls
dom_md  images1.2.3.4.5.6.

将iso文件传到/data/ISO/9aa52acd-acff-4383-80c2-06ac59f4a622(这个文件名略有区别,不用在意)/images/11111111-1111-1111-1111-111111111111目录下,之后不需要再进行文件权限修改即可正常使用。(这里可以用xftp远程软件查看)

ovirt迁移到kvm ovirt安装部署_ios_12

第四步、spice客户端安装

本文选用spice客户端来访问虚拟机,因此需要在使用windows的机子上安装一个virt-viewer(也就是官方推荐的remote-viewer客户端),官网直接下载即可,没什么技巧。使用linux的机子就更简单啦~直接yum install virt-viewer即可。

ovirt迁移到kvm ovirt安装部署_ios_13

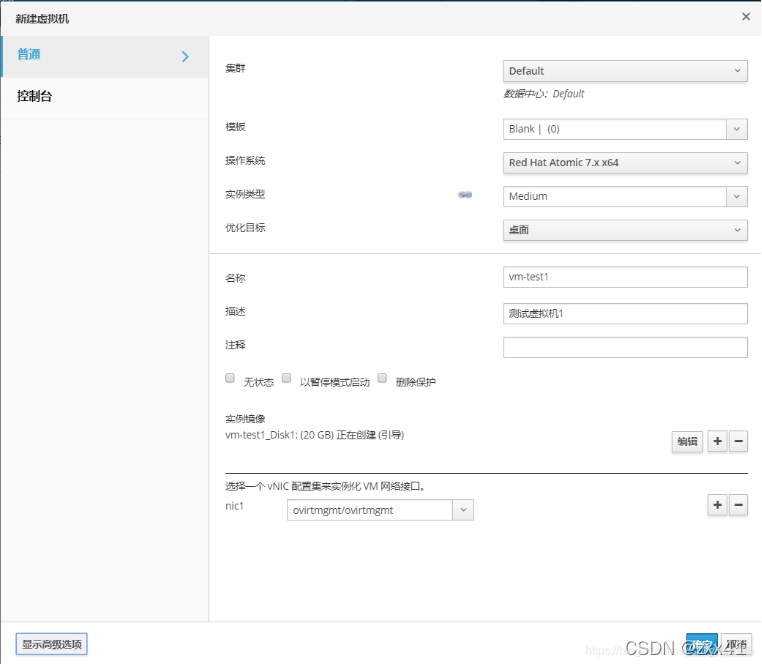
第五步、创建虚拟机

新建虚拟机配置

ovirt迁移到kvm ovirt安装部署_debian_14

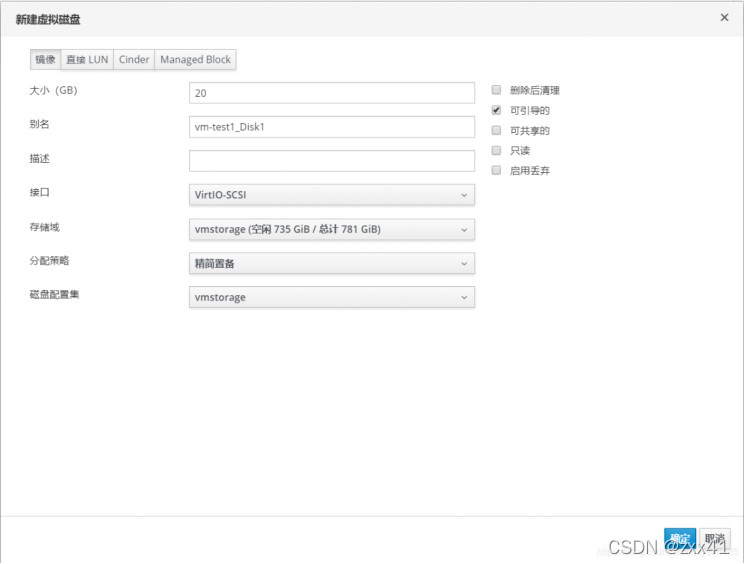
添加虚拟磁盘
点击新建实例镜像

ovirt迁移到kvm ovirt安装部署_linux_15

高级配置

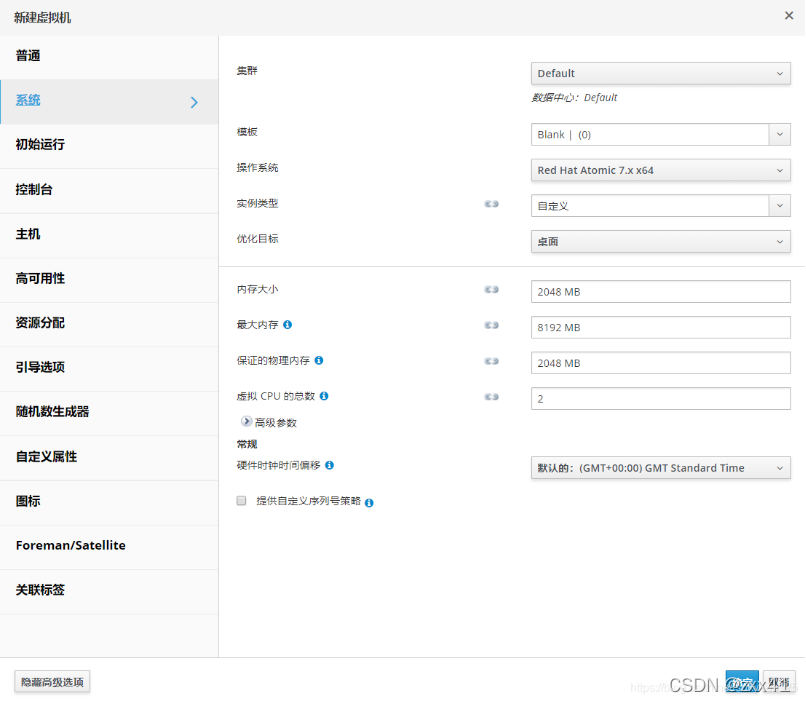
点击左下角的高级选项,根据需要自己定义内存大小,控制台图形界面类型可以选择spice或者是vnc
ovirt迁移到kvm ovirt安装部署_ios_16

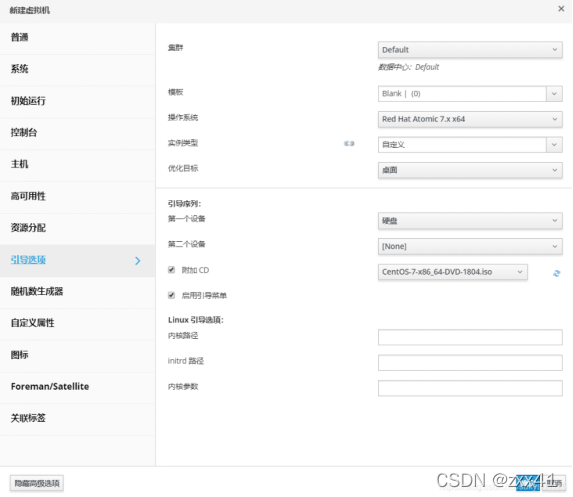
记得选择引导序列,需要把CD附加勾选上

ovirt迁移到kvm ovirt安装部署_ios_17

配置好之后,点击确定稍等30秒左右,虚拟机创建成功。 

ovirt迁移到kvm ovirt安装部署_ios_18

运行一次进行安装

ovirt迁移到kvm ovirt安装部署_ios_19

调整引导顺序

ovirt迁移到kvm ovirt安装部署_linux_20

点击确定会自动下载一个console.vv文件,在安装了remote-viewer的前提下,直接双击该文件即可打开虚拟机控制台。

接下来就是熟悉的装机操作啦~

至此,ovirt4.3的基本部署就结束啦~额外的一些配置后续慢慢探索。

6.Ping通网络

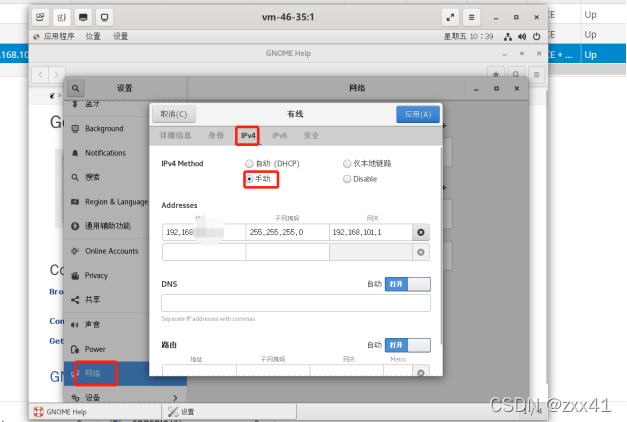
安装的时候选择桥接模式,linux装成功后,选择手动,正确配置ip,掩码,网关,DNS,可直接用控制台工具,在桌面设置

点击控制台-进入Linux桌面

ovirt迁移到kvm ovirt安装部署_ios_21

ovirt迁移到kvm ovirt安装部署_运维_22

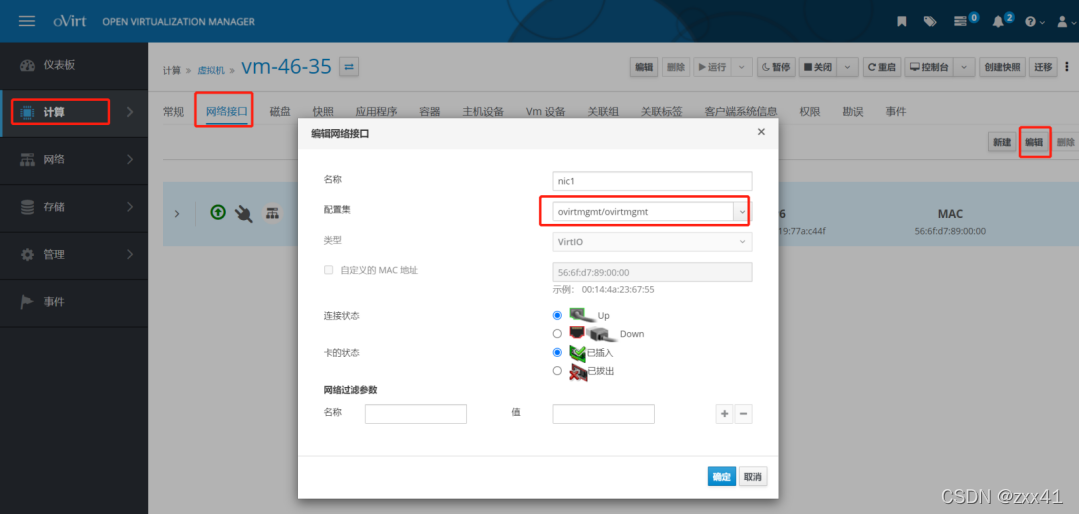
Linux安装完成后,在控制台选择部署好的虚拟机,编辑-配置网络

ovirt迁移到kvm ovirt安装部署_linux_23

ovirt迁移到kvm ovirt安装部署_运维_24

7.解决乌班图无法链接SSH的问题

主要原因是客户端,和服务端版本不一致的原因

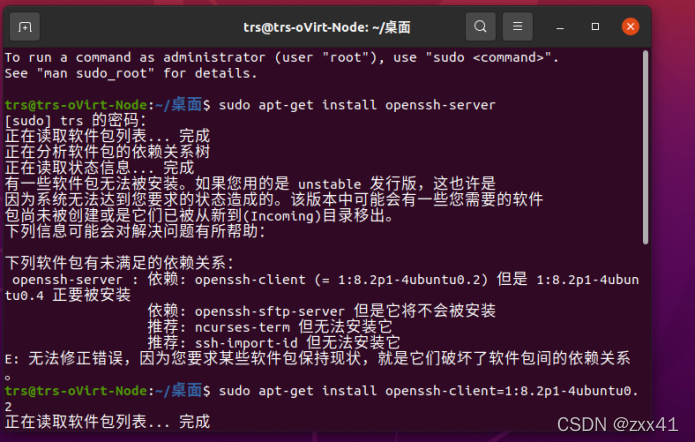
第一步,安装sudo apt-get install openssh-server 服务器

此时错依赖原因,主要原因是server端和客服端版本不一样,此时复制client的版本号
ovirt迁移到kvm ovirt安装部署_ios_25

第二步,重新装客户端版本,sudo apt-get install openssh-client=版本号

第三步,sudo apt-get install openssh-server,重装服务端

第四步,sudo /etc/init.d/ssh start 启动服务

第五步,sudo /etc/init.d/ssh enable 设置开机自启动