Introduction
StarWind SAN & NAS Controller Virtual Machine (CVM) comes as a prepackaged Linux Virtual Machine (VM) to be deployed on any industry-standard hypervisor. The solution is a fully certified shared storage for VMware vSphere Hypervisor ESXi, allowing you to repurpose your existing hardware running industry-standard hypervisor into high-performing storage.
StarWind SAN & NAS supports hardware and software-based storage redundancy configurations. The solution allows turning your server with internal storage into a redundant storage array presented as NAS or SAN, exposing standard protocols such as iSCSI, SMB, and NFS. It features Web-based UI, Text-based UI, vCenter Plugin, and Command-line interface for your cluster-wide operations.
This guide describes the deployment and configuration process of the StarWind SAN & NAS CVM.
StarWind SAN & NAS virtual machine requirements
Prior to installing StarWind SAN & NAS virtual storage appliance, please make sure that the system meets the requirements, which are available at the following link: https://www.starwindsoftware.com/system-requirements
Pre-Configuring the Servers
Setting up StarWind SAN & NAS
Connecting StarWind LUNs to VMware vSphere servers
1. Log in to VMware vSphere Client.
2. Select the ESXi server in the sidebar-menu, then navigate to the “Configure” tab and open the “Storage Adapters” submenu page.
3. Click the “+Add Software Adapter” button to launch the corresponding wizard.
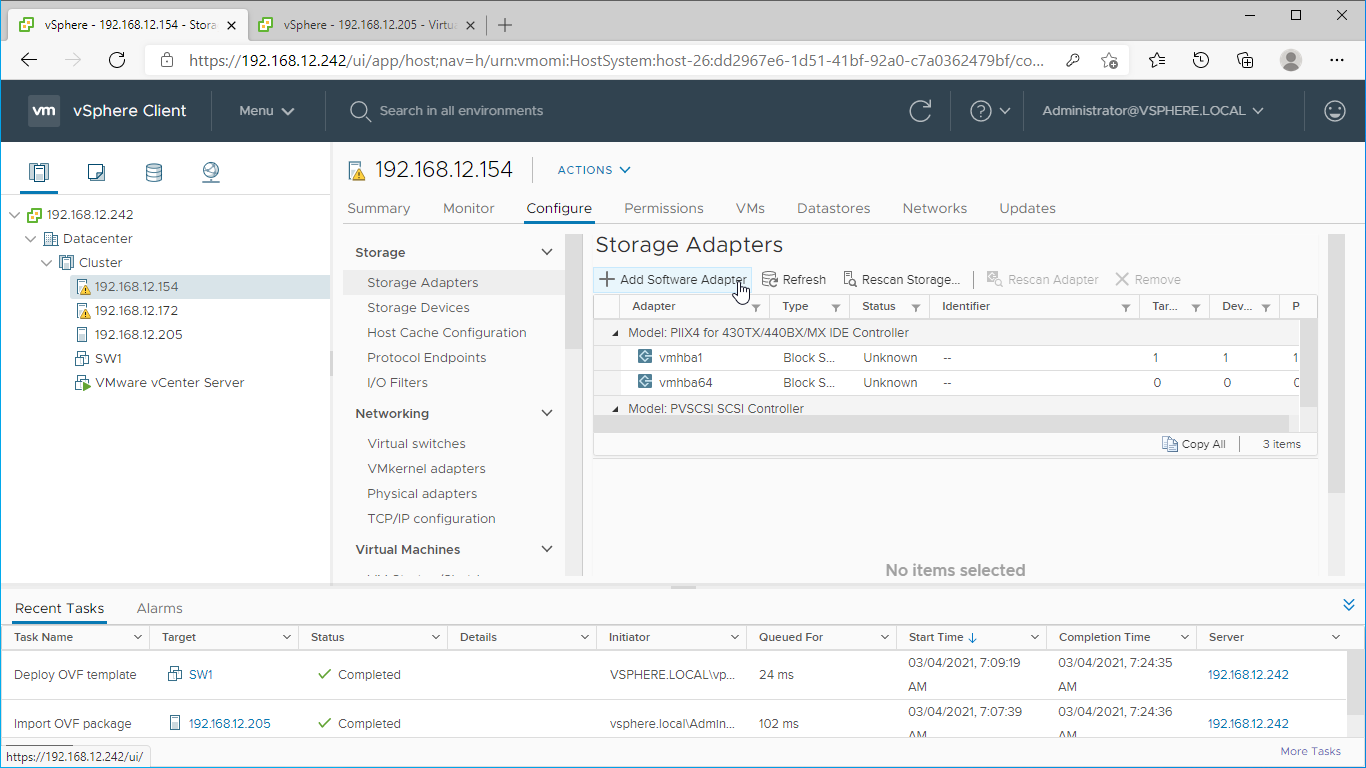
4. Mark the “Add software iSCSI adapter” option and click OK.

5. Add the IPv4 address of StarWind CVM Data\iSCSI network interface to the “Dynamic Discovery“. Save the configuration

6. Click on the “Rescan” button to discover StarWind virtual disk.


7. Once scanned, the created StarWind LUNs appear on the “Storage Devices” submenu page.

8. Right-click on the ESXi server to open the “Actions” menu, click on “Storage” and click the “New datastore” button.

9. The Datastore creation wizard appears. Specify the Datastore type as VMFS.

10. Specify the datastore name. Select the StarWind virtual disk.

11. Specify the VMFS6 version for the datastore.

12. Specify the datastore size using the entire disk capacity.
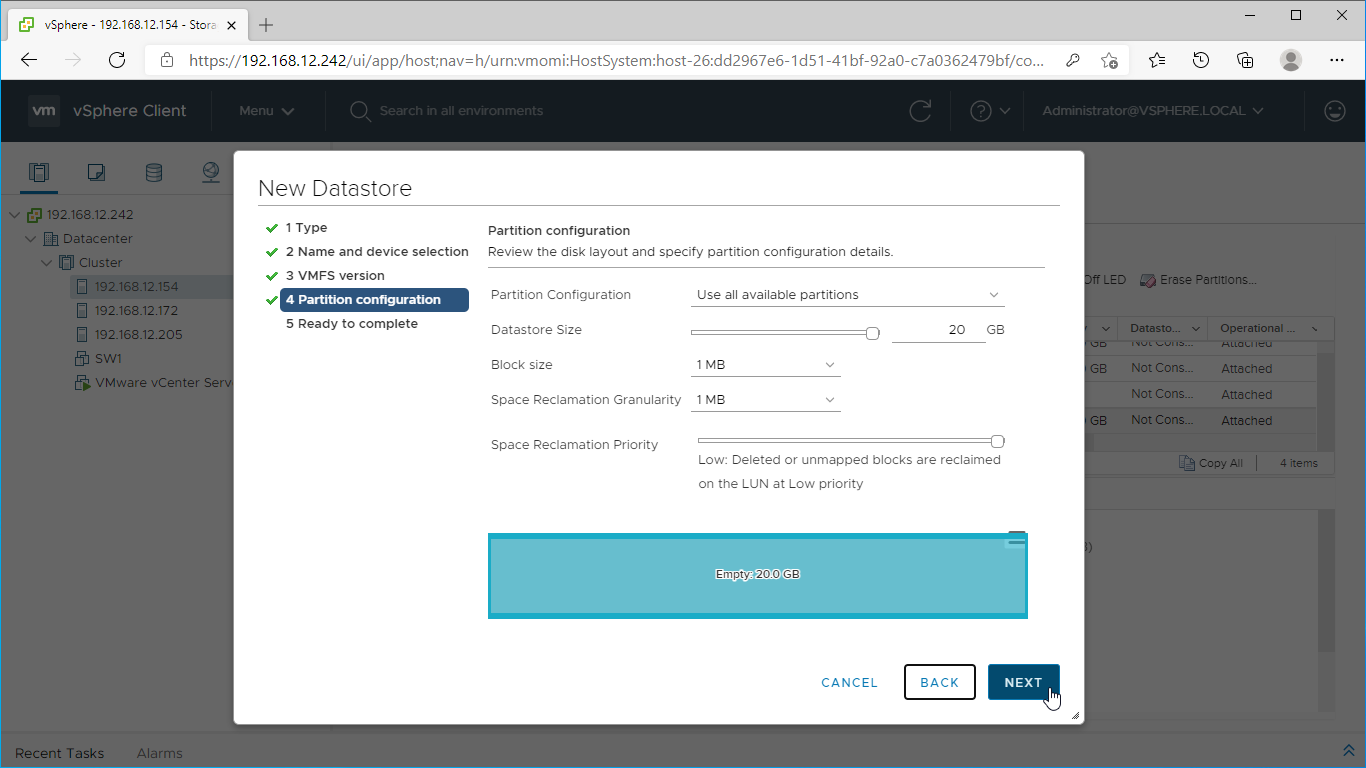
13. Review the configuration summary and click “Finish” to create the datastore.

14. Check the StarWind datastore in the Datastores tab.

15. Repeat the configuration steps 6-13 to add newly created StarWind LUNs as datastores on your VMware vSphere cluster.
Configuring an Automatic Storage Rescan
1. Connect to the appliance via Shell Terminal in a Text-based User Interface (TUI) or using a remote SSH terminal.

2. Edit file /opt/starwind/starwind-virtual-san/drive_c/starwind/hba_rescan_config.py with the following command: sudo nano /opt/starwind/starwind-virtual-san/drive_c/starwind/hba_rescan_config.py

3. In the appropriate lines, specify the IP address and login credentials of the single or multiple ESXi hosts (see NOTE below) on which the current StarWind VM is stored and will trigger the storage rescan task:
$esxi_host_list = [‘IP address’]
$username = ‘Login’
$password = ‘Password’

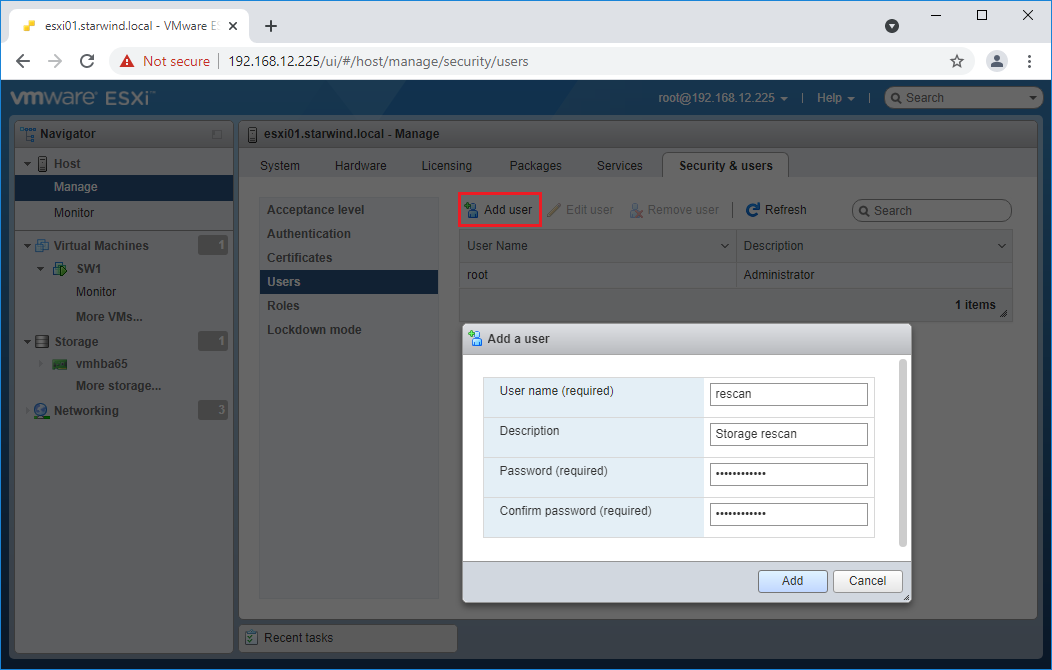
NOTE: In some cases, it makes sense to create a separate ESXi user for storage rescans. To create the user, please follow the steps below:
4. Log in to ESXi with the VMware Host Client. Click Manage, and under Security & users tab, in the Users section click Add user button. In the appeared window, enter a user name, and a password.
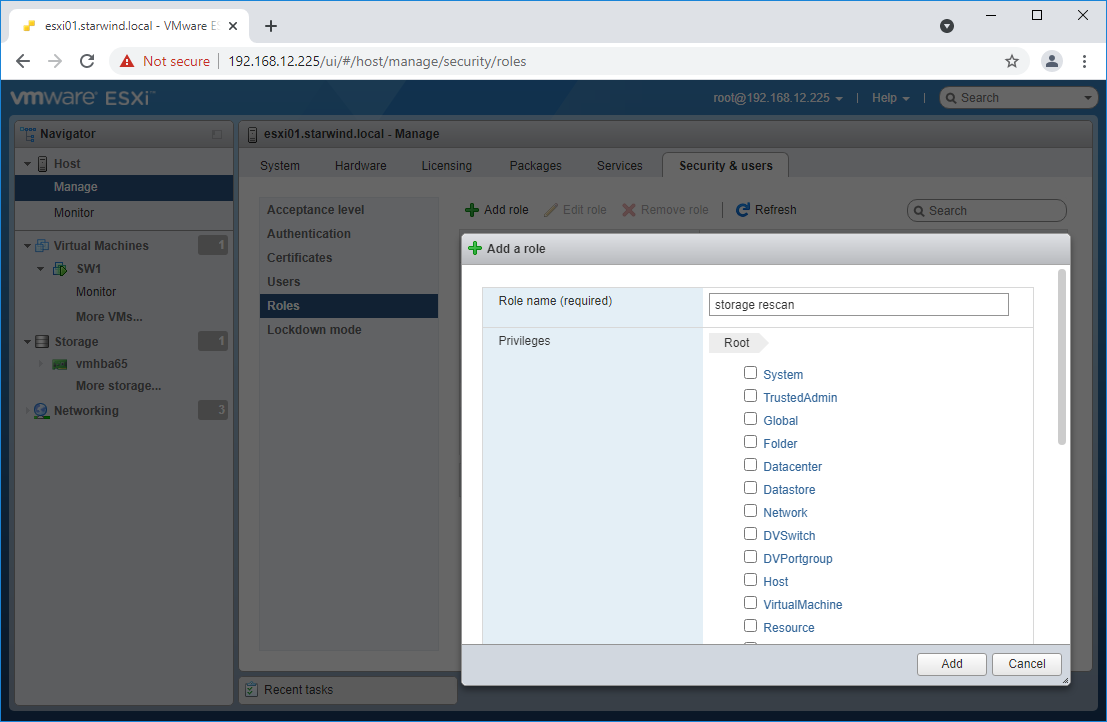
5. Create a new Role, under Roles section, and click New Role button. Type a name for the new role. Select privileges for the role and click OK.
The following privileges might be assigned: Host – Inventory, Config, Local Cim, and Global – Settings.
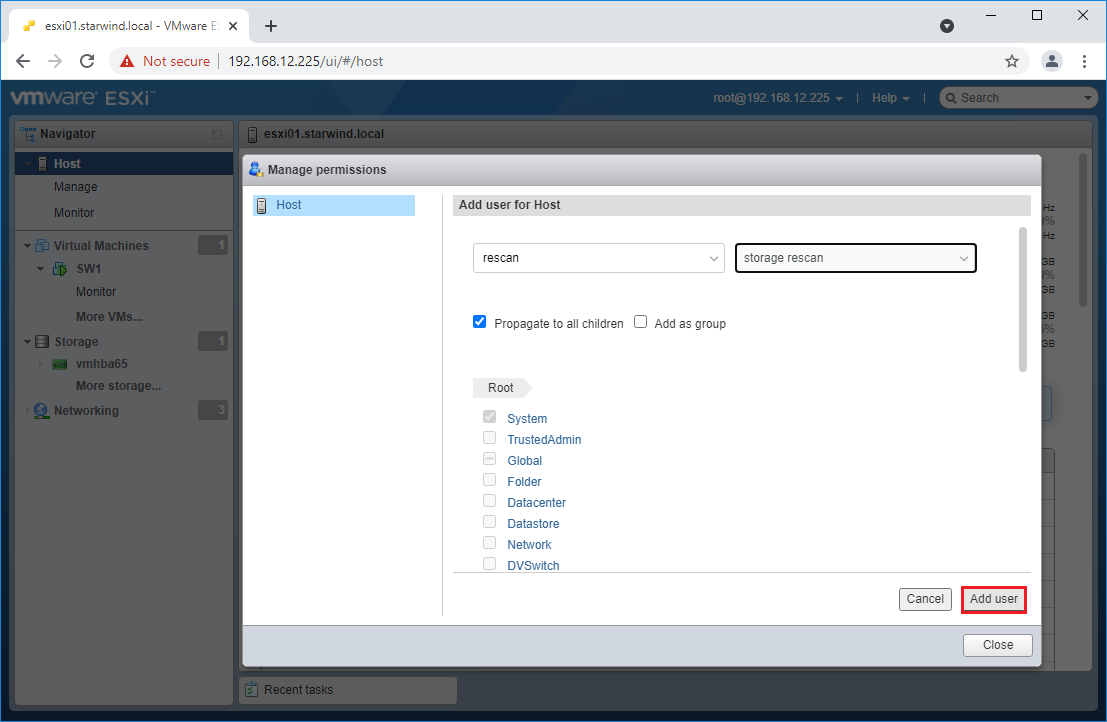
6. Assign permission to the storage rescan user for an ESXi host – right-click Host in the VMware Host Client inventory and click Permissions. In the appeared window click Add user.
7. Click the arrow next to the Select a user text box and select the user that you want to assign a role to. Click the arrow next to the Select a role text box and select a role from the list.
(Optional) Select Propagate to all children or Add as group. Click Add user and click Close.
Make sure that rescan script is working and execute it from the VM: sudo python3 /opt/starwind/starwind-virtual-san/drive_c/starwind/hba_rescan.py
4. Repeat all steps from this section on the other ESXi hosts.
Performance Tweaks
1. Click on the Configuration tab on all of the ESXi hosts and choose Advanced Settings.
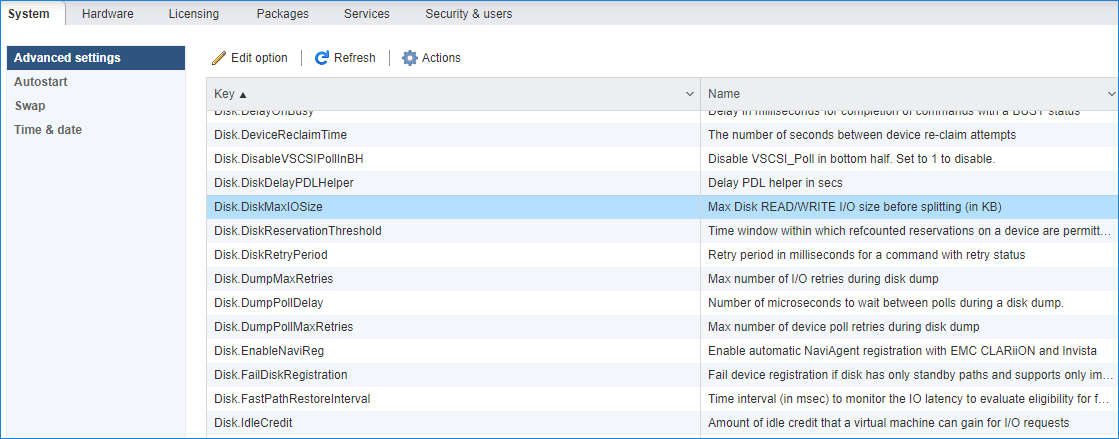
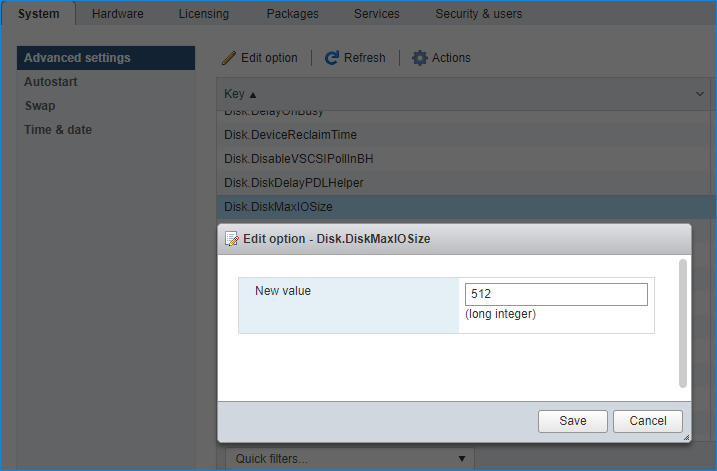
2. Select Disk and change the Disk.DiskMaxIOSize parameter to 512.
3. To optimize performance change I/O scheduler options according to the article below:
https://knowledgebase.starwindsoftware.com/guidance/starwind-vsan-for-vsphere-changing-linux-i-o-scheduler-to-optimize-storage-performance/
NOTE: Changing Disk.DiskMaxIOSize to 512 might cause startup issues with Windows-based VMs, located on the datastore where specific ESX builds are installed. If the issue with VMs start appears, leave this parameter as default or update the ESXi host to the next available build.
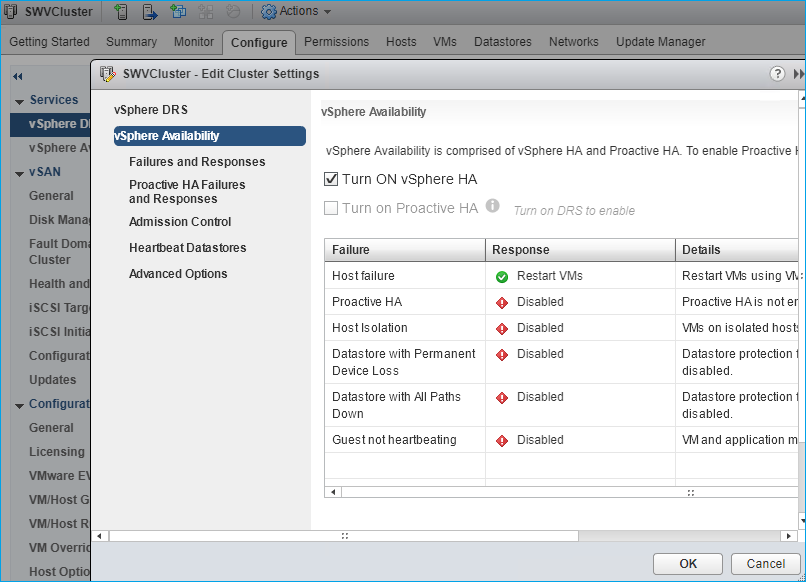
NOTE: To provide high availability for clustered VMs, deploy vCenter and add ESXi hosts to the cluster.
Click on Cluster -> Configure -> Edit and check the turn on vSphere HA option if it’s licensed.


 微信支付宝扫一扫,打赏作者吧~