
spice在桌面虚拟化中的应用系列之一(spice简介,性能优化等)
1.spice介绍
1.1 spice简介
spice是由Qumranet开发的开源网络协议,2008年红帽收购了Qumranet获得了这个协议。SPICE是红帽在虚拟化领域除了KVM的又一“新兴技术”,它提供与虚拟桌面设备的远程交互实现,主要应用在桌面虚拟化,支持图像,2D传输,720P视频播放
目前,spice主要目标是为qemu虚拟机提供高质量的远程桌面访问,它致力于克服传统虚拟桌面的一些弊端,并且强调用户体验
spice包含有3个组件:
SPICE Driver:SPICE驱动器 存在于每个虚拟桌面内的组件
SPICE server:SPICE服务器 存在于红帽企业虚拟化Hypervisor内的组件
SPICE Client: SPICE客户端 存在于终端设备上的组件,可以是瘦客户机或专用的PC,用于接入每个虚拟桌面。
这三个组件协作运行,确定处理图形的最高效位置,以能够最大程度改善用户体验并降低系统负荷。如果客户机足够强大,SPICE向客户机发送图形命令,并在客户机中对图形进行处理,显著减轻服务器的负荷。另一方面,如果客户机不够强大,SPICE在主机处理图形,从CPU的角度讲,图形处理并不需要太多费用
以上简介参考http://os.51cto.com/art/201201/311464.htm
1.2 spice架构

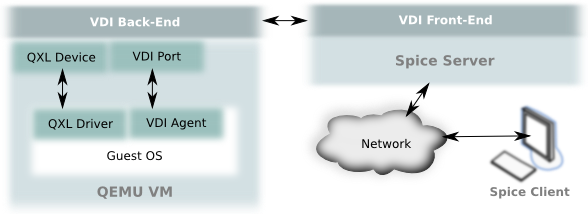
Spice agent运行在客户机(虚拟机)操作系统中。Spice server和Spice client利用spice agent来执行一些需要在虚拟机里执行的任务,如配置分辨率,另外还有通过剪贴板来拷贝文件等。从上图可以看出,Spice client与server与Spice Agent的通信需要借助一些其他的软件模块,如在客户机里面,Spice Agent需要通过VDIPort Driver与主机上 QEMU的VDIPort Device进行交互,他们的交互通过一种叫做输入/输出的环进行。Spice Client和Server产生的消息被写入到设备的输出环中,由VDI Port Driver读取;而Spice Agent发出的消息则通过VDI Port Driver先写入到VDI Port Device输入环中,被QEMU读入到Spice server的缓冲区中,然后再根据消息决定由Spice Server直接处理,还是被发往Spice Client中
以上参考http://blog.csdn.net/hbsong75/article/details/9465683
1.3 spice的不足
spice目标是提供一个高性能,高用户体验的远程桌面连接,就像本地桌面一样展现给用户. 其目前实现的功能有usb重定向,音视频传输,剪贴板,鼠标同步,2D图形支持,任意调整分辨率(qxl驱动)等
spice目前不支持虚拟机中的3D效果,对于windows7系统虚拟机,其aero桌面特效也无法启用,因为spice使用远程连接,所以其高度依赖网络,如果网络环境不好,使用起来将会是一间很痛苦的事情
2 spice服务器端安装配置
2.1 系统准备
系统版本
RHEL6
IP:192.168.11.166
安装KVM软件
#安装kvm/qemu工具,以及virt-manager,libvirtdyum install qemu-kvm qemu-kvm-tools virt-manager libvirt libvirt-devel libvirt-client virt-manager virt-viewer
系统环境检查
运行命令 lsmod | grep kvm 检查 KVM 模块是否成功安装。如果有输出结果,那么 KVM 模块已成功安装
需要服务器硬件支持虚拟化技术(Intel VT-d,AMD-V)。可以使用如下命令检查,有输出信息表示支持
egrep "(vmx|svm)" --color /proc/cpuinfo
2.2 服务器上安装spice-server
yum -y install spice-protocol spice-server xorg-x11-drv-qxl spice-glib
2.3 客户端安装spice client
centos客户端安装virt-viewer
yum -y install virt-viewer
windows7客户端安装virt-viewer
下载链接: http://virt-manager.org/download/sources/virt-viewer/virt-viewer-x64-1.0.msi
2.4 新建centos6.4虚拟机
关于virt-manager工具
virt-manager是一个图形化的虚拟机管理工具,它可以方便地创建虚拟机,修改虚拟机配置,添加新设备等. 但是由于其是图形界面管理,所以效率不是很高,而且对网络也有要求. libvirt提供了一个xml文件用来定义虚拟机的配置细节,并且可以通过virsh命令对虚拟机进行管理
编写一个虚拟机的xml文件
如下是一个centos6.4桌面版的xml文件,默认配置

<domain type='kvm'>
  <name>cdesk1</name>
  <uuid>56f6c45d-aa4d-8b23-85d9-87500199f089</uuid>
  <memory unit='KiB'>2097152</memory>
  <currentMemory unit='KiB'>2097152</currentMemory>
  <vcpu placement='static'>2</vcpu>
  <os>
    <type arch='x86_64' machine='rhel6.5.0'>hvm</type>
    <boot dev='hd'/>
    <bootmenu enable='yes'/>
  </os>
  <features>
    <acpi/>
    <apic/>
    <pae/>
  </features>
  <clock offset='utc'/>
  <on_poweroff>destroy</on_poweroff>
  <on_reboot>restart</on_reboot>
  <on_crash>restart</on_crash>
  <devices>
    <emulator>/usr/libexec/qemu-kvm</emulator>
    <disk type='file' device='disk'>
      <driver name='qemu' type='qcow2' cache='none'/>
      <source file='/data_lij/vhosts/cdesk1.qcow2'/>
      <target dev='vda' bus='virtio'/>
      <address type='pci' domain='0x0000' bus='0x00' slot='0x04' function='0x0'/>
    </disk>
    <controller type='usb' index='0'>
      <address type='pci' domain='0x0000' bus='0x00' slot='0x01' function='0x2'/>
    </controller>
    <interface type='network'>
      <mac address='52:54:00:92:32:a9'/>
      <source network='default'/>
      <model type='virtio'/>
      <address type='pci' domain='0x0000' bus='0x00' slot='0x03' function='0x0'/>
    </interface>
    <serial type='pty'>
      <target port='0'/>
    </serial>
    <console type='pty'>
      <target type='serial' port='0'/>
    </console>
    <input type='mouse' bus='ps2'/>
    <graphics type='vnc' port='-1' autoport='yes' listen='0.0.0.0'>
      <listen type='address' address='0.0.0.0'/>
    </graphics>
    <video>
      <model type='cirrus' vram='9216' heads='1'/>
      <address type='pci' domain='0x0000' bus='0x00' slot='0x02' function='0x0'/>
    </video>
    <memballoon model='virtio'>
      <address type='pci' domain='0x0000' bus='0x00' slot='0x05' function='0x0'/>
    </memballoon>
  </devices></domain>
通过xml文件启动虚拟机
#加入virsh管理
virsh define cdesk1.xml
#启动虚拟机
virsh start cdesk1
#查看端口
netstat -ntpl | grep qemu
查看进程
[root@controller2 qemu]# ps -ef | grep qemu
qemu     21866     1 10 19:26 ?        00:00:00 /usr/libexec/qemu-kvm -name cdesk1 -S -M rhel6.5.0 -enable-kvm -m 2048 -realtime mlock=off -smp 2,sockets=2,cores=1,threads=1 -uuid 56f6c45d-aa4d-8b23-85d9-87500199f089 -nodefconfig -nodefaults -chardev socket,id=charmonitor,path=/var/lib/libvirt/qemu/cdesk1.monitor,server,nowait -mon chardev=charmonitor,id=monitor,mode=control -rtc base=utc -no-shutdown -boot order=c,menu=on -device piix3-usb-uhci,id=usb,bus=pci.0,addr=0x1.0x2 -drive file=/data_lij/vhosts/cdesk1.qcow2,if=none,id=drive-virtio-disk0,format=qcow2,cache=none -device virtio-blk-pci,scsi=off,bus=pci.0,addr=0x4,drive=drive-virtio-disk0,id=virtio-disk0 -netdev tap,fd=25,id=hostnet0,vhost=on,vhostfd=26 -device virtio-net-pci,netdev=hostnet0,id=net0,mac=52:54:00:92:32:a9,bus=pci.0,addr=0x3 -chardev pty,id=charserial0 -device isa-serial,chardev=charserial0,id=serial0 -vnc 0.0.0.0:0 -vga cirrus -device virtio-balloon-pci,id=balloon0,bus=pci.0,addr=0x5
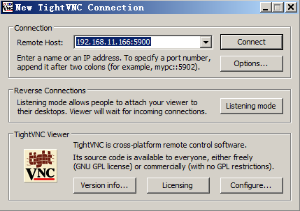
默认情况下,qemu使用vnc建立远程连接,监听地址为0.0.0.0,其端口为自动分配(xml文件中定义graphics type='vnc' port='-1', -1表示端口自动分配5900+N)
客户端使用TightVNC工具远程连接
3 启用spice进行远程连接
3.1 修改xml文件,使用spice进行远程连接
首先virsh命令关闭虚拟机
<!--  添加 -->
 <channel type='spicevmc'>
      <target type='virtio' name='com.redhat.spice.0'/>
      <alias name='channel0'/>
      <address type='virtio-serial' controller='0' bus='0' port='1'/>
    </channel><!--  修改 -->
    <graphics type='spice' port='5902' tlsPort='5903' autoport='yes' listen='0.0.0.0'>
      <listen type='address' address='0.0.0.0'/>
    </graphics>
    <video>
      <model type='qxl' ram='65536' vram='65536' heads='1'/>
      <alias name='video0'/>
      <address type='pci' domain='0x0000' bus='0x00' slot='0x02' function='0x0'/>
    </video>
3.2 修改xml文件支持音频传输
<sound model='ich6'>
   <alias name='sound0'/>
 </sound>
Linux下model='ich6',windows下model='ac97'
3.3 使用windows7客户端远程连接
首先启动虚拟机
virsh start cdesk1
使用virt-viewer工具,其支持vnc和spice两种协议,所以这里需要指定使用spice

3.4 使用virt-manager图形工具配置spice
以上步骤3.1-3.3中是修改xml文件配置spice连接的,也可以使用virt-manager图形界面操作
首先关闭虚拟机
服务器上运行virt-manager命令,打开图形界面(需要开启服务器上的X11转发)
如下图Display中更改Type为spice
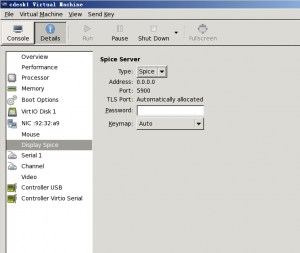
video中更改Model为qxl,修改完成之后,启动虚拟机

4 提高虚拟机性能(鼠标同步,共享剪贴板,音视频传输等)
我们在客户端使用spice client远程连接虚拟机,如果想要虚拟机中播放的音视频传输到本地客户端,或者在虚拟机和客户机之间共享剪贴板,则需要在虚拟机中安装相应增强工具,对于windows系统和Linux系统,需要安装的增强工具不太一样
4.1 windows虚拟机配置
windows虚拟机需要安装增强工具spice-guest-tools(类似vmware中的vmtool工具)
下载地址: http://www.spice-space.org/download/windows/spice-guest-tools/spice-guest-tools-0.74.exe
这个软件包包含了一个qxl视频卡驱动,还包括SPICE guest agent,可以实现同步剪贴板,鼠标,任意调整虚拟机分辨率等功能
4.2 Linux虚拟机配置
centos gnome桌面版虚拟机,需要安装以下软件包
yum install xorg-x11-drv-qxl spice-vdagent
#设置开机启动/etc/init.d/spice-vdagentd start
chkconfig spice-vdagentd on
4.3 把虚拟机中的音视频传输到客户端
修改xml文件实现音视频传输
前面是通过在虚拟机xml文件中添加sound标签,实现虚拟机和客户机的音视频传输,也可以使用virt-manager工具
用virt-manager工具添加音频设备

选择Sound的Model(ac97或者ich6)
以上介绍了spice的安装和配置,以及简单连接,其它spice的功能将在其它文章中介绍
推荐本站淘宝优惠价购买喜欢的宝贝:

本文链接:https://hqyman.cn/post/861.html 非本站原创文章欢迎转载,原创文章需保留本站地址!

 微信支付宝扫一扫,打赏作者吧~
休息一下~~