
安装nginx/certbot/docker:
apt -y update
apt -y install curl nginx python3-certbot-nginx
curl -fsSL https://get.docker.com -o get-docker.shsh get-docker.sh
准备目录、新建compose文件:
mkdir -p /opt/seafile && cd /opt/seafile && nano docker-compose.yml
写入如下配置:
version: '3.8'services:
  db:
    image: mariadb:10.11
    container_name: seafile-mysql
    environment:
      - MYSQL_ROOT_PASSWORD=dbpasswd # 设置数据库root密码
      - MYSQL_LOG_CONSOLE=true
    volumes:
      - ./mariadb-data:/var/lib/mysql
    networks:
      - seafile-net

  memcached:
    image: memcached:1.6
    container_name: seafile-memcached
    entrypoint: memcached -m 256
    networks:
      - seafile-net

  seafile:
    image: seafileltd/seafile-mc:latest
    container_name: seafile
    ports:
      - "127.0.0.1:8090:80"
    volumes:
      - ./seafile-data:/shared
    environment:
      - DB_HOST=db
      - DB_ROOT_PASSWD=dbpasswd # 与mariadb容器的root密码对应
      - TIME_ZONE=Asia/Shanghai
      - SEAFILE_ADMIN_EMAIL=imlala@example.com # 管理员账号
      - SEAFILE_ADMIN_PASSWORD=adminpasswd # 管理员密码
      - SEAFILE_SERVER_LETSENCRYPT=false
      - SEAFILE_SERVER_HOSTNAME=seafile.example.com # 站点域名与nginx的server_name对应
    depends_on:
      - db      - memcached
    networks:
      - seafile-net

networks:
  seafile-net:
启动:
docker compose up -d
新建nginx站点配置文件:
nano /etc/nginx/sites-available/seafile
写入如下配置:
server {
    listen 80;
    server_name seafile.example.com; # 与docker-compose内的环境变量SEAFILE_SERVER_HOSTNAME相对应
    client_max_body_size 0;

    location / {
        proxy_pass http://127.0.0.1:8090;
        proxy_set_header Host $host;
        proxy_set_header X-Real-IP $remote_addr;
        proxy_set_header X-Forwarded-For $proxy_add_x_forwarded_for;
    }}
启用站点:
ln -s /etc/nginx/sites-available/seafile /etc/nginx/sites-enabled/seafile
签发ssl证书:
certbot --nginx
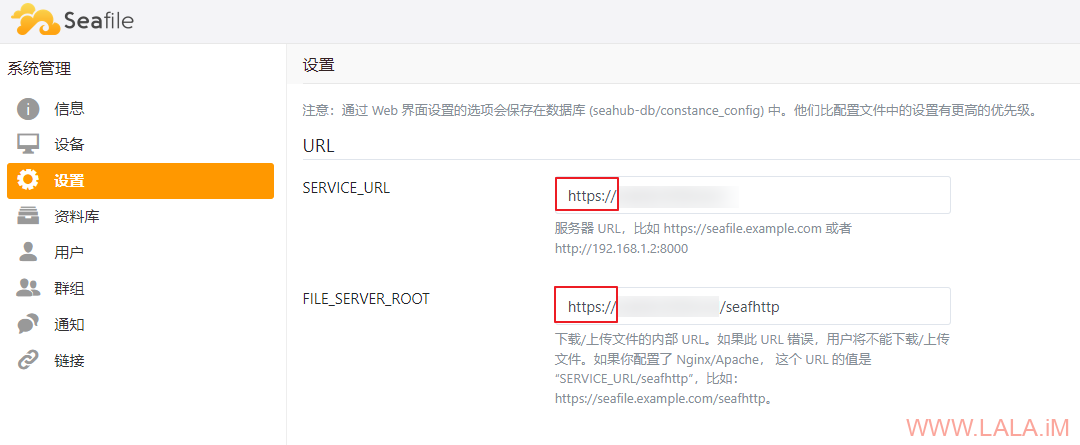
登录到seafile管理后台,务必在这里把http改为https否则无法上传文件:
[可选]集成onlyoffice,在docker-compose文件内加入如下配置:
services:...
  oods:
    image: onlyoffice/documentserver:latest
    container_name: seafile-oods
    ports:
      - "127.0.0.1:9000:80"
    volumes:
      - ./seafile-oods/DocumentServer/logs:/var/log/onlyoffice      - ./seafile-oods/DocumentServer/data:/var/www/onlyoffice/Data
      - ./seafile-oods/DocumentServer/lib:/var/lib/onlyoffice      - ./seafile-oods/DocumentServer/local-production-linux.json:/etc/onlyoffice/documentserver/local-production-linux.json
    networks:
      - seafile-net
    environment:
      - JWT_ENABLED=true
      - JWT_SECRET=imlala # 保护文档不被未经授权访问...
新建需要用到的目录:
cd /opt/seafile
mkdir -p seafile-oods/DocumentServer/
新建local-production-linux.json,用于配置文档自动保存:
nano seafile-oods/DocumentServer/local-production-linux.json
写入如下内容:
{
  "services": {
    "CoAuthoring": {
      "autoAssembly": {
        "enable": true,
        "interval": "5m"
      }
    }
  },
  "FileConverter": {
    "converter": {
      "downloadAttemptMaxCount": 1
    }
  }}
编辑seafile配置文件:
nano /opt/seafile/seafile-data/seafile/conf/seahub_settings.py
在文件的末尾加入如下配置,将ONLYOFFICE_APIJS_URL修改为你的域名、ONLYOFFICE_JWT_SECRET修改为你在docker-compose文件内设置的JWT_SECRET:
ENABLE_ONLYOFFICE = TrueVERIFY_ONLYOFFICE_CERTIFICATE = TrueONLYOFFICE_APIJS_URL = 'https://onlyoffice.example.com/web-apps/apps/api/documents/api.js'ONLYOFFICE_FILE_EXTENSION = ('doc', 'docx', 'ppt', 'pptx', 'xls', 'xlsx', 'odt','fodt', 'odp', 'fodp', 'ods', 'fods')ONLYOFFICE_EDIT_FILE_EXTENSION = ('docx', 'pptx', 'xlsx')ONLYOFFICE_JWT_SECRET = 'imlala'重启容器使之前修改的配置生效:
docker compose down
docker compose up -d
新建nginx站点配置文件:
nano /etc/nginx/sites-available/onlyoffice
写入如下配置:
upstream docservice {
    server 127.0.0.1:9000;}map $http_host $this_host {
    "" $host;
    default $http_host;}map $http_x_forwarded_proto $the_scheme {
     default $http_x_forwarded_proto;
     "" $scheme;}map $http_x_forwarded_host $the_host {
    default $http_x_forwarded_host;
    "" $this_host;}map $http_upgrade $proxy_connection {
    default upgrade;
    "" close;}server {
    listen 80;
    server_name onlyoffice.example.com; # 与ONLYOFFICE_APIJS_URL对应
    client_max_body_size 0;

    location / {
        proxy_pass http://docservice;
        proxy_http_version 1.1;
        proxy_read_timeout 3600s;
        proxy_connect_timeout 3600s;
        proxy_set_header Upgrade $http_upgrade;
        proxy_set_header Connection $proxy_connection;
        proxy_set_header X-Forwarded-Host $the_host;
        proxy_set_header X-Forwarded-Proto $the_scheme;
        proxy_set_header X-Forwarded-For $proxy_add_x_forwarded_for;
    }}
启用站点:
ln -s /etc/nginx/sites-available/onlyoffice /etc/nginx/sites-enabled/onlyoffice
签发ssl证书:
certbot --nginx
上传一个docx文件测试,如果正常的话是可以进行预览和编辑的:
推荐本站淘宝优惠价购买喜欢的宝贝:

本文链接:https://hqyman.cn/post/9873.html 非本站原创文章欢迎转载,原创文章需保留本站地址!

 微信支付宝扫一扫,打赏作者吧~
休息一下~~