Monitor插件使用
图示:
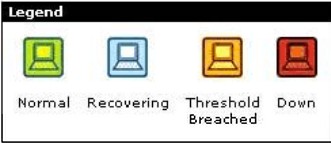
绿色:被监控设备状态正常;
红色:被监控设备Down机;
兰色:被监控设备恢复(Down后重新启动,界于红色与绿色之间的状态);
黄色:被监控设备门槛报警
Monitor的选项设定:
counsle → settings → Misc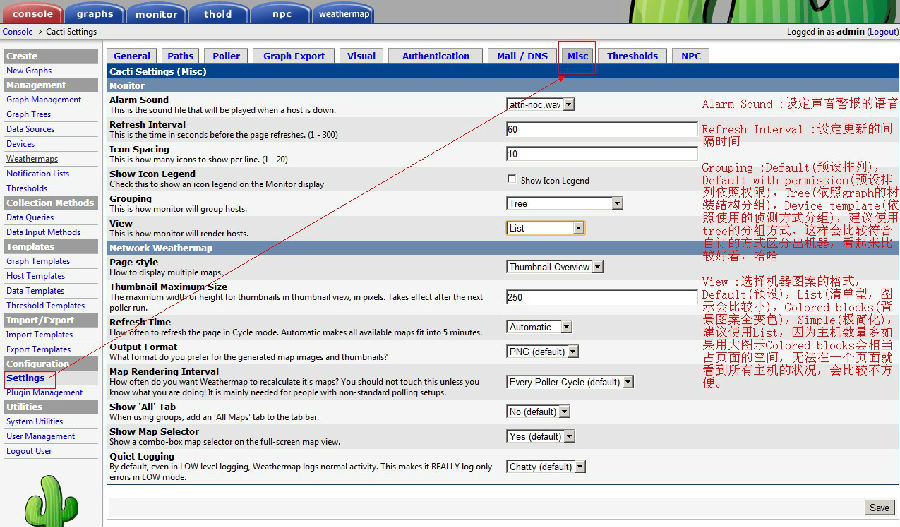
Alarm Sound :设定声音警报的语音
Refresh Interval :设定更新的间隔时间
Show Icon Legend:显示图例,如什么色代表Down机,正常等
Grouping:设置如何分组,Default(预设排列),Default with permission(预设排列依照权限),Tree(依照graph的树装结构分组),Device template(依照使用的侦测方式分组),建议使用tree的分组方式,这样会比较符合自订的方式区分出机器,看起来比较好看,哈哈
View :选择机器图案的格式,Default(预设),List(清单型,图示会比较小),Colored blocks(背景图案全变色),Simple(极简化),建议使用List,因为主机数量多如果用大图示Colored blocks会相当占页面的空间,无法在一个页面就看到所有主机的状况,会比较不方便。
在Monitor里添加主机
单个主机添加
console → Device →点击要添加的主机--勾选Monitor Host

批量主机添加
console → Device--选择要添加的主机--在“Choose an action”中选择“Enabled Monitoring”或者“Place on a tree(monitor)” --GO-continue
Place on a tree(monitor)和Place on a tree(default)后面括号内的是tree名字,在graphs里有几个tree这里会显示几个类似选项

Thold插件使用
Thold 是报警插件,通过设置超过最高或最低值的时候进行报警,可以发送邮件或短信方式。
(1)配置
配置settings插件
“Console”---“Configuration”---“Settings”---选择“Mail / DNS”根据图中的信息,填写发送的SMTP服务器及邮箱信息---save
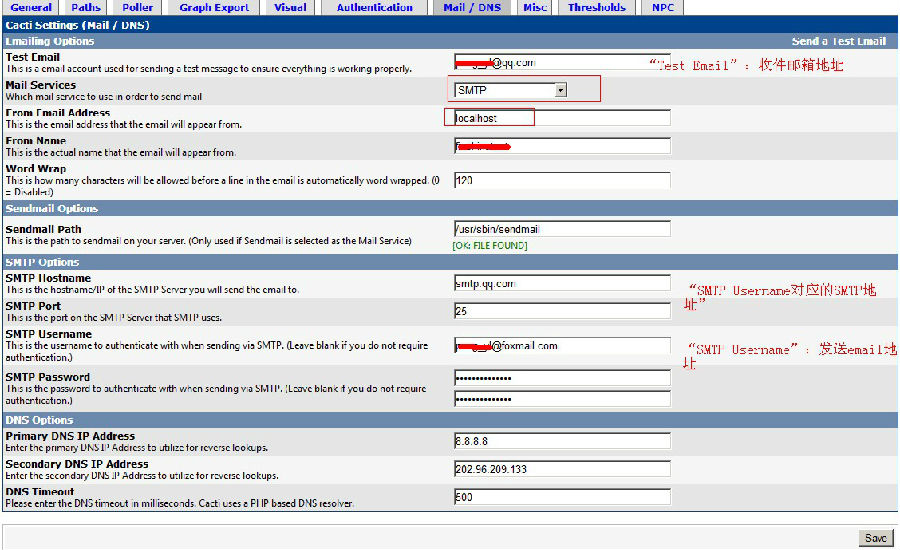
配置thold插件
“Console”---“Configuration”---“Settings”---选择“Thresholds”修改相应选项---save
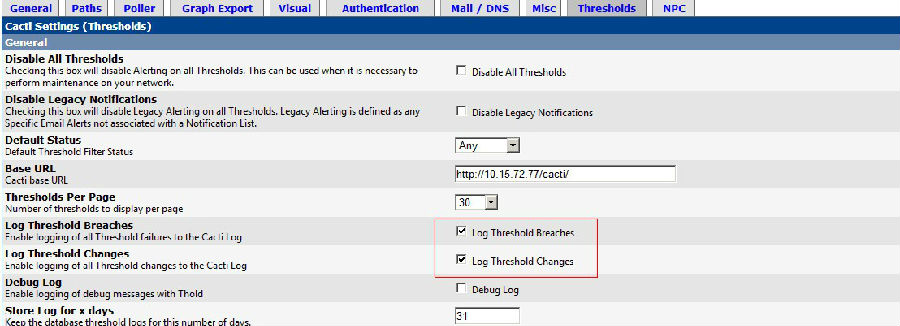


其中有两处单选框必须选中,分别是:
"Syslogging":这一栏是将要发送的信息记入cacti.log中。
"Send alerts as text":这一栏是将要送的警告信息保存为文本形式,没有图片。
测试
“Console”---“Configuration”---“Settings”---选择“Mail / DNS”--点击“Send a Test Email”--弹出测试页面“Authenication: true”表示成功

设置thold报警
(1)创建一个thold模板
Console”---“Management”---“Thresholds”

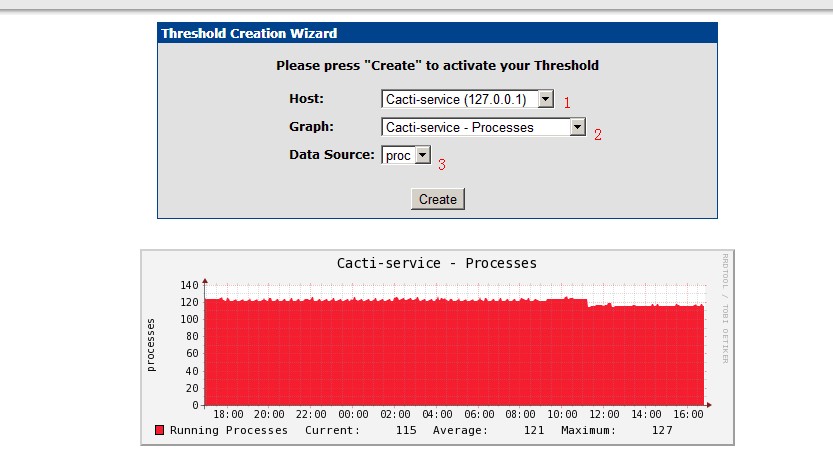
单击图中右上脚的“Add”按钮,弹出如下图示:

在图中的“Host:”一栏中,单击右侧的下拉框,选择你要监控的报警的主机,选好“Host:”后,会出现下面的“Graph:”,在下拉框中,选择你要设置报警的服务,这里以选择“Localhost-Processes”为例,选择好后,单击“Create”按钮后,会出现一个页面,让你去设置一个阀值,达到多少会发报警邮件:
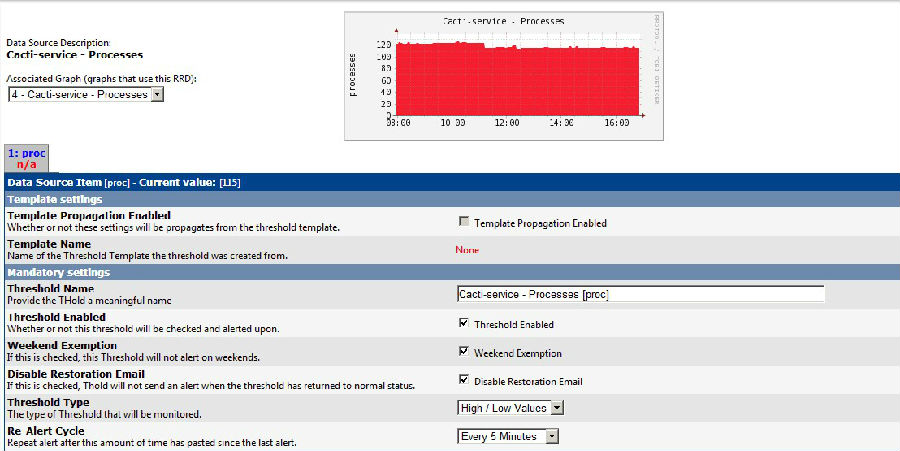

Templates Name: 这一个Templates 的名称。
Template Propagation Enabled:是否套用Thold模板。如果这个Thold还使用设置好的统一模板的,就选上Enabled
Date Template: Templates资料来源。
Data Field: Templates 的资料项目。
Enable: 启用这一个Templates。
Weekend Exemption: 这一个项目就是六日不会发出警告,很贴心的设计不过在台湾大概行不通。
Disable Restoration Email: 远端主机发生异常断线后重新连结发出警告,这是一个反向的选项,预设是开启,勾选后取消。
Threshold Type: 设定警戒值属性,选项有High/Low values,Baseline,Time Based。
High Threshold: 警戒值上限。
Low Threshold: 警戒值下限。
一般情况下,Threshold的阀值即为实际数据,但在网络流量Thold中,有所不同,具体的换算方法为: 网络流量阀值设定值=网络流量限值/8 如我们设网络流量限值为10M的话,哪么网络流量阀值设定值为: 10×1024×1024/8= 1310720 |
Min Tigger Duration: 警戒值触发需要的时间。
Data Type: 警戒值计算方式,可以选择Exact Value(回传值为单位),CDEF,Percentage。
Re-Altert Cycle: 重复发出警告的时间间隔。
Notify accounts: 设定警告帐号。
Alter E-Mail: 设定警告信的收件者,多位收件者可以用逗号“,”区隔
Tips:由于上图的图表中的processes已经有100了,这里设置最高阀值是20,这里肯定会发送报警的。单击右下脚的“Save”保存。到此为止,设立报警项目已经完成。
查看thold当前的报警信息
Console”---“Management”---“Thresholds

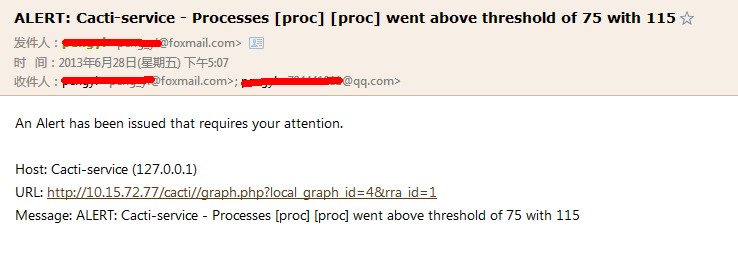
此时可以看到一个红色的区域的报警信息,然后再看QQ邮箱里是不是有报警邮件,查看邮件可以看到:

查看cacti.log是否有报警发送邮件的记录
| [root@localhost html]# tail -f /usr/local/cacti/log/cacti.log |
日志里会记录报警的相关信息,以及要发送到的邮件地址
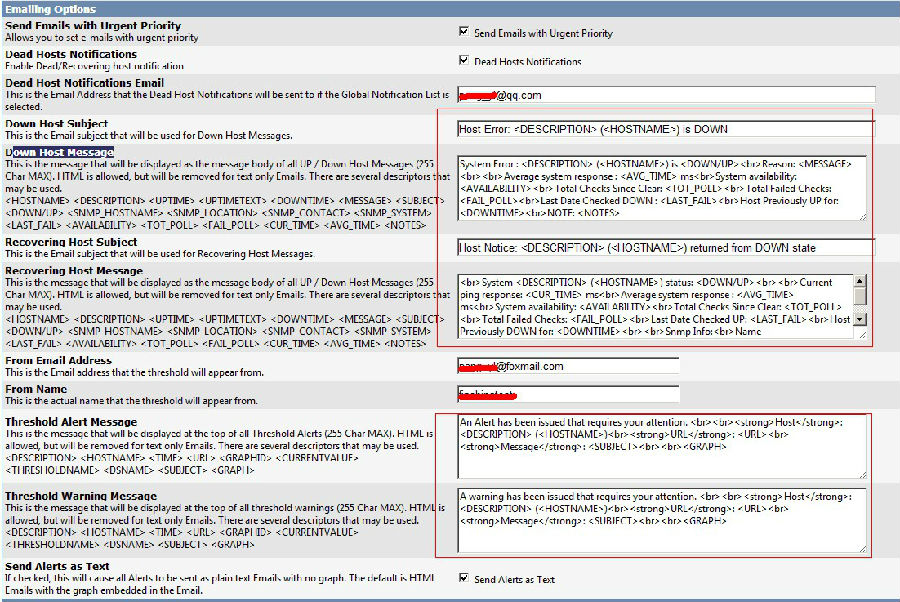
报警的内容更改:
选择“Console”---“Configuration”---“Settings”---选择“Thresholds”
如图示红线处即为变更报警信息的内容:
套用建立的规则
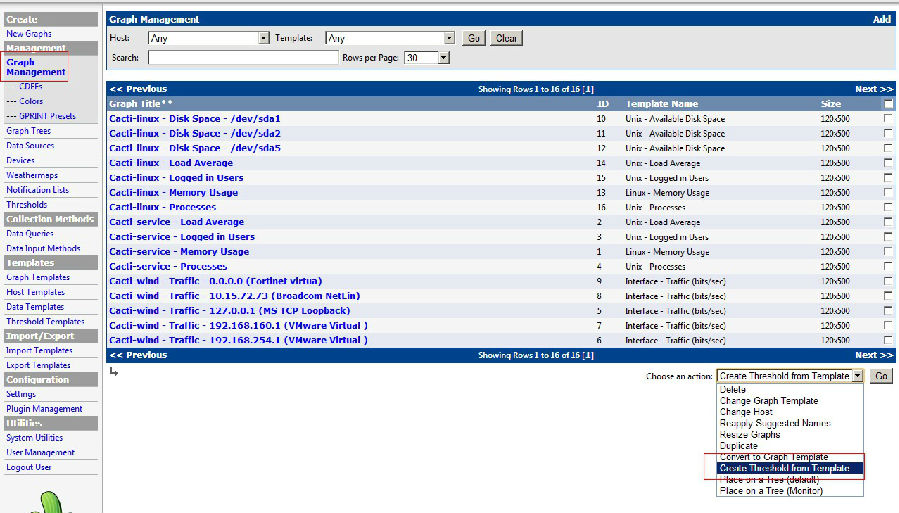
主机数量多如果要每一部都加上规则是相当消耗时间的,而且日后的维护也不容易,在Cacti 中可以多选主机一次套用Template
console → Graph Managerment--选择要套用thold Templates 的项目,选择图表资源项目,在到下面的选单中选择Create Threshold from Templates 选项,就将选择的主机统一套用所设定的Templates--Continue
要查看已经建立的thold 项目可以到console → thold 这一个项目中,选择status 到any 的状况就会出现所有的项目,预设是只出现被tiggered 的项目,方便管理人员在表单中辨识符合警戒值的主机项目。在主机的内容中Template Propagation Enabled 的项目是被勾选的,就表示这一个项目是有套用thold Templates,当修改Templates 的异动修改都会同步套用到这一项目
推荐本站淘宝优惠价购买喜欢的宝贝:

本文链接:https://hqyman.cn/post/112.html 非本站原创文章欢迎转载,原创文章需保留本站地址!
打赏

微信支付宝扫一扫,打赏作者吧~
休息一下~~
 HQY 一个和谐有爱的空间