测试目的
2. 通过该测试,熟悉strongswan软件的使用及排错。

测试环境描述
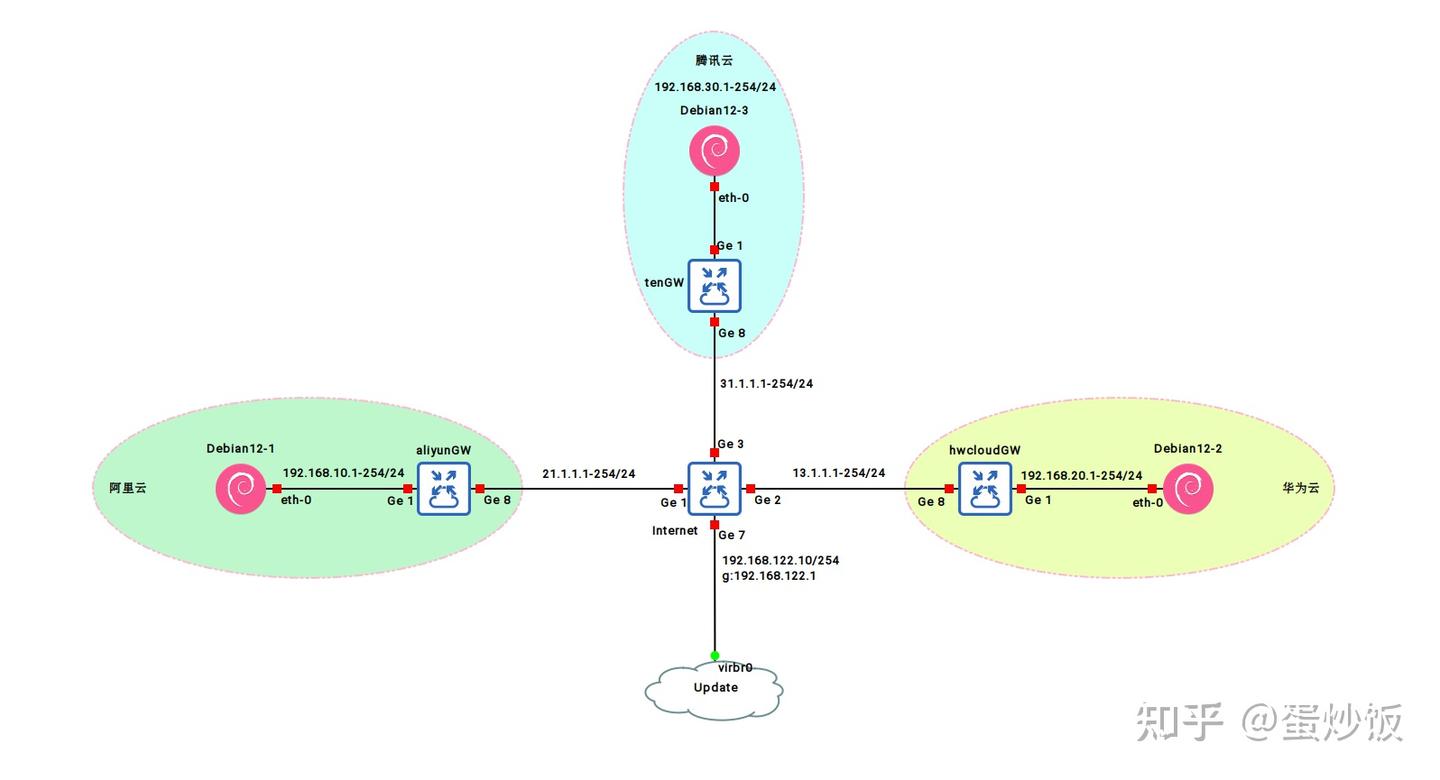
三台模拟服务器使用
debian12操作系统4台路由器使用
CSR1000v分别模拟3个网关及互联网。GNS3配置CSR1000VUpdate用来更新debian12操作系统及软件安装strongswan软件版本--5.9.8-5
测试环境配置
阿里云 GW路由器配置
# 接口配置
interface FastEthernet0/0
ip address 192.168.10.254 255.255.255.0
ip nat inside

interface FastEthernet1/0
ip address 21.1.1.1 255.255.255.0
ip nat outside

# 路由配置
ip route 0.0.0.0 0.0.0.0 21.1.1.254

# nat配置
access-list 10 permit 192.168.10.0 0.0.0.255
ip nat inside source list 10 interface FastEthernet1/0 overload

# 端口映射ip nat inside source static tcp 192.168.10.253 22 21.1.1.2 22 extendable
ip nat inside source static udp 192.168.10.253 500 21.1.1.2 500 extendable
ip nat inside source static udp 192.168.10.253 4500 21.1.1.2 4500 extendable

# dhcp配置
ip dhcp excluded-address 192.168.10.1 192.168.10.252

ip dhcp pool aliyun
network 192.168.10.0 255.255.255.0
dns-server 202.102.224.68
default-router 192.168.10.254腾讯云GW路由器配置
# 接口配置
interface FastEthernet0/0
ip address 192.168.20.254 255.255.255.0
ip nat inside

interface FastEthernet1/1
ip address 13.1.1.1 255.255.255.0
ip nat outside

# 路由配置
ip route 0.0.0.0 0.0.0.0 13.1.1.254

# nat配置
access-list 10 permit 192.168.20.0 0.0.0.255
ip nat inside source list 10 interface FastEthernet1/1 overload

# 端口映射
ip nat inside source static tcp 192.168.30.253 22 31.1.1.2 22 extendable
ip nat inside source static udp 192.168.30.253 500 31.1.1.2 500 extendable
ip nat inside source static udp 192.168.30.253 4500 31.1.1.2 4500 extendable

# DHCP配置
ip dhcp excluded-address 192.168.30.1 192.168.30.252

ip dhcp pool tencloud
network 192.168.30.0 255.255.255.0
dns-server 202.102.224.68
default-router 192.168.30.254华为云GW路由器配置
# 接口配置
interface FastEthernet0/0
ip address 31.1.1.1 255.255.255.0
ip nat outside

interface FastEthernet1/0
ip address 192.168.30.254 255.255.255.0
ip nat inside

# 路由配置
ip route 0.0.0.0 0.0.0.0 31.1.1.254

# nat配置
access-list 10 permit 192.168.30.0 0.0.0.255
ip nat inside source list 10 interface FastEthernet0/0 overload

# DHCP配置
ip dhcp excluded-address 192.168.20.1 192.168.20.252

ip dhcp pool hwcloud
network 192.168.20.0 255.255.255.0
default-router 192.168.20.254
dns-server 202.102.224.68

# 映射服务器的22/500/4500端口
ip nat inside source static udp 192.168.20.253 500 13.1.1.2 500 extendable
ip nat inside source static tcp 192.168.20.253 22 13.1.1.2 22 extendable
ip nat inside source static udp 192.168.20.253 4500 13.1.1.2 4500 extendable
Internet路由器配置
# 接口配置
interface FastEthernet0/0
ip address 31.1.1.254 255.255.255.0
ip nat inside

interface FastEthernet1/0
ip address 21.1.1.254 255.255.255.0
ip nat inside

interface FastEthernet1/1
ip address 13.1.1.254 255.255.255.0
ip nat inside

interface FastEthernet2/1
ip address 192.168.122.10 255.255.255.0
ip nat outside

# 路由配置
ip route 0.0.0.0 0.0.0.0 192.168.122.1

# nat配置,用于3台服务器进行update和软件安装
access-list 10 permit 21.1.1.0 0.0.0.255
access-list 10 permit 13.1.1.0 0.0.0.255
access-list 10 permit 31.1.1.0 0.0.0.255
ip nat inside source list 10 interface FastEthernet2/1 overload
服务器配置
接口默认自动获取IP地址,在网关路由器配置
DHCP,省去IP地址配置。修改更新源
root@debian:~# cat /etc/apt/mirrors/debian.list
#https://deb.debian.org/debian
https://mirrors.tuna.tsinghua.edu.cn/debian/

root@debian:~# cat /etc/apt/mirrors/debian-security.list
#https://deb.debian.org/debian-security
https://mirrors.tuna.tsinghua.edu.cn/debian-security
root@debian:~#
5. 系统更新
apt update
apt upgrade
6.安装firewalld服务,开放udp500/4500端口
apt install firewalld
firewall-cmd --permanent --add-port=500/udp
firewall-cmd --permanent --add-port=4500/udp
firewall-cmd --reload7.firewalld转发配置
配置masquerade
firewall-cmd --permanent --add-masquerade物理网卡划分到public区域
firewall-cmd --zone=public --change-interface=ens3 --permanentfirewalld配置信息
root@:~# firewall-cmd --list-all

public (active)
 target: default
 icmp-block-inversion: no
 interfaces: ens3
 sources:
 services: dhcpv6-client ssh
 ports: 500/udp 4500/udp
 protocols:
 forward: yes
 masquerade: yes
 forward-ports:
 source-ports:
 icmp-blocks:
rich rules:安装StrongSwan
apt install strongswan
apt install strongswan-swanctl
apt install strongswan-pki
apt install libstrongswan-extra-plugins
创建证书
在hwCloud主机上创建自签名CA根证书,依次创建hwCloud、aliyun、TenCloud三个主机的私钥,并使用子签名CA根证书进行签发。
自签名CA证书
生成pem格式的EdDSA 25519算法的私钥
pki --orm --outfgen --type ed25519 pem > strongswanKey.pem生成pem格式的自签名X.509 证书
pki --self --ca --lifetime 3650 --in strongswanKey.pem --dn "C=CN, O=strongSwan, CN=strongSwan Root CA"--outform pem > strongswanCert.pem列出证书信息
pki --print --in strongswanCert.pem
subject:  "C=CN, O=strongSwan, CN=strongSwan Root CA--outform"
 issuer:   "C=CN, O=strongSwan, CN=strongSwan Root CA--outform"
 validity:  not before Jul 18 03:59:38 2023, ok
            not after  Jul 15 03:59:38 2033, ok (expires in 3649 days)
 serial:    15:6d:6f:55:df:b8:d6:89
 flags:     CA CRLSign self-signed
 subjkeyId: c4:dc:af:e7:46:69:a2:58:ce:20:d1:6a:c3:16:39:d2:47:96:37:dd
 pubkey:    ED25519 256 bits
 keyid:     e3:e7:99:26:71:bf:15:7e:f3:31:4f:27:78:e9:29:a9:d7:90:c5:fe
subjkey: c4:dc:af:e7:46:69:a2:58:ce:20:d1:6a:c3:16:39:d2:47:96:37:dd如果需要CA私钥和X.509证书使用DER格式,省略命令中的--outform pem选项即可。
/etc/swanctl/x509ca目录以DER或Base64 PEM格式存储所有必须的CA证书。不论文件名的后缀如何,正确的格式strongSwan能够自动识别。
创建终端实体证书
生成终端实体证书的私钥,使用ed25519算法或RSA算法
pki --gen --type ed25519 --outform pem > hwCloud.pem

or

pki --gen --type rsa --size 3072 > hwCloud.der根据密钥类型,私有主机或用户密钥存储在/etc/swanctl目录的相应子目录中。
使用hwCloud.pem私钥申请证书
pki --req --type priv --in hwCloud.pem --dn "C=CN, O=strongswan, CN=hwCloud.strongswan.local" --san hwcloud.strongswan.local --outform pem > hwCloudReq.pem根据证书请求文件,CA使用pki --issue命令颁发证书
pki --issue --cacert strongswanCert.pem --cakey strongswanKey.pem --type pkcs10 --in hwCloudReq.pem --serial 01 --lifetime 365 --outform pem > hwCloudCert.pem列出证书信息
pki --print --in hwCloudCert.pem
subject:  "C=CN, O=strongswan, CN=hwCloud.strongswan.local"
 issuer:   "C=CN, O=strongSwan, CN=strongSwan Root CA--outform"
 validity:  not before Jul 18 04:25:14 2023, ok
            not after  Jul 17 04:25:14 2024, ok (expires in 364 days)
 serial:    01
 altNames:  hwcloud.strongswan.local
 flags:
 authkeyId: c4:dc:af:e7:46:69:a2:58:ce:20:d1:6a:c3:16:39:d2:47:96:37:dd
 subjkeyId: 4b:30:05:f3:57:8d:e7:10:c9:0b:25:fc:39:ad:64:77:2e:5f:f8:dc
 pubkey:    ED25519 256 bits
 keyid:     9a:2c:f2:c5:5b:0a:84:f4:b0:3c:11:4c:f6:3f:99:03:a0:db:bf:dd
subjkey: 4b:30:05:f3:57:8d:e7:10:c9:0b:25:fc:39:ad:64:77:2e:5f:f8:dc终端实体证书通常存储在/etc/swanctl/x509目录中。
为每个对等方(即网络中的所有VPN客户端和VPN网关)创建一个不同的私钥和一个由您的CA签名匹配的x.509终端实体证书,并将对等方的私钥和X.509证书存储在响应主机的/etc/swanctl目录中。
然后依次创建aliyun和TenCloud的终端实体证书。
注: 执行以上命令的时候,会提示TPM模块的问题,因为用的虚拟机,没有加入虚拟TPM模块,不影响证书的生成和测试。
TPM 2.0 - could not load "libtss2-tcti-tabrmd.so.0"
plugin 'tpm': failed to load - tpm_plugin_create returned NULL
strongSwan Docs Certificates Quickstart
拷贝证书
将CA根证书存放到/etc/swanctl/x509ca/目录; 将终端实体证书存放到/etc/swanctl/x509/目录; 将用户私钥文件存放到/etc/swanctl/private/目录。
root@aliyun:/etc/swanctl# tree
.
├── bliss
├── conf.d
├── ecdsa  ├── pkcs12
├── pkcs8
├── private
│   └── aliyun.pem
├── pubkey
├── rsa
├── swanctl.conf
├── x509
│   └── aliyunCert.pem
├── x509aa
├── x509ac
├── x509ca
│   └── strongswanCert.pem
├── x509crl
└── x509ocsp

15 directories, 4 files
推荐本站淘宝优惠价购买喜欢的宝贝:
本文链接:https://hqyman.cn/post/8614.html 非本站原创文章欢迎转载,原创文章需保留本站地址!
休息一下~~


 微信支付宝扫一扫,打赏作者吧~